

My first introduction to GraphQL was roughly 7 years ago, about a year after it was initially announced by Facebook. My first taste was using the "SWAPI," The Star Wars API, GraphQL wrapper that the team at Facebook created. You can view the source code for it here. It was an eye-opening experience, GraphQL felt like a game changer, but I only had an excuse to use it once joining Amplication.
So I thought today would be the best time to recreate that GraphQL API. Using tools like Amplication, ChatGPT, and SWAPI. A lot has changed since 2015, and we'll build this backend together in a breeze!
May the 4th Be With You...
What is Amplication
Before we start, you may wonder, "What even is Amplication?" Amplication is a developer tool to help generate backends in an instant. With a few clicks, you can create a Node.js server that supports GraphQL and REST APIs, that's secure using trusted libraries, that has authentication baked in, that automatically syncs with GitHub, and so much more!
We'll be using Amplication to build the GraphQL server for our backend.
When you realize you love using Amplication, remember to star our repository on GitHub.

Building the Backend
To recreate the GraphQL API, it would be good to understand the original schema of our data. The GraphQL wrapper had information on people, starships, vehicles, species, planets that appeared in the films, and information about the films themselves. Our Amplication-generated backend will need to host all of this data and the relations between the data. So let's first get started stubbing out our project.
Visit app.amplication.com and sign in to Amplication with your GitHub account; if you haven't used Amplication before, that's ok... when you try to sign in, a new account will be created.

Creating a Project
Now let's create a new Project for our Star Wars and add a Service, which will be the GraphQL server serving all the Star Wars movies, characters, and more. The process of creating a Service has been recently improved by the release of our Service Wizard; you can learn more about it here.
Feel free to name your Service whatever you want, though I'll call mine Holocron.

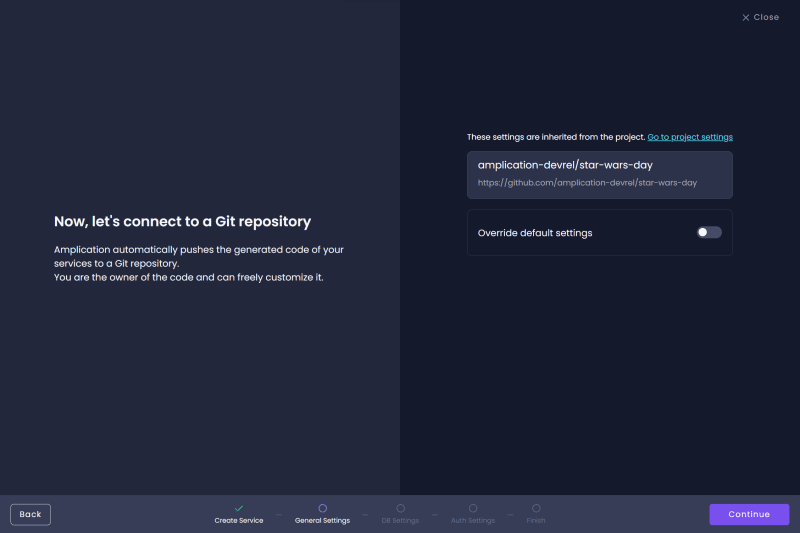
The next step in the process is to configure the Service with a Git repository. As this is a new service, you may need to click "Go to project settings" to connect to GitHub, though if you have already, you should see a screen like the one below. Then, just click "Continue."
The main focus of this project is to build a GraphQL version of the Star Wars API, not a REST version. However, Amplication makes generating both REST and GraphQL API endpoints easy. So the work we do now will apply to both GraphQL and REST.

Amplication has made great strides in supporting mono and polyrepo projects for developers working with microservice architecture. However, this project will be in a unique state where we will not be developing a microservice project and will be syncing all of our project's code into one repository. As a result, selecting polyrepo will make sense for our usage as our one and only Service will be generated into the root of our repository.

When it comes to what database you want to use, you have options. You can use PostgreSQL, MongoDB, or MySQL for your backend. The choice is yours based on what you're comfortable with, but I'll use Postgres.

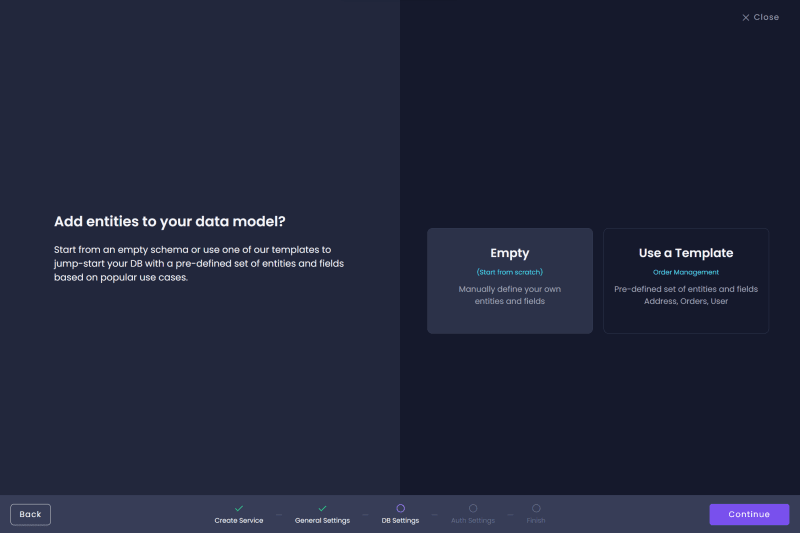
Select "Empty" so we have a blank workspace to work from when creating our Entities.
Our API will not require users to be authenticated to access data, so select "Skip Authentication."

Now we've set the base of our Service, and we can get into defining the data our backend will serve to users.

Adding our Entities
The Star Wars API serves 6 types of data: people, starships, vehicles, races, planets, and films. In Amplication, we refer to these data objects as Entities. One way to think of an Entity is like a table in SQL or a collection in NoSQL. So we'll be creating 6 entities or 6 tables.
So on the left-hand side, click the "Entities" button and then "Add entity +" to create your first Entity.
Person Entity
We'll call our first entity "Person" and add the following Fields. Each field should be Searchable with the Data Types shown in the sub-bullet points:
| Field | Data Type |
|---|---|
| Name | Single Line Text |
| Height | Whole Number |
| Mass | Decimal Number |
| Hair Color | Single Line Text |
| Skin Color | Single Line Text |
| Eye Color | Single Line Text |
| Birth Year | Single Line Text |
| Gender | Single Line Text |
| Description | Multi Line Text |

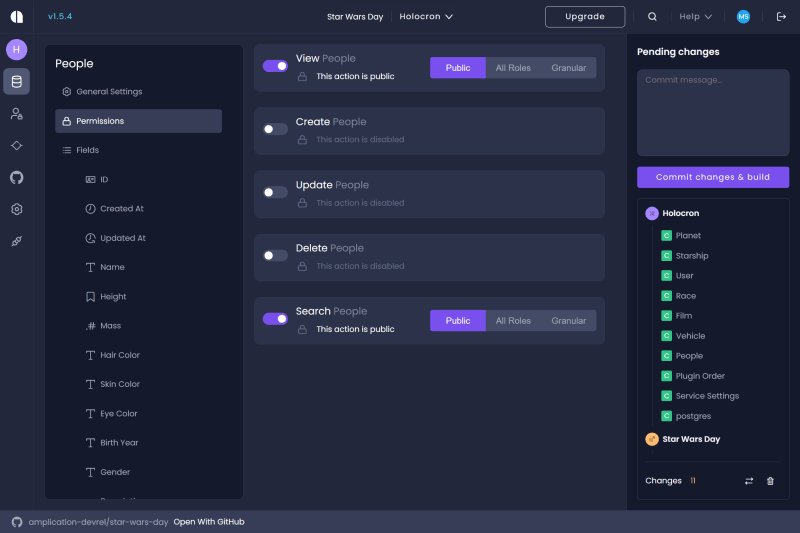
With the fields added to the Entity, we'll then want to set permissions for the Entity. Amplication, by default, requires all requests, mutations, and queries from an authenticated user. For this backend, we want to allow anyone to search it. Therefore, we want to set the View and Search actions to Public for the People entity and all other Entities we will create. Select Permissions on the left-hand side; you'll be greeted with a robust UI for protecting your entities. Set the View and Search actions to Public here, and disable all other options.
Starship Entity
Next, create a "Starship" entity:
| Field | Data Type |
|---|---|
| Name | Single Line Text |
| Model | Single Line Text |
| Manufacturer | Json |
| Cost in Credits | Decimal Number |
| Length | Decimal Number |
| Max Atmosphering Speed | Whole Number |
| Crew | Single Line Text |
| Passengers | Single Line Text |
| Cargo Capacity | Decimal Number |
| Consumables | Single Line text |
| Hyperdrive Rating | Decimal Number |
| MGLT | Whole Number |
| Starship Class | Single Line Text |
| Description | Multi Line Text |
Vehicle Entity
For the "Vehicle" entity:
| Field | Data Type |
|---|---|
| Name | Single Line Text |
| Model | Single Line Text |
| Manufacturer | Json |
| Cost in Credits | Decimal Number |
| Length | Decimal Number |
| Max Atmosphering Speed | Whole Number |
| Crew | Single Line Text |
| Passengers | Single Line Text |
| Cargo Capacity | Decimal Number |
| Consumables | Single Line Text |
| Vehicle Class | Single Line Text |
| Description | Multi Line Text |
Race Entity
For the "Race" entity:
| Field | Data Type |
|---|---|
| Name | Single Line Text |
| Classification | Single Line Text |
| Designation | Single Line Text |
| Average Height | Decimal Number |
| Average Lifespan | Whole Number |
| Eye Colors | Json |
| Skin Colors | Json |
| Hair Colors | Json |
| Language | Single Line Text |
| Description | Multi Line Text |
Planet Entity
For the "Planet" entity:
| Field | Data Type |
|---|---|
| Name | Single Line Text |
| Diameter | Whole Number |
| Rotation Period | Whole Number |
| Orbital Period | Whole Number |
| Gravity | Single Line Text |
| Population | Decimal Number |
| Climates | Json |
| Terrains | Json |
| Surface Water | Decimal Number |
| Description | Multi Line Text |
Film Entity
And finally, for the "Film" entity:
| Field | Data Type |
|---|---|
| Title | Single Line Text |
| Episode ID | Whole Number |
| Opening Crawl | Single Line Text |
| Director | Single Line Text |
| Producers | Json |
| Release Date | Date Time |
| Description | Multi Line Text |
Creating Relations
If it wasn't obvious, People could be associated with various Starships, they may appear in multiple Films, and have their own home Planet. These associations are referred to as Relations. We'll want to add the appropriate relations between our entities so users can query data about the entities they are curious about.
Person Entity Relations
Return to the Person entity and add a new field called "Planet." Amplication will understand that this field is likely a relation to the Planet entity and will automatically make the connection assuming that one
"Person" can be related to one "Planet."

Add the fields "Films," "Races," "Vehicles," and "Starships" to the Person entity, and Amplication will automagically build the correct relations between the entities.
Starship Entity Relations
Go into the Starship entity and click on the "Person" field. Then select "One 'Starship' can be related to many 'Person.'" Then add the field "Films."
Vehicle Entity Relations
In the Vehicle entity and click on the "Person" field. Then select "One 'Vehicle' can be related to many 'Person.'" Then add the field "Films."
Race Entity Relations
For the Race entity and click on the "Person" field. Then select "One 'Race' can be related to many 'Person.'" Then add the field "Films."
Planet Entity Relations
To the Planet entity, add the field "Films."
Film Entity Relations
Finally, for the Film entity, we'll revamp the relation fields. Update the "Person," "Starship," "Vehicle," "Race," and "Planet" fields so that one "Film" can be related to many of their respective entities.
With the Holocron service created, you'll want to run the code locally to continue this guide. This requires syncing code to GitHub and then cloning it locally. Assuming you're comfortable with git commands, such as git clone, check out Amplication docs site to learn how to sync your code to GitHub.
Completing the Archives

If you still need to clone the Amplication code from GitHub, now is the time. Once you've done that, open the server folder in your IDE (as that's where we'll be doing all of our work). Our custom code will depend on a few libraries not installed on the Amplication generated server. Run the following commands to install all existing dependencies and then add the remaining ones we need.
npm i
npm i -D isomorphic-unfetch crypto dotenv openai
Then, inside the scripts folder, create a file called download.ts. This file will be a scraper of the Star Wars API so we have all the details of our characters, films, ships, and more. However, rather than creating it from scratch, we will modify the scraper script that Facebook created for their version of the GraphQL API. Most changes are just adding typing data as we write code in TypeScript rather than JavaScript. So rather than reviewing all of the changes, just copy and paste the code from here.
You'll want to run the download script, and you can do so with the following command ts-node scripts/download.ts scripts/data.json. Consider adding the command to your package.json scripts to make it repeatable.
Writing a Custom Seed
Running an Amplication project locally requires a few steps, including configuring and seeding your database. We fetched most of the data we'll want to populate into our backend. To get started, we need to generate the Prisma client, which the Node.js app uses to communicate with the database. Run the following command.
npm run prisma:generate
First, in scripts/seed.ts, add the following code in the if statement :
  seed().catch((error) => {
    console.error(error);
    process.exit(1);
  });
Now, open the file scripts/customSeed.ts and delete everything, then copy in the following.
import { PrismaClient } from "@prisma/client";
import crypto from "crypto";
import { Configuration, OpenAIApi } from "openai";
import allData from "./data.json";
Getting Descriptions From OpenAI
The Star Wars API doesn't provide descriptions of characters, films, or anything. So while we could scrape the data from the web, we can also ask ChatGPT via the OpenAI APIs to generate descriptions. You'll need an OpenAI developer account, but create an API key and add it to the .env file as OPENAI_API_KEY.
Back in scripts/customSeed.ts add the following code:
const configuration = new Configuration({
  apiKey: process.env.OPENAI_API_KEY,
});
const openai = new OpenAIApi(configuration);

async function getDescription(name: string): Promise<any> {
  const completion = await openai.createCompletion({
    model: "text-davinci-003",
    max_tokens: 1000,
    prompt: `Give me a summary about "${name}" from Star Wars.`,
  });

  return completion.data.choices[0].text;
}
The code above creates an OpenAI API client configured with our API key. Then we define a function, getDescription, which will take in the name of any film, character, etc., and ask OpenAI to generate a summary of said item.
Identifying Elements
We need access to real IDs of data from the Star Wars API to draw relations between our Entities. However, all elements are identified by their unique URL. So we can hash these URLs into something that looks more like an ID. That way, we can create relations between our data more efficiently. Add the following code as well:
function generateId(key: string): string {
  return crypto.createHash('md5').update(key).digest('hex');
}
Seeding Data
Finally, we need to add our data. Again, this requires a bit of leg work, especially when it comes to cleaning and formatting the data. Replace the customSeed function with the following and I'll explain a bit of what's going on.
export async function customSeed() {
  const client = new PrismaClient();
// Get the URLs of all the data from the Star Wars API, but filter out summary pages
  const keys = Object.keys(allData).filter(k => /\d\/$/.test(k));

  // Seed Data
  for (const key of keys) {
    const data: { [key: string]: any } = (allData as any)[key];
    const id = generateId(key);
    const description = await getDescription(data.name || data.title);

    // Seed People
    if (key.includes('people')) {
      const person = {
        id,
        name: data.name,
        height: parseInt(data.height) || 0,
        mass: parseFloat(data.mass) || 0,
        hairColor: data.hair_color,
        skinColor: data.skin_color,
        eyeColor: data.eye_color,
        birthYear: data.birth_year,
        gender: data.gender,
        description
      };

      await client.person.upsert({
        where: { id },
        update: person,
        create: person,
      });
    }
  }

  client.$disconnect();
}
The data.json file is all the data we ripped from the Star Wars API with the script from the Facebook team. It's stored as an Object, where every key is the URL of a query, and the object is the data. So first, we'll take all the keys and filter out the queries that provide a summary of the query. Then, we'll loop through the filtered keys/URLs and add the data to our backend.
As we iterate over all the keys, we'll create a data object that stores all the data belonging to a URL. We then generate an ID for that URL. We also generate our description from OpenAI. Note we're going to make a lot of requests, and you may get rate-limited... Consider adding logic to slow down the time between queries or something else. If you can't get it to work, you can always just set the description variable to an empty strong.
The fastest way to identify the type of Entity our key belongs to is by examining the URL/key. For example, for a Person, it will have "people" in the URL, and we can use that to identify the current data we're working with represents a person.
Once we know what type of object we're working with, we can create a clean data object, with all the fields converted or parsed from the data.json. Finally, we upsert the database with the cleansed object. Upserting is good when you want to create an entry in your database but are unsure if it already exists. This is helpful when seeding, as a seed may run multiple times. Also, sometimes updating data, but you want to avoid throwing an error if you try to create an element that already exists, or you want to write code to verify if an element exists or not, then try to create or update that element.
For the remaining Entities, add the following code to the for loop.
// Seed Starships
if (key.includes('starships')) {
  const starship = {
    id,
    name: data.name,
    model: data.model,
    manufacturer: data.manufacturer.split(', '),
    costInCredits: parseFloat(data.cost_in_credits) || 0,
    length: parseFloat(data.length) || 0,
    maxAtmospheringSpeed: parseInt(data.max_atmosphering_speed) || 0,
    crew: data.crew,
    passengers: data.passengers,
    cargoCapacity: parseFloat(data.cargo_capacity) || 0,
    consumables: data.consumables,
    hyperdriveRating: parseFloat(data.hyperdrive_rating) || 0,
    mglt: parseInt(data.MGLT) || 0,
    starshipClass: data.starship_class,
    description
  };

  await client.starship.upsert({
    where: { id },
    update: starship,
    create: starship,
  });
}

// Seed Vehicles
if (key.includes('vehicles')) {
  const vehicle = {
    id,
    name: data.name,
    model: data.model,
    manufacturer: data.manufacturer.split(', '),
    costInCredits: parseFloat(data.cost_in_credits) || 0,
    length: parseFloat(data.length) || 0,
    maxAtmospheringSpeed: parseInt(data.max_atmosphering_speed) || 0,
    crew: data.crew,
    passengers: data.passengers,
    cargoCapacity: parseFloat(data.cargo_capacity) || 0,
    consumables: data.consumables,
    vehicleClass: data.vehicle_class,
    description
  };

  await client.vehicle.upsert({
    where: { id },
    update: vehicle,
    create: vehicle,
  });
}

// Seed Races
if (key.includes('species')) {
  const race = {
    id,
    name: data.name,
    classification: data.classification,
    designation: data.designation,
    averageHeight: parseFloat(data.average_height) || 0,
    averageLifespan: parseInt(data.average_lifespan) || 0,
    skinColors: data.skin_colors.split(', '),
    hairColors: data.hair_colors.split(', '),
    eyeColors: data.eye_colors.split(', '),
    language: data.language,
    description
  };

  await client.race.upsert({
    where: { id },
    update: race,
    create: race,
  });
}

// Seed Planets
if (key.includes('planets')) {
  const planet = {
    id,
    name: data.name,
    diameter: parseInt(data.diameter) || 0,
    rotationPeriod: parseInt(data.rotation_period) || 0,
    orbitalPeriod: parseInt(data.orbital_period) || 0,
    gravity: data.gravity,
    population: parseFloat(data.population) || 0,
    surfaceWater: parseFloat(data.surface_water) || 0,
    climates: data.climate.split(', '),
    terrains: data.terrain.split(', '),
    description
  };

  await client.planet.upsert({
    where: { id },
    update: planet,
    create: planet,
  });
}

// Seed Films
if (key.includes('films')) {
  const film = {
    id,
    title: data.title,
    episodeId: data.episode_id,
    openingCrawl: data.opening_crawl,
    director: data.director,
    producers: data.producer.split(', '),
    releaseDate: new Date(data.release_date),
    description
  };

  await client.film.upsert({
    where: { id },
    update: film,
    create: film,
  });
}
Now it comes time to add our relations. With all of our entities added at this point of the script, we can update each one to connect them to their respective planet, vehicles, film, and so on. Add the following code after the for loop but before the client.$disconnect().
// Add relations
for (const key of keys) {
  const data: { [key: string]: any } = (allData as any)[key];
  const id = generateId(key);

  // People's Relations
  if (key.includes('people')) {
    await client.person.update({
      where: { id },
      data: {
        planet: {
          connect: {
            id: generateId(data.homeworld)
          }
        },
        races: {
          connect: data.species.map((s: string) => ({
            id: generateId(s)
          }))
        },
        vehicles: {
          connect: data.vehicles.map((v: string) => ({
            id: generateId(v)
          }))
        },
        starships: {
          connect: data.starships.map((s: string) => ({
            id: generateId(s)
          }))
        }
      }
    });
  }

  // Films' Relations
  if (key.includes('films')) {
    await client.film.update({
      where: { id },
      data: {
        planet: {
          connect: data.planets.map((v: string) => ({
            id: generateId(v)
          }))
        },
        race: {
          connect: data.species.map((s: string) => ({
            id: generateId(s)
          }))
        },
        vehicle: {
          connect: data.vehicles.map((v: string) => ({
            id: generateId(v)
          }))
        },
        starship: {
          connect: data.starships.map((s: string) => ({
            id: generateId(s)
          }))
        }
      }
    });
  }
Creating and Seeding the Database
It's finally time to seed our database with all the data we have. First, we'll need a database to seed into, but Amplication makes that easy. Included by default in the server folder is a file called docker-compose.db.yml with the configuration required to spin up a PostgreSQL instance. When you run the backend locally, it'll be configured to connect to this instance. You must have Docker installed and running. If you need to set up Docker, check out their getting started guide.
With Docker installed and running, execute the following command.
npm run docker:db
Run this command to initialize the database by creating the necessary schemas and seeding the database using the logic we added to the customSeed.ts file.
npm run db:init
Querying the Holocron
Now is the time to see the fruits of your labor. First, let's run the server with the following command.
npm start
After a minute or so, the server should be up and running at localhost:3000, though that URL won't do much. So instead, you should visit localhost:3000/graphql to be greeted by the GraphQL Playground (if you're interested in testing traditional REST API endpoints, visit localhost:3000/api instead).
Clicking "DOCS" and "SCHEMA" on the right side will show you everything you can do and see in the Holocron. Below is a sample query you can try yourself and the query variables you need to get something. Put them in and run the query to see what you get.
# Write your query or mutation here
query people($take: Float) {
  people(take: $take) {
    name
    starships {
      name
    }
    vehicles {
      name
    }
  }
}
{"take": 10}

Wrapping Up
With everything we've done up until now, we've recreated the SWAPI GraphQL Server with the help of Amplication. It's a great intro to GraphQL. Playing with the original SWAPI GrpahQL API was my first experience with GraphQL. I'm happy to share this experience with you!
Remember to join our developer community on Discord; if you like the project and what we're doing, give us a 🌟 on GitHub!

Finally, the source code for this project is available on GitHub.
May the force be with you...


Top comments (0)