
Introduction.
FaunaDB provides you with a fully managed database, therefore you don’t have to worry about provisioning, patching and monitoring.
Therefore, using FaunaDB is a great way for developers to increase their productivity.
This tutorial demonstrates how to get started with GraphQL with FaunaDB. In this tutorial will be building a simple URL shortening app. With this app you can test basic create and read functionality.
The Application
The final application will allow us do the following.
- Enter a long unreadable/readable link and turn it into a shorter less scary link.
- Direct you to the original URL upon visiting the generated short URL. Pretty much the basic features of a URL shortener such as Bitly.
Pre-requisites.
- A FaunaDB Account
- A Netlify Account.
Application Architecture/Stack.
The application we build in this tutorial will model concepts of the JAMStack.
Why JAMStack?
JAMStack is a relatively new way of building websites and apps that delivers a better performance, higher security, lower cost of scaling, and a better developer experience.
For the frontend, we will be using React to build our web page which will be served on Netlify. One of the biggest advantages of this is that Netlify will automatically build, deploy and serve your application for you. This site will be served from their CDNs, hence you are assured of extremely fast site response times.
As in the case of many applications, we will need to store our data. In this case, we will make use of FaunaDB. Due to the advantages of FaunaDB we are able to focus on the app and let the Fauna team worry about provisioning, patching and monitoring tasks.
In order to securely access our database without sharing our Fauna API keys we will use Netlify Functions as an intermediary to interact.
TIP:
Adopting an architecture similar to the one above allows you to focus on what really matters. The features you need for your application’s users while leaving other time-consuming tasks such as provisioning, automatic scaling, maintaining infrastructure and patching the provider to handle it for you, Netlify and FaunaDB in this case.
NOTE:
It’s possible to hit FaunaDB GraphQL endpoints from the browser over HTTP, but in this case, we will make use of Netlify Functions for our server-side logic. Hence, our use of Netlify Functions.
Application Flow.
Our basic flow for shortening a link will be as follows.
- Enter your long URL in a form. In this case an HTML form from our React frontend.
- Check for URL validity by using Regex pattern to test if the input is a valid URL.
- This input is then sent to your database and a short URL is generated. All this will be taken care of using the Netlify Function. If successful, the short URL will be sent back to the client as the short version of their URL.
- On the part of resolving shortened links, once a URL is visited, all requests meant to resolve links will be routed to functions running on Netlify. We will do this by applying routing rules in our
netlify.tomlfile.
Login to your FaunaDB account.
If you don’t have an account, you will be required to sign up to get started which is very easy.
FaunaDB also offers a generous free tier for you not only to test your app but you can also use this to build your small hobby apps.
Creating the GraphQL database.
In order to hold all our application’s data, we will need to create a database.
Click [ New Database], provide any preferred name for the database, in our case, we will name it url_shortener.

Importing your GraphQL schema to FaunaDB.
The beauty of using GraphQL on Fauna is that it allows you to define a schema and it will do its magic to ensure your entities, their relationships are created. All you need to provide is a schema.
On the GraphQL tab, you should see the following page.

Click [Import Schema], and select your schema file and allow for Fauna to do all the magic for you.
Our entire application will be based around this simple schema.
[schema.gql]
type URL {
  short_url: String!
  long_url: String!
}
type Query {
  findURLbyShortURL(short_url: String!): URL
}
Testing queries and mutations.
For our URL shortener to work, we will need to send data to the database to save our long URLs and also need to read the database for stored URLs while resolving these URLs.
In GraphQL lingo, these can be described as mutations and queries respectively.
In order to understand how this works and whether it really works, let's test these using the GraphiQL interface provided by Fauna.
To test saving a link, we can do the following.
[Test Mutation Code Snippet]
 # Write your query or mutation here
mutation {
          createURL(data:{
            short_url:"fdb",
            long_url:"https://fauna.com"
          }) {
            short_url
            long_url
            _id
          }
}
[Test Mutation Screenshot]

Now, we can test retrieving the link we just saved, we can use the following code.
[Testing Querying Code Snippet]
# Write your query or mutation here
query {
        findURLbyShortURL(short_url:"fdb"){
      long_url
        _id
        _ts
  }
}
[Testing Querying Screenshot]

TIP:
You may notice two ‘strange’ fields (_ts and _id) while querying your saved data.
Fauna automatically takes care of creating two fields for you. A unique identifier (_id) and the timestamp (_ts). Therefore you don’t really have to worry about creating these yourself. Simply saving your data will ensure the two fields are automatically present which I really like.
Obtain your API key and save it.
On the security tab, select [New Key]

Then proceed to select the type of key you want to create. In this case, a Server Key is sufficient to provide access to our database.
NOTE:
Fauna allows you to create two types of keys.
- Admin: Used to create, destroy, or manage any database or key.
- Server: Can be used to create, destroy, or manage the database to which they are assigned.
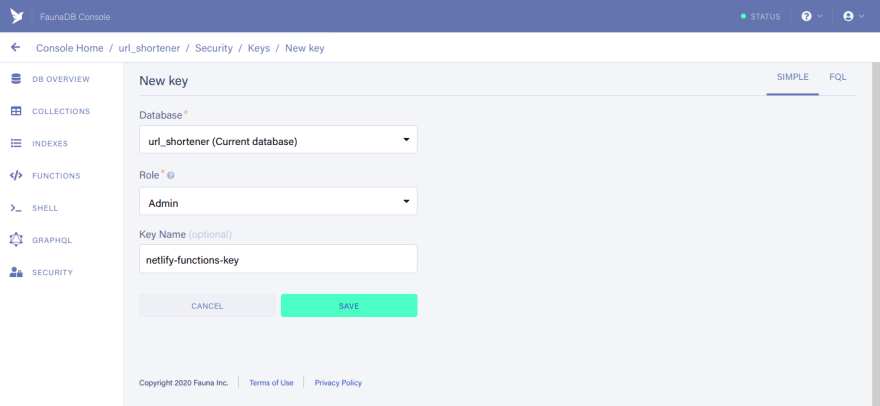
In order to access this database from any external application, FaunaDB requires you to provide this key for it to determine which database you have permission to access.
Save it somewhere safely as you will require it in the upcoming steps.
You can now make it available in your env by using the following command.
export FAUNA_SECRET=yourfaunaAPIkey
Structuring the project
Creating the React App.
We will download and run the official Netlify create-react-app and Lambda starter kit. This will set us up with a base for both our frontend and backend code and allow us to quickly get started.
We will run the following commands
git clone https://github.com/netlify/create-react-app-lambda.git
cd create-react-app-lambda
npm install
Let’s take a quick look at the file structure here:
- package.json: This application's dependencies, shared between client and server code.
- netlify.toml: The configuration that Netlify will use for our application.
- src/: The source code for the React frontend app.
- src/lambda/: The server source code that will be deployed to Netlify Functions.
Add your functions in the lambda folder.
Inside your app directory, you will find a lambda folder.
The functions in our application are going to live in this lambda folder. You can set up this to be whatever you want but Netlify recommends using this convention.
In the case of this tutorial, we will only have two functions.
- Shorten URL - Take the long URL, save it on Fauna and return a short URL.
- Resolve URL – Takes a short URL and will return the original long URL.
Write code for the two functions.
Since we will use Apollo to access our GraphQL API, install it then create a ‘utils.js’ file to maintain a cleaner code and allow for code reuse instead of initializing it twice.
[utils.js]
import { ApolloClient, InMemoryCache } from '@apollo/client';
import fetch from 'isomorphic-fetch';

const URL = 'https://graphql.fauna.com/graphql'

const client = new ApolloClient({
   uri: URL,
   fetch: fetch,
   headers: {
       authorization: “Bearer ${process.env.FAUNA_SECRET}“,
   },
   cache: new InMemoryCache({}),
 })

export default client;
Inside the functions directory we created above, we will write two functions.
We will create two files shortenURL.js and resolveURL.js
Inside src/lambda/shortenURL.js write the following code.
[shortenURL.js]
import { gql } from '@apollo/client';
import client from './utils';


export async function handler(event, context) {

   if (event.httpMethod === 'POST'){
       // get data from POST request
       console.log(event)
       let long_url = JSON.parse(event.body).long_url;

       let SHORTEN_URL_QUERY = gql`
           mutation {
             createURL( data:{short_url: "${(Math.random().toString(36).substring(7))}", long_url:"${long_url}"})
                       {
                           short_url
                           long_url
                       }
           }`;
        let results = await client.mutate({
           mutation: SHORTEN_URL_QUERY
       })

       console.log(results.data.createURL.short_url);
       return {
           statusCode: 200,
           body: JSON.stringify({

"short_url":results.data.createURL.short_url }),
       }
   }
   else {
       return {
           statusCode: 405,
           body: JSON.stringify({ error: "Method not allowed" })
       }
   }

}
Inside src/lambda/resolveURL.js write the following code.
[resolveURL.js]
import { gql } from '@apollo/client';
import client from './utils';

export async function handler(event, context) {

   let short_url = event.path.split('/', 5)[4];
   let RESOLVE_URL_QUERY = gql`
     query {
           findURLbyShortURL(short_url:"${short_url}"){
           long_url
       }
     }
   `;
   let results = await client.query({
       query: RESOLVE_URL_QUERY
     })

   return {
     statusCode: 301,
     // send HTTP redirect headers (Location)
     headers:{
       Location: results.data.findURLbyShortURL.long_url
     },
     body: results.long_url,
   }
}
TIP:
Once you are done. It is always good development practice to test these functions. Netlify provides a CLI tool to quickly test your functions locally. You can install it by running.
npm install netlify-cli -g
Then on your command line use
ntl dev
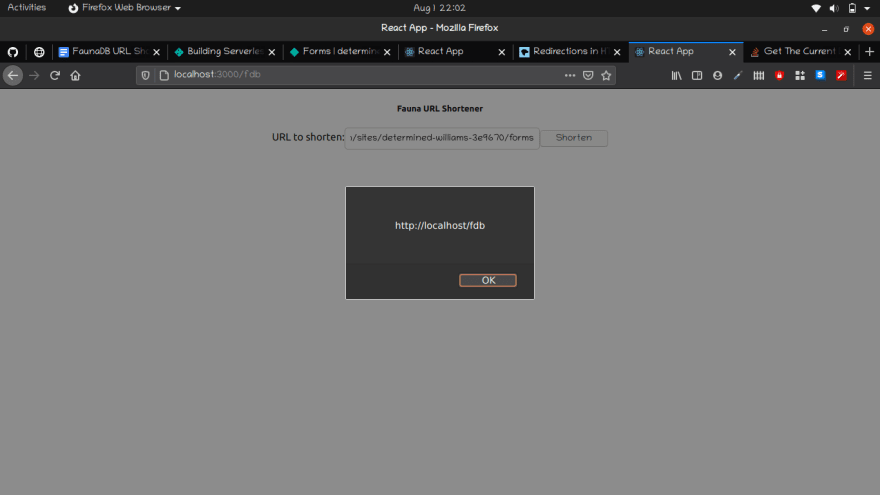
Implement React Frontend
Now that we have our functions working, we will need to connect them to our frontend.
We will create a simple input form with a button to allow the user to enter a long URL and send it over to a function that will take care of generating a short URL and the save it to FaunaDB.
To do this, go to your src/app.js file and add the following code.
[*app.js]
import React, { useState } from "react";
const node_fetch = require('node-fetch');

export default function App(props) {
 const [URL, setURL] = useState("");

 const shortenURL = async function(long_url) {

   let response = await node_fetch('/.netlify/functions/shortenURL', {
     body: JSON.stringify({long_url: long_url}),
     method: 'POST',
     mode: 'no-cors'
   })
   let data = await response.json();
   return data;
 }
  const handleSubmit = async (event) => {
   event.preventDefault();
     if (URL !== ""){
       event.preventDefault();
       await shortenURL(URL).then(data => {
         alert(“http://”+window.location.hostname + “/”+ data.shorturl);
       })
     }
     else{
       alert(`Provide a valid URL`)
     }
 }
 return (

   <form style={{margin:"auto", textAlign:"center"}}>
     <h5>Fauna URL Shortener</h5>
     <label>
       URL to shorten:
       <input type="text" value={URL} onChange={e => setURL(e.target.value)} />
     </label>
     <input type="button" value="Shorten" onClick={handleSubmit} />
   </form>
 );
}
This will have your application looking like in the below figure.
Linking functions to React Application.
We need a way to tell our React code to call the functions as required to ensure the application flow works as desired.
For URL resolution requests, we don’t need to load our React application in order to perform the redirect.
Instead, in the netlify.toml file at the root of our project, we will add the following line.
[[redirects]]
  from = "/*"
  to = "/.netlify/functions/resolveURL/:splat"
Now all requests beyond the / route will be redirected to our resolver function to take care of the routing to that URL.
Deployment.
Deploying to Netlify is relatively easy, all you need to do is to create a git repository.
This is a good practice as you are able to easily version control your entire application.
Next, commit your changes and push to the repository you created.
On the Netlify GUI, go to [New Site from Git]

Then select your desired project and Netlify will take care of the building, provisioning and deploying.
Once it's done, you will be provided with a URL to access your application.
Wasn’t that easy?
Other possibilities.
- You can allow users to shorten their URL and provide customized short links that could stand for events, entities or literally anything.
- You can enable analytics for URL shortened
- You can switch from using GraphQL and use FQL instead.


Top comments (0)