
After completing the Hello World quest on the last post, you should feel more comfortable about solving a more advanced quest.
Understanding README.md
As before, let's open our quests folder, then, open the 2-auth-store folder to start tackling the second quest.

On the README.md file, we can see that we are tasked with using the put function of the Soroban contract to save some data onto the Stellar ledger. Then, we should use get or get_self functions to retrieve the data we saved.
Setting Up Our Stellar Quest Account
As usual, use sq login to login to your Stellar Quest account if you haven't, and use sq play 2 to start solving the second quest. Don't forget to fund your account with sq fund to succesfully transact on the Futurenet.
Examining the Contract
As usual, open up the src/lib.rs file to view the contract's source code. In addition to test.rs, you will also see error.rs for this quest. Let's start by checking out the functions of the DataStoreContract.
put Function
The put function allows us to store arbitrary data mapped to our account address.
pub fn put(env: Env, value: Bytes) -> Result<(), ContractError> {
        let key = match env.invoker() {
            Address::Account(account_id) => account_id,
            Address::Contract(_) => {
                panic_with_error!(&env, ContractError::CrossContractCallProhibited)
            }
        };

        if value.len() <= 10 {
            panic_with_error!(&env, ContractError::InputValueTooShort)
        }

        env.data().set(key, value);

        Ok(())
}
The put function has two arguments, one of them being the environment variable env, and the other one is the value argument of type Bytes. The Bytes type can be thought as a string, as each character of a string consists of one byte. The difference between the Symbol and the Bytes type is that the Symbol type can only have a maximum of 10 characters. The function returns either the Ok value or a ContractError.
Understanding Contract Errors
Custom errors are
enums, which is a number type that is mapped to labels. The use of numbers are efficient for computers, and labels are helpful for programmers to understand what they mean.Using custom contract errors is useful when negative testing the contract. Negative tests make sure that the implementations support unexpected input, while positive tests ensures that the implementations are working as expected. Since our Soroban contracts will be immutable, testing against harmful behavior helps with preventing some attack patterns.
Using custom contract errors are also useful for User Experience, as the users usually get these errors before calling a contract function. Giving helpful names to errors help users fix their input arguments easily.
First, the put function finds the key of the contract invoker. The invoker can be one of two things: an Externally Owned Account (EOA), which will be us, an user with a private and public key pair, or another contract using cross-contract calls. This implementation blocks the use of cross-contract calls, which we can see by inspecting the match statement. if env.invoker() matches a contract address, the program panics and exits with the custom contract error, CrossContractCallProhibited. The implementation of these errors can be found in the error.rs file.
Next, the put function checks if the length of the supplied value is shorter or equal to 10 bytes, and panics with the custom InputValueTooShort error if it is the case. This is to highlight the difference between a Symbol variable and a Bytes variable, and is not required when implementing a function.
If all the checks are correct, the contract stores the supplied value variable mapped to the invoker's address to persist between function invocations.
Persisting Data vs Temporary Data
If you are familiar with any programming language, you would remember that there are global variables, which are accessible anywhere from the code, and local variables, that are scoped to their blocks.
Variables declared in the functions are lost after the execution has ended, and not stored permanently onto the chain. By storing the variables into the environment however, we make permanent records on the Soroban network. Due to this, storage is usually very expensive compared to the other methods on smart contract chains.
get Function
The get function allows us to retrieve data set by a given account.
pub fn get(env: Env, owner: AccountId) -> Bytes {
        env.data()
            .get(owner)
            .unwrap_or_else(|| Ok(bytes!(&env)))
            .unwrap()
}
The get function looks pretty simple, but has some hidden functionality behind it. Excluding the env argument, the get function has the owner parameter of type AccountId, which can be tricky to supply from the soroban CLI as an argument. First, the function uses env.data.get(owner) to get the value set by the given account. If this value does not exist, the function returns Ok with env converted to bytes using the bytes! macro. If this value does exist, it returns the value set by the account.
Note that the cross-contract calls are allowed for this function, meaning that we can use another contract to call this function to get any user's set data from our contract. Pretty handy!
get_self Function
If you check out the get_self function at first, it looks a little off.
pub fn get_self(/* env: Env */) -> Result<Bytes, ContractError> {
        unimplemented!("not implemented")
        // let key = match env.invoker() {
        //     Address::Account(account_id) => account_id,
        //     Address::Contract(_) => {
        //         panic_with_error!(&env, ContractError::CrossContractCallProhibited)
        //     }
        // };
        // Ok(env
        //     .data()
        //     .get(key)
        //     .unwrap_or_else(|| Ok(bytes!(&env)))
        //     .unwrap())
    }
The implementation of the contract is commented out, meaning the compiler ignores those lines. Comments are shown with the double forward slashes, //, or can be done inline using /* */ in Rust. To "unlock" the functionality of the get_self function, remove or comment the line starting with the unimplemented! macro, and uncomment the other lines, including the input parameter, env.
pub fn get_self(env: Env) -> Result<Bytes, ContractError> {
        // unimplemented!("not implemented")
        let key = match env.invoker() {
            Address::Account(account_id) => account_id,
            Address::Contract(_) => {
                panic_with_error!(&env, ContractError::CrossContractCallProhibited)
            }
        };
        Ok(env
            .data()
            .get(key)
            .unwrap_or_else(|| Ok(bytes!(&env)))
            .unwrap())
    }
Comments on Codes
On any code file, you will usually see some comments, explaining the code, disabling some lines, or drawing some awesome ASCII art. The comments are an important part of programming, and they are not even for computers (mostly)!
The comments are a helpful way for programmers, who generally work on a codebase on a different time than each other, to give out details, explain the cryptic parts, and even leave themselves some reminders. The Doom inverse square root code is a great example on comments:
Well maybe not. The code is still cryptic, but the programmer also thinks that it is, which we can understand from the comment that they left for us. They also commented out the 2nd iteration as they think that it is not required. Be kind to other programmers and try to explain your code if you think commenting is required!

The get_self function allows us to retrieve data that we set ourselves. It first checks if the caller is an EOA and not an external contract as before, and returns the data set by the caller, as before. This function is easier to use for our quest, as we don't need to supply an account to retrieve a data. We will use both solutions to solve this quest.
Examining the Tests
The test.rs file containing the tests is pretty hefty! Usually, tests take more time to write than the contract to ensure the safety of the contract. Since the tests are extremely well commented, I encourage you to understand them yourselves! I will explain some key features of these tests that do not exists on the HelloContract tests.
#[ignore] Modifier
The #[ignore] modifier is used on tests which should be, well, ignored. The main reason for this can be unimplemented source code, or unfinished tests. Since we have removed the comments on the get_self file, we can remove the #[ignore] modifier for its test.
#[test]
#[should_panic(expected = "Status(ContractError(1))")]
fn test_contract_get_self() {
    /* the test code as usual */
}
Now, we can also test the functionality of the get_self function when we use cargo test to test our contract.
should_panic Keyword
#[test]
#[should_panic(expected = "Status(ContractError(2))")]
fn test_store_value_too_short() {
    let env = Env::default();
    let contract_id = env.register_contract(None, DataStoreContract);
    let client = DataStoreContractClient::new(&env, &contract_id);

    let u1 = env.accounts().generate();
        .with_source_account(&u1)
        .put(&bytes![&env, 0x007]);
}
The should_panic keyword, supplied with a custom contract error makes sure that the contract returns the expected error when supplied with an invalid input argument. On this test, we are calling the put function with a value that is two bytes long, and expecting it to fail with the InputValueTooShort error, which has the value 2.
Contract Implementation in test.rs
We can implement contracts just for testing on the test.rs file. this is helpful to test the cross contract calls, and many other methods that require another contract.
pub struct CallerContract;

#[contractimpl]
impl CallerContract {
    pub fn try_put(env: Env, contract_id: BytesN<32>, data: Bytes) {
        let cli = DataStoreContractClient::new(&env, contract_id);
        cli.put(&data);
    }

    pub fn try_get_s(env: Env, contract_id: BytesN<32>) -> Bytes {
        let cli = DataStoreContractClient::new(&env, contract_id);
        cli.get_self()
    }

    pub fn try_get(env: Env, contract_id: BytesN<32>, owner: AccountId) -> Bytes {
        let cli = DataStoreContractClient::new(&env, contract_id);
        cli.get(&owner)
    }
}
The CallerContract implements three functions. The first one is the try_put function, which tries to use the put function on the DataStoreContract using a cross-contract call. This invocation is expected to fail, but it is important to test the failing cases too! Next, it has the try_get_s function, which is used for trying to invoke the get_self function via a cross-contract call. This is also expected to fail with the custom CrossContractCallProhibited error. Lastly, it has the try_get function, which should successfully call the get function of the DataStoreContract.
Why are Function Names Too Short?
The functions are implemented as
Symbols, which are at most 10 characters long. Storing function names asSymbols is helpful due to execution efficiency and storage cost. Since the efficiency is important on blockchains, and this issue does not really cause a bad user experience, this implementation is chosen.
Generating a Test Account and Using Test Contracts
We can generate accounts for testing our contracts using env.accounts().generate(). This is helpful for testing the implementation using multiple accounts.
fn test_contract_get() {
    let env = Env::default();
    let contract_id_data_store = env.register_contract(None, DataStoreContract);
    let client_data_store = DataStoreContractClient::new(&env, &contract_id_data_store);

    let contract_id_caller = env.register_contract(None, CallerContract);
    let caller_client = CallerContractClient::new(&env, contract_id_caller);

    let u1 = env.accounts().generate();
    client_data_store
        .with_source_account(&u1)
        .put(&bytes!(&env, 0x48656c6c6f20536f726f62616e21));

    let value = caller_client.try_get(&contract_id_data_store, &u1);
    assert_eq!(value, bytes!(&env, 0x48656c6c6f20536f726f62616e21));
}
This test uses a test account to invoke the put function on the DataStoreContract, in order to test the get function using a cross-contract call, as it is not possible to put data to the contract environment using a contract.
We can use let u1 = env.accounts().generate() to create an EOA, then, use client_data_store.with_source_account(&u1).put(&bytes!(&env, 0x48656c6c6f20536f726f62616e21)); to test invoking the put function using the generated account. with_source_account method is what accomplishes our task.
We can use let contract_id_caller = env.register_contract(None, CallerContract); to register the contract implementation into our testing environment, and use let caller_client = CallerContractClient::new(&env, contract_id_caller); to create the client used for testing cross-contract calls.
Solving the Quest
Now that we fully understand the Quest, we can attempt solving it. We will use both get and get_self to solve this Quest.
Deploying the Soroban Contract
As usual, we will use cargo build --target wasm32-unknown-unknown --release to build the contract, and cargo test to see if everything works before publishing our contract. cargo build will create the target/wasm32-unknown-unknown/release/soroban_auth_store_contract.wasm file, which we will deploy to the Soroban network.
We will use
soroban deploy --wasm target/wasm32-unknown-unknown/release/soroban_auth_store_contract.wasm
to deploy our contract. If it succeeds, we will see a success message, followed by the contract id of our contract.
![]()
If your local RPC does not work, use sq rpc -c to change your RPC endpoint to an official one.
Why Use My Own RPC Endpoint?
The Remote Procedural Call (RPC) endpoint is a server that can execute custom RPC commands on the server. The Soroban blockchain is interacted using the RPC procedure to deploy contracts, invoke functions, and check data on-chain. The
sorobanCLI acts as the middleware which uses the RPC calls underneath to interact with the Soroban network.Using your own RPC endpoint helps with privacy, as other RPC servers might collect your IP address, log your calls, and so on to identify who you are. Running a local Soroban node helps with hiding this information from third-party actors, and helps with the decentralization of the Soroban network.
putting Data to Our Contract
After deploying the contract, if everything works well, we can use
soroban invoke --id [your contract id] --fn put --arg [value]
to save data to your contract environment. If we recall that the type of value was Bytes, we know that we need to supply the hexadecimal value of the "string" we are looking to save. We can convert the string value we need to hexadecimal without even leaving our terminal! Type
echo "Hello Soroban!" | xxd -p
to convert the string "Hello Soroban!" to its hexadecimal representation. Note that you should select a value that is longer than 10 characters.
![]()
What Does
xxdDo?The
xxdprogram creates a hexdump of the input given. A hexdump is the hexadecimal representation of a given file, string, or anything digital, which is actually how the computer stores given data. Thexcharacter represents the heXadecimal word, and thedcharacter represents the dumping process.The
-poption prints the output plainly into the standard output, which is without grouping and without thestringrepresentation. Remove the-pflag to test it!As with almost all Linux commands, you can use
man xxdto learn more about thexxdcommand by reading the manual page. Getting to know more about Linux commands makes you a more efficient programmer!
After we obtain the hexadecimal value of our message, let's put the value into our contract data.

Using get_self to Retrieve Data
Using get_self to retrieve data is simple, as we don't need to supply any arguments. Simply call
soroban invoke --id [your contract id] --fn get_self
to retrieve the data you saved using the put function. You should receive a success message, followed by an array of bytes in decimal representation.

How to Check if the Returned Value is Correct
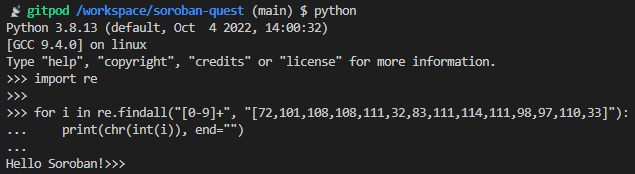
The returned value consists of some decimal values, which makes it hard to check if the received value is the same with the supplied value. Luckily, we can use Python to easily check if that is the case.
import re

for i in re.findall("[0-9]+", "[72,101,108,108,111,32,83,111,114,111,98,97,110,33]"):
    print(chr(int(i)), end="")
That is one cryptic code, but what it does is replacing all the decimals in the returned array, that is
[72,101,108,108,111,32,83,111,114,111,98,97,110,33], with their ASCII representations. We should see the originalstringwe converted into its hexadecimal representation.
Success!
Using get to Retrieve Data
Using get to retrieve the data we supplied with our account is harder than the first method, but nothing impossible. We will use
soroban invoke --id [your contract id] --fn get --arg '{"object": { "accountId": { "publicKeyTypeEd25519": "[your raw public key in hexadecimal format]" } } }'
As you see, the hard part is constructing the AccountId type from the CLI, and finding the hexadecimal format of our public key. Since Soroban uses the JSON-RPC spec to communicate with clients, the complex types derive from the object class. Please check out the wonderful guide from Smephite for more information about Soroban types.
JSON-RPC Types
JSON stands for JavaScript Object Notation, which is a data interchange format which is derived from the JavaScript types. The reason complex types derive from the "object" class is due to JSON supporting only a handful types, which are
strings,numbers,booleans,null,object, andarray. All other classes are composed using these 6 classes.Soroban has 8 default JSON-RPC classes, where
u63andu32are unsigned integer types,i32is the signed integer type,staticis an enum type that can take the valuesvoid,true,false, andledgerKeyContractCode,objectis the sameobjecttype from JSON,symbolis a value that is limited by 10 bytes of length,bitsetis a type that consists of at most60bits, andstatusis also anenumtype that denotes errors.
Since we have access to Python on our workspace, we can use the stellar_sdk Python package, which has some great utility tools we can use. Since it is not preinstalled, we can use
pip install stellar_sdk
to install it to our workspace. Note that the package will cease to exist after your workspace becomes inactive. After installing stellar_sdk, we can enter Python and find our public key's hexadecimal representation using
from stellar_sdk import Keypair

print(Keypair.from_public_key("[your public key]").raw_public_key().hex())

Great! After calling the get function, we should get a success message, followed by the data we saved using the put function into the contract.

Success! Use sq check 2 to claim your reward 🎉!

Top comments (1)
Hope you enjoyed this post!
If you want to support my work, you can send me some XLM at
GB2M73QXDA7NTXEAQ4T2EGBE7IYMZVUX4GZEOFQKRWJEMC2AVHRYL55VThanks for all your support!