Today we will dive a bit deeper into the way I work with redux and why I think that, despite recent developments of react hooks, redux still has its place in our infrastructure.
I've got multiple requests for more information about my redux setup after writing my last article so I decided to make a small deep dive into the topic this week and I will probably follow up with another one in the next article about routing with redux and typescript, should I get a similar response.
As always, you can find the GitHub Link to the finished code at the end of the article.

What is redux?
Redux is a predictable state container that uses the concept of actions and reducers to change data in a single source of truth, the redux store.
Wow... This sure sounds important but what does it actually mean? What is the state of a website or, for that matter, a store?
Redux store
The redux store is nothing more than an object containing our websites data and UI state, ideally in a normalised form. If, for example, a user navigates to the article listing page of our website and filters the listed articles by a topic, our state contains the following:
- Navigation state: the current page/URL
- Data state: the list of articles (response from an API call)
- UI state: the current filter mask
Redux actions
Actions are messages of intent. An action does not change any data in our stored state. An action is nothing more than a message containing an identifier and a payload to be handled by a reducer.
- If the user navigates to a page, we dispatch a navigation action and the navigation updates
- If the page wants to load data from the website, it dispatches an API action
- If the user selects a filter in the UI, an action is dispatched to update the filter for the currently displayed data
Redux reducer
Reducers handle all incoming actions and decide on applicable state changes. If a dispatched action has a matching reducer, the reducer will check the action's identifier (type), accept the data (payload) and make changes by creating a new state. "New" is important here, in redux we do not mutate the state. Every action creates a new state.
BONUS: Redux middleware
Redux also has an optional third layer called middleware. The middleware is sitting between actions and reducers, reads
every action passing through
and handles it based on the content.
This (optional) part is the most interesting in my opinion. I usually have zero logic inside my actions and as little as possible in my reducers. Actions are nothing but messages with an intent and reducers only handle the state change in a predictable way. They should be as clean as possible, returning the same output every time they receive the same input.
Another thing to keep in mind when you decide on whether or not to use middleware is that redux is synchronous. If you want asynchronous interactions (like API requests), the middleware is the right place to implement this. A few common examples of middleware are the following:
Filter
Filter middleware looks at incoming actions and makes decisions based on its own logic. You might, for example, want to throttle user actions that result in an API request or UI change. In that case, you can do so here, only letting an action through every n seconds.
Async API requests
API requests are another use case. Let's say the user loads a list of articles. The article action signals its intent to load data from an API as well as callbacks to execute on the success and failure of the request. The middleware will let the action pass through so that the message is following the correct flow and then dispatches a neutral API action with the payload of the original request.
The API action does not need to know about the source of the request (our articles page) and only cares for the requested data and URL. This way you only need to write and test the API logic once and it is fully reusable. Once the API request is resolved, the response is passed on to the success action (store articles) or error action (handle a failed request).
This might sound verbose and like a lot of actions are dispatched for a simple request of data from an API but it allows us to look at the state of our app and the flow of messages and see exactly what happened.
[ROUTER] Navigate
[ARTICLES] Request article List
[API] Request data
[API] Request success
[ARTICLES] Store articles
Splitter
If you take it one step further, you might want to update your UI based on the loading/pending request. In that case, you would set up the articles middleware to trigger the API request and update the UI accordingly.
The middleware would then "split" or dispatch multiple separate actions and the action/message flow could then look like this.
[ROUTER] Navigate
[ARTICLES] Request article List
[UI] Set page loading
[API] Request data
[API] Request success
[ARTICLES] Store articles
[UI] Set page idle
In some cases more is more
The official redux guidelines recommend a different pattern where you write one action and multiple reducers handle it accordingly but I recommend not to do so.
Don't get me wrong. I, too, prefer to write less code and chose to work with redux toolkit, exactly for this reason, but dispatching more actions and handling them separately, turning your application into a message-based system, has its benefits regarding scalability and readability, two qualities that can make a big difference in the future if your project.
If you follow the path described above, the separation of your project's different concerns is much clearer and is following well-established design patterns developed and described many years ago by people (links at the end of the article) with loads of hands-on project experience.
Demo Time
We have outlined where we want to go with our project so let's see what we need to get our article page working with redux.
Preparation
I've prepared a new project using create-react-app and a typescript template. I've also added some linting and an article component to showcase our store.
Right now, we are displaying a list of articles that is hardcoded. We want to move this to a mock-api server, which I've prepared, including the mocked server response for our articles.
You can check out the prepared project including the mock api server here to get started.
Additionally, we will work with a pattern called redux ducks. A duck is a single file containing all the actions, middleware and reducers needed to define and handle one slice of our stored data.
You can read more about the Redux ducks proposal to get a better idea of what our file/directory structure is based on.
Starting the development environment
In addition to starting the web project using npm start, we also need to start the mock server, which is a separate and simple express server. To do so, simply run npm run mock-server in a separate terminal tab. You could also chain both in a combined script in the package.json but I prefer them to run in separate tabs so that their logging is clean and separated in case of issues.
Redux articles duck
We will start by defining our imports and types. The Article type can be copied from our articles.tsx while the rest is new.
// File: src/redux/ducks/article.ts

/* eslint-disable no-param-reassign */
import { Middleware } from 'redux'
import { createAction, createReducer } from '@reduxjs/toolkit'
import { apiRequest } from './api'

export type Article = {
    title: string
    author: string
    date: number
    tags: string[]
    excerpt: string
    urls: {
        page: string
        url: string
    }[]
}

export type RequestStatus = 'idle' | 'pending'

type InitialState = {
    data: Article[] | null
    status: RequestStatus
}
For our actions, we need to be able to
- request articles
- store articles
- set the status of the UI
- handle a request error
// File: src/redux/ducks/article.ts

export const requestArticlesData = createAction(
    '[ARTICLE] request data'
)
export const setArticlesStatus = createAction(
    '[ARTICLE] set status',
    (status: RequestStatus) => ({ payload: { status } })
)
export const storeArticlesData = createAction(
    '[ARTICLE] store data',
    (data: Article[]) => ({ payload: { data } })
)
export const cancelArticlesRequest = createAction(
    '[ARTICLE] cancel failed request',
    (error: string) => ({ payload: { error } })
)
In our middleware, we will match all actions that match our requestArticleData action, to dispatch the UI update and send off the API requests via API actions. We tell the API the type and target of our request and what to do with the resulting success or error. This is the splitter pattern, we talked about earlier.
We also match for cancelArticleRequest actions because we want to both log the error (for now temporary to console) and update the UI to cancel the "pending" state.
// File: src/redux/ducks/article.ts

export const articleMiddleware: Middleware = ({ dispatch, getState }) => next => action => {
    next(action)

    if (requestArticlesData.match(action)) {
        const state = getState()
        if (!(state.article && state.article.status === 'pending')) {
            dispatch(apiRequest({
                url: '/articles',
                method: 'GET',
                onSuccess: data => storeArticlesData(data),
                onError: error => cancelArticlesRequest(error)
            }))
            dispatch(setArticlesStatus('pending'))
        }
    }

    if (cancelArticlesRequest.match(action)) {
        const { error } = action.payload
        console.log("Error while requesting articles: ", error) // eslint-disable-line no-console
        dispatch(setArticlesStatus('idle'))
    }
}
Our last bit here is the default export for our articleReducer. We only need to handle actions that either store the article data or simply update the UI state.
// File: src/redux/ducks/article.ts

const articleReducer = createReducer(initialState, (builder) => {
    builder
        .addCase(setArticlesStatus, (state, action) => {
            const { status } = action.payload
            state.status = status
        })
        .addCase(storeArticlesData, (state, action) => {
            const { data } = action.payload
            state.data = data
            state.status = 'idle'
        })
})

export default articleReducer
Redux API duck
Our API code is not trivial and I'd advise you to simply copy it for now if you feel like you still need a better understanding of how redux with typescript works but I'll try to outline the basics.
First of all, we need to define our API endpoint (API_HOST). Our example assumes that there is only one and it's currently set to our mock API server.
Then we need to define all different types of requests ("GET", "POST", "PUT", "DELETE") and how an API payload is structured including onSuccess and onError actions.
// File: src/redux/ducks/api.ts

import { Middleware, Action } from 'redux'
import { createAction } from '@reduxjs/toolkit'

const API_HOST = 'http://localhost:3031'

export type SuccessAction<T> = (data: T) => Action
export type ErrorAction = (message: string) => Action

export type ApiBaseRequest = {
    url: string
    headers?: Record<string, string>
}

export type ApiGetRequest = ApiBaseRequest & {
    method: 'GET'
}

export type ApiPostRequest = ApiBaseRequest & {
    method: 'POST'
    data: Record<string, unknown>
}

export type ApiPutRequest = ApiBaseRequest & {
    method: 'PUT'
    data: Record<string, unknown>
}

export type ApiDeleteRequest = ApiBaseRequest & {
    method: 'DELETE'
}

export type ApiRequest = ApiGetRequest | ApiPostRequest | ApiPutRequest | ApiDeleteRequest

export type ApiRequestPayload<T = never> = ApiRequest & {
    onSuccess: SuccessAction<T>
    onError: ErrorAction
}
Our actions are relatively simple, now that we have defined all the typings above. We have our apiRequest as well as the apiSuccess and apiError actions.
// File: src/redux/ducks/api.ts

export const apiRequest = createAction(
    "[API] Request",
    (api: ApiRequestPayload<any>) => ({ // eslint-disable-line @typescript-eslint/no-explicit-any
        payload: { ...api },
    })
)

export const apiSuccess = createAction(
    "[API] Success",
    (onSuccess: SuccessAction<unknown>, data: unknown) => ({
        payload: { onSuccess, data },
    })
)

export const apiError = createAction(
    "[API] Error",
    (onError: ErrorAction, message: string) => ({
        payload: { onError, message },
    })
)
The final part here is our middleware because the API does not have a state in our store. Our middleware is responsible for resolving the request via fetch and handling the success and error cases with the respective actions, dispatched with the original callbacks from our article action.
// File: src/redux/ducks/api.ts

export const apiMiddleware: Middleware = ({ dispatch }) => next => action => {
    next(action)

    if (apiRequest.match(action)) {
        const {
            url,
            method,
            headers,
            onSuccess,
            onError,
        }: ApiRequestPayload<any> = action.payload // eslint-disable-line @typescript-eslint/no-explicit-any


        fetch(`${API_HOST}${url}`, {
            method,
            headers
        })
            .then(response => response.json())
            .then(reponseData => dispatch(apiSuccess(onSuccess, reponseData)))
            .catch(error => { dispatch(apiError(onError, error.message))
            })
        return
    }

    if (apiSuccess.match(action)) {
        const { onSuccess, data } = action.payload
        dispatch(onSuccess(data))
    }

    if (apiError.match(action)) {
        const { onError, message } = action.payload
        dispatch(onError(message))
    }
}
Redux - wiring everything up
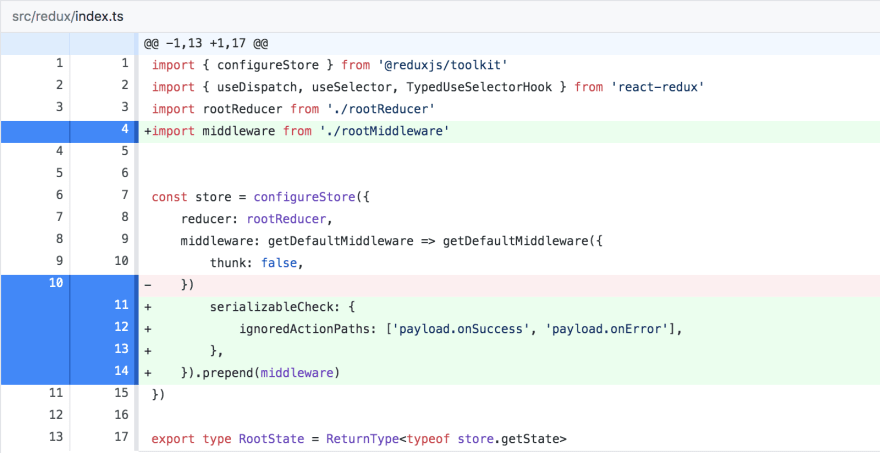
We now need to register our reducers with the rootReducer and add a rootMiddleware to register our new apiMiddleware and articlesMiddleware.
// File: src/redux/rootReducer.ts

import { combineReducers } from '@reduxjs/toolkit'
import articleReducer from './ducks/articles'

const rootReducer = combineReducers({
    articles: articleReducer,
})

export default rootReducer
// File: src/redux/rootMiddleware.ts

import { apiMiddleware } from './ducks/api'
import { articlesMiddleware } from './ducks/articles'

export default [
    apiMiddleware,
    articlesMiddleware,
]
To add our middleware to the store, we can append it to the already existing default middleware that redux toolkit brings to the table. We also need to make an exception to our serializableCheck middleware (from redux toolkit) because our onSuccess and onError actions are not serializable.
React Redux, hook things up with the new store
We already have our redux provider component as a wrapper around our app (part of the prepared setup I made) but right now, our Articles.tsx component does not know how to access the article state.
In the past, it was common to use the connect() function from react-redux to allow components to access the state but with the advent of react hooks, this changed. We already have a typed useReduxDispatch and useReduxSelector hook (also part of the prepared setup) and could use them directly in our Articles component but I personally prefer to keep them separate in a .hooks.ts file for each component.
We will create a new articles.hooks.ts file next to our articles.tsx component file and add our redux interaction there to keep our Articles component as clean as possible.
// File: src/components/pages/articles.hooks.ts

import { useEffect } from 'react'
import { requestArticlesData, Article } from '../../redux/ducks/articles'
import { useReduxDispatch, useReduxSelector } from '../../redux'


export const useArticlesData = (): Article[] | null => {
    const data = useReduxSelector(state => {
        return state.articles.data || null
    })
    const dispatch = useReduxDispatch()

    useEffect(() => {
        if (!data) {
            dispatch(requestArticlesData())
        }
    }, [dispatch, data])

    return data
}
With this in place, we can clean up our Articles.tsx and remove everything by replacing all the state logic with our new hook.
// File: src/components/pages/articles.tsx

import React from 'react'
import { useArticlesData } from './articles.hooks'

const Articles = (): React.ReactElement => {
    const data = useArticlesData()

    return (
        // nothing changed here so I skipped this part
    )
}

export default Articles

Wrapping up
With all said and done, we've successfully hooked up our website with a mock API using a clean and scalable message pattern in redux, allowing for a readable and easy to understand message flow.
Link to the finished code/tag v0.1.1 on GitHub
There are two minor changes I did not show in the article above. For one I had to adjust my linting to allow for imports using './articles.hooks' as the linter thought .hooks was the file ending... we can't have that.
"import/extensions": [
      "error",
      "never",
      {
        "style": "always",
        "hooks": "always" // this is new
      }
    ],
The other thing I did change was adding a key attribute to my list of articles because react always needs a key attribute when rendering lists of elements.
<li key={`article_${date}`}>
Links and Recommendations
Nir Kaufmann has a great presentation on Advanced Redux Patterns on YouTube, and while he does some things differently, you will be able to see the same patterns emerge.

Additionally, I can really recommend this old book because many of the ideas and concepts are still relevant today.
Enterprise Integration Patterns

Outlook
Next time we will look at routing and page navigation in detail before we move on to applying layout and styling our app with styled-components and themes.

Top comments (0)