
Cat Trophy Kingdom: Building a video game with Airkit’s low-code platform
A few weeks ago, in preparation for releasing version 18.1 of Airkit, some coworkers and I were stress-testing the new animation functionality. We started with the basics, things we imagined might be among the most common use cases: building out a customized progress bar, associating an animation with the appearance of a warning label so as to draw more attention to it. Then, with the cadence of a joke, someone asked, “Can we animate a chicken crossing the road?”
The answer, as it turned out, was that we could. Easily. It took less than ten minutes and required only two assets: a JPEG of a road at dusk, and a GIF of a dancing chicken.

I was in love. In the span of less than ten minutes, this road-crossing chicken had become my muse, for it made me realize two things:
Airkit’s animation functionality can be combined with GIFs to create the illusion of complex motion with very little effort.
If you can animate a chicken moving in one direction, you can apply the same principles to move any character in any direction.
And once I had realized those two things, the conclusion was inevitable. I would use Airkit to build a video game.
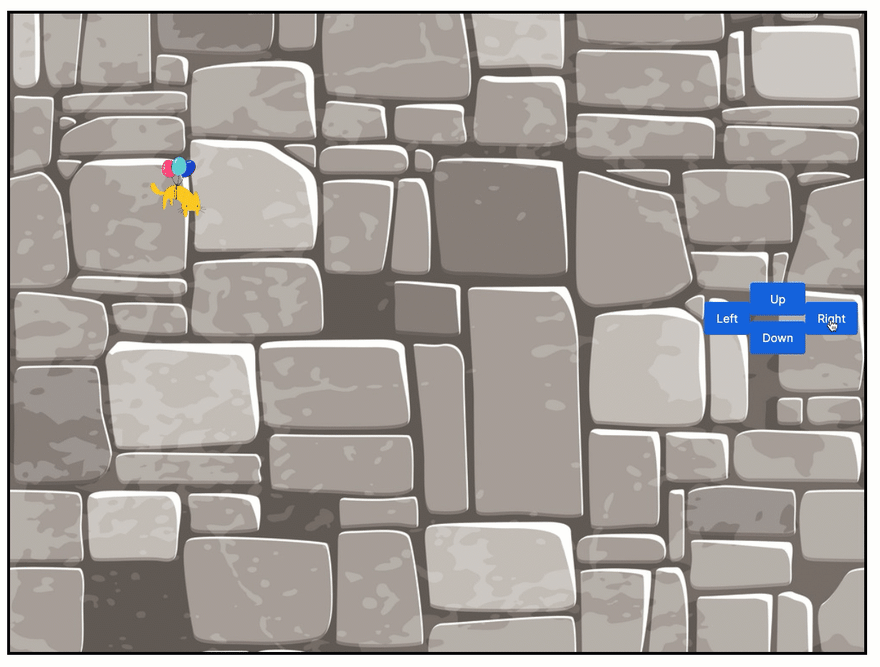
In around 48 hours, I had put together Cat Trophy Kingdom, a short CRPG (Computer Role-Playing Game) where you earn the crown of Cat King by knowing trivia about how to build in Airkit.

(Pictured: A brief snippet of Cat Trophy Kingdom. Click here to play!)
This is absolutely not the sort of thing Airkit was optimized to build, and so while I did have to implement a few hacky work-arounds, I was overall pleasantly surprised by how quickly I was able to throw together something so far beyond the scope of CX automation.
Let me tell you about how I did it.
Building the Castle
When I first started building, I had only a vague idea of how I wanted the game to go, and I wasn’t entirely sure what would be feasible to complete in the 48-hour period I had given myself. I started with the basics: the game needed a protagonist.
After considering the constraints I was working within, not least of which was time, I decided to make a GIF of a little yellow cat held up by balloons. Out-of-the box animation in Airkit is smooth thanks to the automatic incorporation of easing, which looks good in combination with gentle bobbing. A floating means of transportation also meant that I didn’t need to worry about timing and configuring a complex walking cycle.

Almost immediately, I began to mentally refer to this cat as the “PC,” which stood simultaneously for “Player Character” and “Player Cat.”
Now that I had my PC, I needed to create a space for them to explore. I’d already decided that I wanted to set the game in a castle, so I found a picture of some masonry that could pass as a castle floor. This, I set as the background for the Container that would hold all the furniture and characters that would exist in my digital castle, starting with my PC. For the sake of organization and scalability, I put the Image Web Control containing the GIF of my PC in its own Container, which nested under the broader Container encompassing the whole castle floor. It was to this sub-Container that I would apply animations. I was kicking around the idea of having visible objects float alongside the PC under certain circumstances, and I didn’t want to have to animate them individually.

The PC needed a way to move about the castle floor, not in a single direction, but four: up, down, left, and right. These would dictate movement along two dimensions: the vertical and the horizontal. I defined two variables to keep track of the cat’s placement along these dimensions: x, to track distance in pixels from the leftmost border, and y, to track distance in pixels from the upper border. So that their values could be easily changed by simple addition and subtraction, both of these variables were Numbers. (This whole setup was based off of the standard Cartesian plane, with the orientation of the y axis reversed to avoid having to work with negative margin values.)
Upon updating the Airkit platform to v18.1, animations are incorporated into the preexisting UI of the platform by tying them to the styling properties of Web Controls. While styling properties are defined statically by default, they can also be defined in terms of variables, and changes to the values of such variables are reflected as changes in the appearance of the Web Control. Applying animations to the variable styling properties smoothens the transition. The Container that held my PC, then, would have varying values of the left and top margins, which would change according to the values of x and y respectively. (Because I had defined x and y as Numbers, I needed to use the FORMAT_NUMBER function to convert them into a string the margin expression could parse. The left margin was defined as “{{FORMAT_NUMBER(x, “”)}}px”, and the upper margin was defined as “{{FORMAT_NUMBER(y, “”)}}px”.)
I then animated changes to the margin so that the transition between different margin values would take place over the span of a second:

The values of x and y would be changed by pressing Buttons, which would trigger the Set Variable Action to change the value of x or y as appropriate.

The values of x and y would change by adding or subtracting numbers to or from their initial value, so once the Buttons were configured, I set up the initialization of x and y. Upon navigating to the Web Page on which I was building my castle, two Set Variable Actions would be fired, setting first x to 0 and then y to 0.

(Pictured: A fancy cat doing a fancy dance.)
By this point, I had built out something only marginally more complicated than the chicken crossing the road, and it was becoming clear that I was going to have to find ways around Airkit’s core assumptions if I wanted to get much further.
Airkit apps are designed to be easily accessible on screens of any size, browser or mobile. Out of the box, Web Controls don’t have a set pixel size; they scale automatically to account for the size of each user’s screen. When defining dimensions within styling properties, Airkit parses input given in either pixels or percentages. “50px” means fifty pixels, and “50%” means fifty percent of the Container the Web Control is nested under, which by default depends on the size of the screen being used to view the app. In most of the common use cases, the things Airkit was optimized to build – form digitization, call deflection – it’s considered best practice to define lengths in terms of percentages when possible, allowing the UI to appear standardized regardless of screen size.
As you may have already noticed, I was not doing this. I was already defining my PC’s movement in terms of pixels, not percentages. To better create the illusion of various images interacting with each other, I wanted fine control of each image’s location down to the pixel.
So I redefined the size of the castle floor Container, overwriting the defaults that would adjust the size to fit the screen it was displayed on. This meant I had to pick, then and there, what sort of screen ought to be used to play the game, and I decided to make a computer game, not a mobile-friendly experience. I set the size of my castle floor Container to exactly 1200 pixels by 900 pixels and tinkered around with the Page Layout so that the layout would remain the same regardless of screen size. This would render the game effectively unplayable if someone tried to access it from their phone, but that was a sacrifice I was willing to make.
This also meant I had to put the Up, Down, Left, and Right Buttons in a Container and adjust their placement so that they were more obviously visible on a computer screen.

(This was my first time changing the position of a Container from Relative to Absolute, but it would not be my last.)
My PC now had a defined and finite castle floor to explore. Pressing the Up, Down, Left, and Right Buttons would move the PC some number of pixels in the desired direction. How far each Button would move the PC was entirely arbitrary, but as long as the size of the change stayed consistent, it imposed a conceptual grid structure on occupiable spaces. The PC would only be able to reach spaces divisible by the number of pixels it could move at a time.
Here is the convention I settled on. The PC itself would occupy a 100 pixel by 100 pixel Container, which would move in 100-pixel steps. The coordinates “defining” the position of the PC would be defined by the pixel at the upper left of the 100 pixel by 100 pixel Container. For instance, given x = 0 and y = 0, the PC would appear at the upper left corner, apparently filling up the space defined by all values of x between 0 and 99, and all values of y between 0 and 99.

(Pictured: The grid as it exists in my imagination.)
Upon saving and previewing my progress, I was delighted to see my PC move about as intended. However, the lack of limitations surrounding the castle floor quickly became apparent: pressing the Up Button too many times sent my PC floating up and away into the limitless void, never to be seen again.
(Unless I pressed the Down Button an equally ludicrous number of times.)
I needed to impose further restrictions on the spaces my PC could occupy: I did not want them to be able to leave the castle floor, so I decided to create a new UDF (“User Defined Function”) to check if a proposed destination was within the established parameter. The UDF, designated ISINSIDE#USER_FUNCTION, took two Numbers, x and y, as input, used the out-of-box IF function to return the boolean TRUE if x and y described a position inside the castle, and returned FALSE if otherwise:
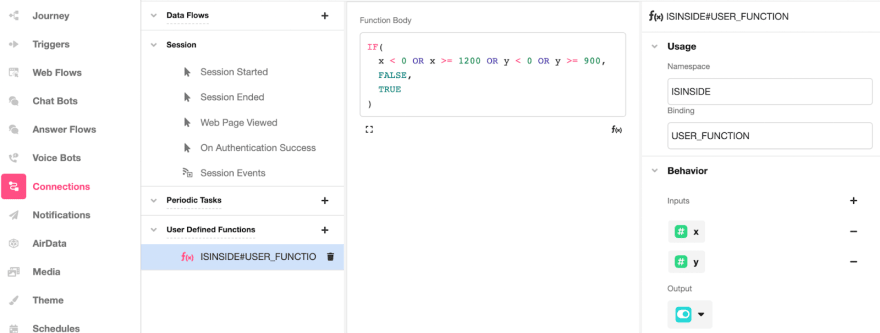
By making this a UDF, I was able to reuse it easily, and I incorporated it into the Action Chains associated with the Up, Down, Left, and Right Buttons. Now, before resetting the value of either x or y (as appropriate), each would run a Conditional Action to check if the new coordinates were inside of the castle. If they were, the cat would move as asked. If not, the cat would stay still.

This accomplished the illusion of the cat being unable to pass through the implied walls.

So now I had my PC, and the PC had a room to explore. Now was time to fill the room with characters and furniture for my PC to interact with.
Interacting with Characters and Furniture
The process of building my castle floor had solidified two key ideas:
My 1200 pixel by 900 pixel castle floor was also a 12 by 9 grid, in which my PC could occupy exactly one square at a time (and each square was defined by the coordinates of the pixel in the top left corner). The same principles could be applied to define the locations of furniture and other characters.
Keeping track of the location of each character or piece of furniture could be done via UDF, and each UDF could be used in an additional IF ELSE statement associated with the Conditionals tied to the Up, Down, Left, and Right Buttons.
The first character I wanted to establish was the Cat King, as the PC’s interactions with him would make up a core part of the game. I whipped up a sprite for him, which I confined to its own 100 pixel by 100 pixel Container. His placement on the board was defined using the same conventions as I had applied to my PC, only no variables were required:

This placed the Cat King in the location described by x = 800 and y = 100.

(Pictured: The placement of the Cat King in my imagination.)
I didn’t want my PC to be able to enter this occupied space, so I applied a similar strategy to the one I had used to prevent my PC from leaving the castle floor.
First, I created a new UDF, called ONCATKING:

Then, in the Action Chains associated with each of my Up, Down, Left, and Right Buttons, I added an IF ELSE branch and used my new UDF to trigger different behavior in cases where the PC tried to occupy the same space as the Cat King. Now, before resetting the value of either x or y (as appropriate), it would not only check to see if the new coordinates would be inside the castle, if they were, it would also check to see if the new coordinates would put the PC in the same square as the Cat King.
And if so, I wanted to open a modal.
Up until this point, I’d been working within a single Web Page, but now I needed to make a new Web Flow, which I would open as a modal in order to bring up the Cat King’s dialogue and allow the player to select how they wanted to reply. In my early iterations, the Cat King’s dialogue was a simple Label, and the dialogue options were simple Buttons, which might close the modal or navigate to another Web Page depending on the nature of the reply. For a bit of polish, I shortly after incorporated additional styling components, such as a drawing of the Cat King’s face, and a talk balloon gif from Giphy. After nesting some additional Containers and playing around with Airkit’s out-of-the-box styling properties, I found a layout I liked, which I would later re-use (by copying and pasting) when creating additional character interactions.

As I added more possible character (and furniture!) interactions to my game, I repeated this process in at least a dozen different forms. For each new interaction, I would place the sprite, make a UDF to test if the space was occupied by the sprite in question, and then I would incorporate the UDF into new IF ELSE statements in the Conditionals associated with the Up, Down, Left, and Right Buttons.
And yes, these Action Chains did grow very, very long, very, very quickly.
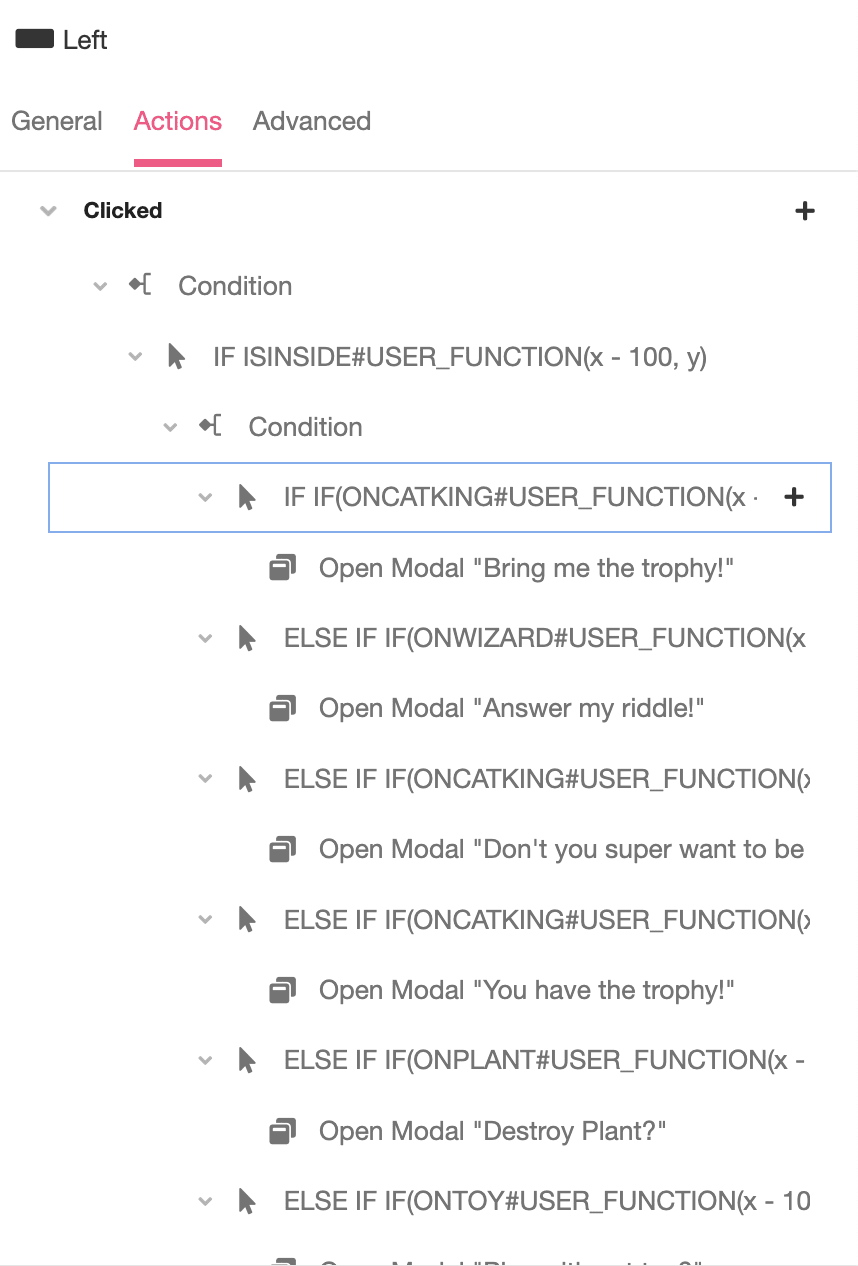
(Image Caption: This Action Chain is too long for my computer screen to even display all at once.)
Key insight: Using UDFs to keep track of occupied spaces was an even better idea than I first thought.
When I first made a UDF to keep track of whether a proposed location was inside the castle, I had originally only been thinking to save myself from writing x < 0 OR x >= 1200 OR y < 0 OR y >= 900 four separate times (one for the Conditional associated with each of the Up, Down, Left, and Right Buttons). I made UDFs to keep track of each occupied space for the same reason.
But as I placed more and more characters and pieces of furniture on the castle floor, I was sometimes struck by the urge to rearrange them, often for aesthetic purposes, more rarely to place the obstacles so that the way around them seemed less ambiguous. Regardless of why, moving the furniture meant both redefining the margins on the Container holding the furniture in question, and redefining the Conditional that managed the PC’s interaction with the furniture.
And when I needed to do that, I was glad I had a UDF that served as the single source of truth for the location of an interaction. Changing the UDF so that it referenced the new location of the occupied space was all it took to update every relevant Conditional, across every Button.
Tracking Progress and Interactions
Now I had built my castle and filled it with characters and furniture for my PC to interact with. There was one last key component of the game to work out: tracking the PC’s progress.
Game-play-wise, the flow I had in mind was not complicated: the PC would talk to the Cat King, who would tell them to bring him a Cat Trophy. Then the PC would talk to the Court Mage, who would give them a riddle, and once the PC answered it correctly, they would get the Cat Trophy. Then the PC would bring the Cat Trophy to the King, winning the game.
The same modal could not be opened every time the PC went to the location of the Cat King. One modal needed to open when the PC did not have the trophy, and a different modal needed to open when the PC did.
I wound up tracking these sorts of interactions with Booleans. For instance, I created a Boolean variable called have_trophy, which was initialized as FALSE at the start of the Journey but reset to TRUE when the correct Button was pressed to answer the court mage’s riddle.
More IF ELSE statements were added to the Conditionals associated with the Up, Down, Left, and Right Buttons, and some of the IF ELSE statements that I had already made grew more complicated. For instance, the Condition that needed to be met by the Left Button in order to open the Cat King’s initial modal, where he told the PC to bring him a Cat Trophy, used to look only like this:

and now it looked like this:

(The variable have_trophy is written as session.have_trophy here because it is a global variable. I made most of the progress-tracking Booleans global variables because changing their values was typically done in modals, and the modals, as separate Web Flows, are different Activity Groups from the Web Page that held my castle floor.)
Once my PC had earned their trophy, in addition to opening a different modal when interacting with the Cat King, I also wanted to have a little trophy float next to the PC’s sprite as they moved about the castle floor. As you may recall, I’d been kicking this idea around for a while, and I was prepared for it. The image of my PC was already inside a Container, and I could easily add the image of my trophy to the same Container. After a bit of resizing and tinkering with the margins of the trophy image until I was satisfied with its placement in relation to my PC, I toggled to the Advanced tab of the Inspector, and set the Is Visible field so that it was equal to session.have_trophy.

Now the trophy would only appear visibly next to the PC if session.have_trophy was equal to TRUE. And, because the movement animation had been applied to the Container both the PC and the trophy shared, I did not need to define any more animations to account for it.

(Pictured: A fancy cat doing a fancy dance with their new Cat Trophy. By this point, I had changed the colors of the buttons for aesthetic purposes.)
Key Insight: There’s a lot you can do when you track interactions with Booleans
Once I started tracking whether or not my PC had earned their trophy with the simple Boolean have_trophy, I realized I could do two extremely powerful things:
Interact differently with objects or other characters based on the variable’s value.
Render images visible or invisible based on the variable’s value.
These two things applied no matter what variable I made or what interaction I used it to track. I used these principles to create new ways for the PC to interact with their environment. Soon, my PC could do all of the things real cats can do: destroy a plant, hide in a box, and cast spells. Some of the Airscript expressions grew lengthy, but the underlying logic was always the same.
Conclusion
By this point, the 48-hour period I had given myself to build out this game was drawing to a close. I added a little more polish – an opening Web Page so that each player could name their PC something different, a Web Page that allowed players to crown their PC upon becoming Cat King – and then my work was done.
Given that Airkit isn’t a video game creation platform, I was quite happy with the end result. The tools Airkit provides might be structured with particular use cases in mind, but they’re also versatile enough that I was able to work around any out-of-the-box functionality that didn’t fit my use case, and I made much more progress in this 48-hour period using Airkit than I would have if I had tried to construct the same game from scratch.
While the gameplay was relatively short and simple, in a way, this worked to my advantage: after my 48-hour flurry of artistic verve, I was excited to show of my creation, and the fact that a single playthrough didn’t require much time commitment meant that it was easy to coax everyone into giving it a try.

(Pictured: My cat, after having been forced to sit through the dozenth playthrough of Cat Trophy Kingdom. He just became Cat King again!)

Top comments (0)