
I use Calendly a lot in my day to day to book meetings that fit within my schedule, and as I continued to use it, I wanted to see if I could build the core functionality of the tool in Airkit. There were a few things I wanted to make sure we could do in Airkit, which is connect to both google calendar and zoom, be able to programmatically get all of the free slots on my calendar in 30 minute increments, and programmatically generate zoom links attached to calendar invites.
With that in mind, this tutorial will walk through the steps on how to build a Calendly clone, integrated with Google Calendar and Zoom.
Application Overview
When a user visits the application, they will see a calendar with an availability list of 30 minute appointment slots where they can choose and confirm an appointment time of their choice.

Once the user selects the time slot. They will be presented with a form where they enter details about themselves (name and email address), add additional guests, and a message for the meeting. When they click on Schedule Event, Airkit will then create an appointment, send out meeting invitations to all participants along with a Zoom Meeting link.
You can check the application out here: https://app.airkit.com/calendly
Prerequisites
To build along with this tutorial, you will need a few things to get started:
- Access to Airkit Studio
- A Google Developer account
- A Zoom Developer account
Creating APIs for the Google Calendar and Zoom Meetings
Let’s start with the Google Calendar API. One of the first things you will need to do to get started is create a project in the Google Developer Console. You will need to create a new project called Calendly Airkit and then select it. Next add the Google Calendar API.
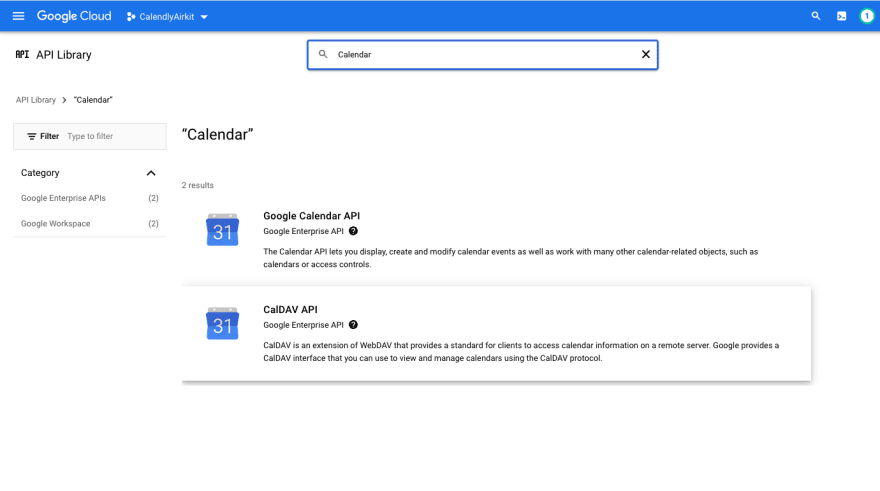
After enabling the Google Calendar API, you will need to configure the Credentials with an OAuth client id.

Provide the OAuth consent screen with the appropriate information and then you will need configure any scopes which are necessary for the Google Calendar API to work with this newly established Project:
- Google Calendar API –
/auth/calendar - Google Calendar API –
/auth/calendar.readonly - Google Calendar API –
/auth/calendar.events

Now are you able to create the OAuth Credential. You will need the redirect URI which can be found in this doc. Because my organization is in the US region, I use the below redirect URI.
“`
https://us.api.prod.airkit.com/internal/sessions/v1/auth/callback
“`
Next let’s configure the Zoom Developer API. Like Google, you will need a Zoom Developer account. You will be creating an OAuth app type. The app will be an account level application.

You will be using the information from the App credentials later. Like before refer to the Custom Integrations documentation for the URL information for Redirect URL and Allow List. Now you are able to create the application. Finally you will need to add Scopes:
- View and manage all user meetings

All of our integrations setup on Google Cloud and Zoom are done and ready to to be integrated into Airkit.
Creating the Integration
Now that you have the API integrations setup with Zoom and Google Calendar, it’s time to create the custom integration within our Airkit application. In the Airkit Console, go to the Integration tab. We will be creating two custom integrations. First, we will create a custom integration with Zoom and then will create a connected account to our application there. Next, we will repeat this process again with Google Calendar .
Zoom Integration
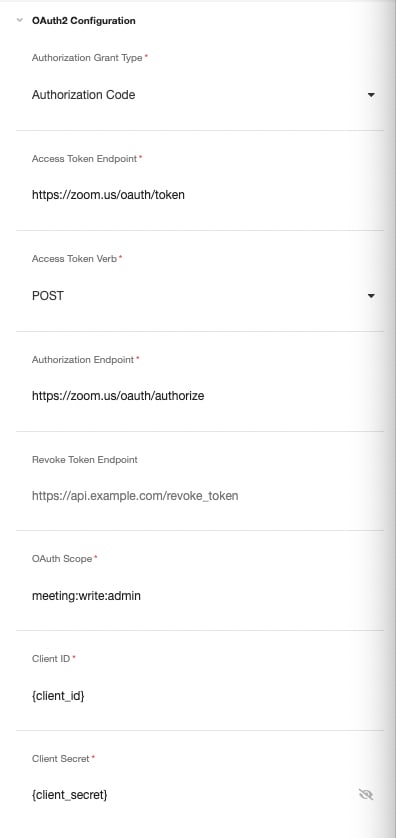
Create a new Custom Integration, with a name and key that you indicate an integration with Zoom. The authentication type we are going to use is OAuth 2.0. The Integration Parameters are client_id and client_secret.

The OAuth2 Configuration will be using the following configuration parameters listed below and shown in the sample:
- Authorization Grant Type: Authorization Code
- Access Endpoint: “https://zoom.us/oauth/token”
- Access Token Verb: POST
- Authorization Endpoint: “https://zoom.us/oauth/authorize”
- OAuth Scope: meeting:write:admin
- Client ID:
{client_id} - Client Secret:
{client_secret}
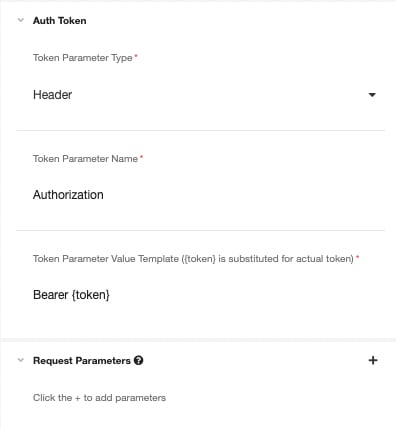
The Auth token configuration will be the following configurations:
- Token Parameter: Header
- Token Parameter Name: Authorization
- Token Parameter Value Template: Bearer {token}
Google Calendar Integration
Create a new Custom Integration, with a name and key that you indicate an integration with Google Calendar. We will follow similar steps as done for the Zoom Integration. The authentication type we are going to use is OAuth 2.0. The Integration Parameters are client_id and client_secret.

The OAuth2 Configuration will be using the following configuration parameters listed below and shown in the sample:
- Authorization Grant Type: Authorization Code
- Access Endpoint: “https://oauth2.googleapis.com/token”
- Access Token Verb: POST
- Authorization Endpoint: “https://accounts.google.com/o/oauth2/v2/auth?access_type=offline&prompt=consent”
- OAuth Scope:
- Client ID:
{client_id} - Client Secret:
{client_secret}

The Auth token configuration will be the following configurations:
- Token Parameter is Header
- Token Parameter Name is Authorization
- Token Parameter Value Template is Bearer {token}

Refer to this snippet of the video on how to pair the connected accounts for Zoom and Google Calendar API or refer to this document on Connected accounts.
Functionality through Data Flows
Now we have the integrations ready for use in the Airkit Application, next we will need to build out six Data Flows for the application for self-service appointment scheduling. Refer to the YouTube Video for complete details on how to create all these Data Flows.
First, we will create three Data Flows for finding all the available time slots on a particular day. The main Data Flow will be called “Get Free Slots” and then we will create two additional supporting Data Flows called “Merge Objects” and “Generate 30 Min Slots”.

Get Free Slots Data Flow: We will be setting the appointment window starting time and ending time, finding the existing appointments via the Google Calendar API, and creating a list of 30 minute available time slots.
Google Calendar API expects the date to be in RFC 3339 format. We will need to use the following Airscript function: FORMAT_DATETIME in order to format the date into RFC 3339.

We can use this FORMAT_DATE Airscript in a Transform Function for both the Start of the Day and End of the Day Variable.
<https://support.airkit.com/reference/format_datetime>
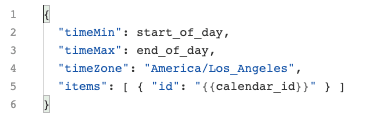
Now we will need information from Google Calendar API to find the busy times so we will leverage the integration we set up already. In order to make this request, we will use HTTP Request Data operation and use the following settings:
- Service: Google Calendar API
- Method: POST
- URL: “https://www.googleapis.com/calendar/v3/freeBusy“
- Content Type: “application/json”
- Body will use results from previous Data Operations show in the screen shot below
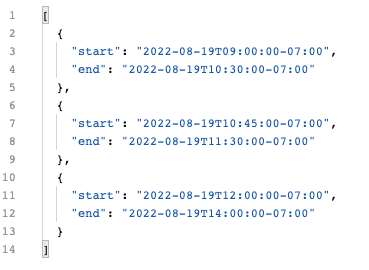
The resulting busy time slots will look like the following:
Merge Objects Data Flow: Since we have a few time slot objects, we will need to bring some different object data together and we will create and use another Data Flow called Merge Objects. This Data Flow will use the Airscript Function [MERGE_OBJECT](https://support.airkit.com/reference/merge_objects). Refer to the YouTube Video for more details on this Data Flow.
Additionally there will be some additional time formatting needed to produce a list of 30 minute available time slots. Key Airscript functions will be TIME_FROM_FORMAT, UPDATE_TIMEZONE, and DATETIME_FROM_FORMAT refer to the documentation to learn more about these functions.
Generate 30 min Slots Data Flow: To generate a list of available time slots, we will create another supporting Data Flow called “Generate 30 min slots”. This Data Flow will take two inputs of start_time and end_time and create an object with a list of slots in 30 minute increments. In order to accomplish the list, use a Query Expression to create the list.
The list of time slots will be used later when we build the Airkit application.
Now we will create the last three Data Flows which will schedule the Calendar event and create a Zoom Meeting. We will create another main Data Flow called “Schedule Event” and two supporting Data Flows: “Create Zoom Meeting” and “Create Google Calendar Event”.

Create Zoom Meeting Data Flow: Let’s build this Data Flow! This Data Flow takes an input of starting time and a list of emails and then makes a HTTP request to Zoom for the meeting information.
We will use the Zoom API integration we configured before and will use the HTTP Request Data operation with the following settings:
- Service: Zoom OAuth API
- Method: POST
- URL: “https://api.zoom.us/v2/users/me/meetings”
- Content type: “application/json”
- Body will need the following parameters modified:
- “
schedule_for” : - “
Meeting_invitees” : Use a query expression to all the emails to send invites to- FROM email IN
list_of_emailsSELECT{ “email”: email }
- FROM email IN
- “
start_time” : Use the start time and format appropriately for Zoom-
“{{FORMAT_DATETIME(start_time, “yyyy-MM-ddTHH:mm:ss”)}}”
-
- “

The result can be customized accordingly with a Transform operation and then sent back to the “Schedule Event” Data Flow to be used in the “Create Google Calendar Event” Data Flow.
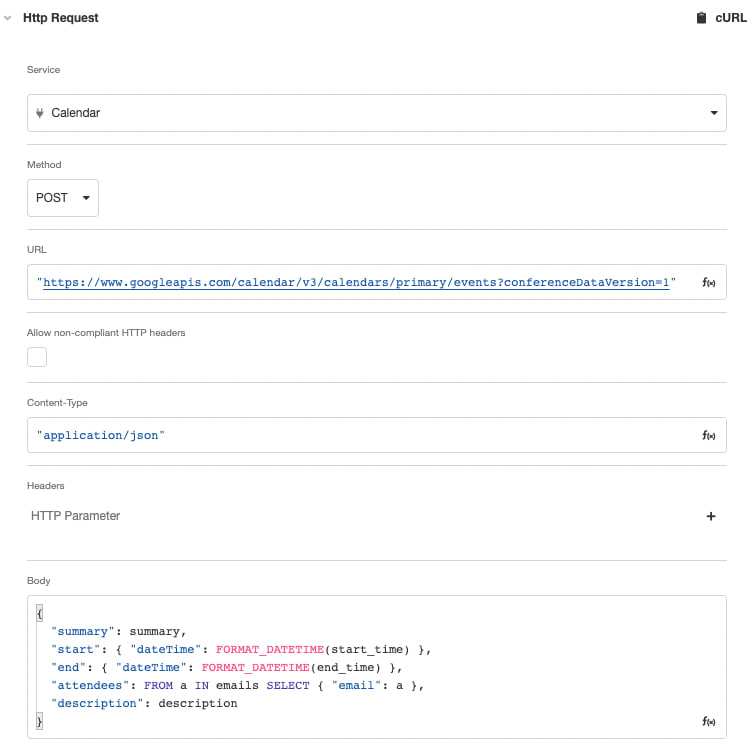
Create Google Calendar Event Data Flow: Let’s build it! This Data Flow takes the input of the following variables: summary, start_time, end_time, list_of_emails, and a description. And then makes a HTTP request to Google Calendar API to create a Google Calendar Meeting.
We will use the Google Calendar API integration we configured before and will use the HTTP Request Data operation with the following settings:
- Service: Google Calendar API
- Method: POST
- URL: “https://www.googleapis.com/calendar/v3/calendars/primary/events?conferenceDataVersion=1″“
- Content type: “application/json”
-
Body:
{ “summary”: summary,
“start”: { “dateTime”: FORMAT_DATETIME(start_time) },
“end”: { “dateTime”: FORMAT_DATETIME(end_time) },
“attendees”: FROM a IN emails SELECT { “email”: a },
“description”: description}
Schedule Event Data Flow: Let’s build it now! This is the main Data Flow which brings all the necessary data together to create the Google Calendar Event. The Input data variables are the following: selected_time, name, email, list_guest_email, and preparation notes which all will come from a web page form built later in the Building Airkit Application section. See the screenshot below to see how the Data Flows are configured or continue to watch the Youtube Video to see how this app is built.


Building the Airkit Application
Now we have the integrations and Data Flows ready for use in Airkit Application, next we will need to build out the application for self-service appointment scheduling.
In Journey Builder, add a Visit a Link Trigger to start the application, and add a webflow in the first Journey step. Then in Web Builder, we will make three Web Pages. On the first page, a self-service appointment scheduler, we will add the following key controls: Label, Container, Date Picker and Container List with two Buttons. Make sure you label all the controls appropriately.
The Web Page Tree should look like the following example:

After you add these controls you can configure labels appropriately similar to what is shown in the Youtube Video or the screenshot below:

Next, we will configure the controls for the Date and Time Slot Selection. First we will configure the Date Picker control. You will configure the Control Properties as shown below to get a one month layout.

The selection of the date has a concurrent action of calling a Data Flow which gets all available time slots for that particular day. We use the “Get Free Slots” Data Flow, which will extract information from Google Calendar. See the screenshot for the variables to update.

The variable session.availability will have all the time slot data which will populate the buttons in the Container List control. The application will show a list of buttons with the available time slots.
Once a time slot is selected and confirmed via the Confirm Button control, the application will move to the next Web Page “Enter Details and Confirm”.
On the second page, “Enter Details and Confirm”, we will create a scheduled event form where a user can create a meeting, add guests to the email guest list, add any notes to the meeting and then schedule the appointment. We will be adding another set of controls: Container, Label, Text Input, Text Area Input and Button. Make sure you label all the controls appropriately.
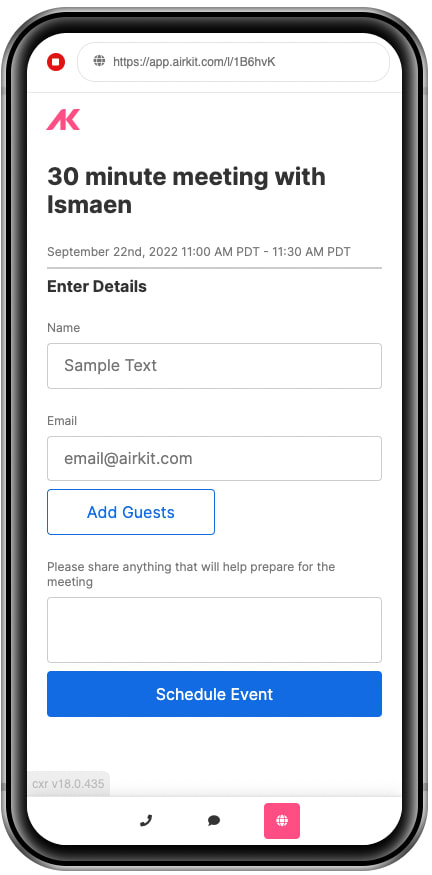
The Schedule Event button action unifies all the inputs from the initial page and current page via the “Schedule Event Data Flow” in order to create a Google Calendar Event with a Zoom Meeting. See the screenshot below:

After the event is scheduled, the user is sent to the Thank You page.
On the final page, a Thank you page, add a label which thanks the user for scheduling an appointment.

Wrap Up
Hopefully this walkthrough has been a helpful guide on how to create a calendly clone on your own.
Even this build has room to add additional functionality! You could upload additional documents for the meeting to the calendar invite via the File Upload control. You could change the video conference link by creating a new API integration with Microsoft Teams or any other video conferencing service. Try adding new features of your own and let us know what you build!

Top comments (0)