The last week we've gone all in on AI functions. An AI function is the ability to create AI assistants logic, allowing the chatbot to "do things", instead of just passively generating text.
To understand the power of such functions you can read some of our previous articles about the subject.
- Demonstrating our new AI functions
- How to build a Shopping Cart AI Chatbot
- The Sickest B2B sales AI Chatbot you have Ever Seen
You can also try out our AI functions by for instance asking our chatbot to How's the weather today?
How an AI function work
If a user asks a question we've got an AI function for, we instruct OpenAI to return a "function invocation". A function invocation for our AI chatbot looks as follows.
___
FUNCTION_INVOCATION[/modules/openai/workflows/workflows/web-search.hl]:
{
  "query": "Who is the World Champion in Chess",
  "max_tokens": 4000
}
___
If the AI function takes arguments, and the user has not specified values for these arguments, OpenAI will ask the user for values for these argument. You can see this process in the following screenshot.
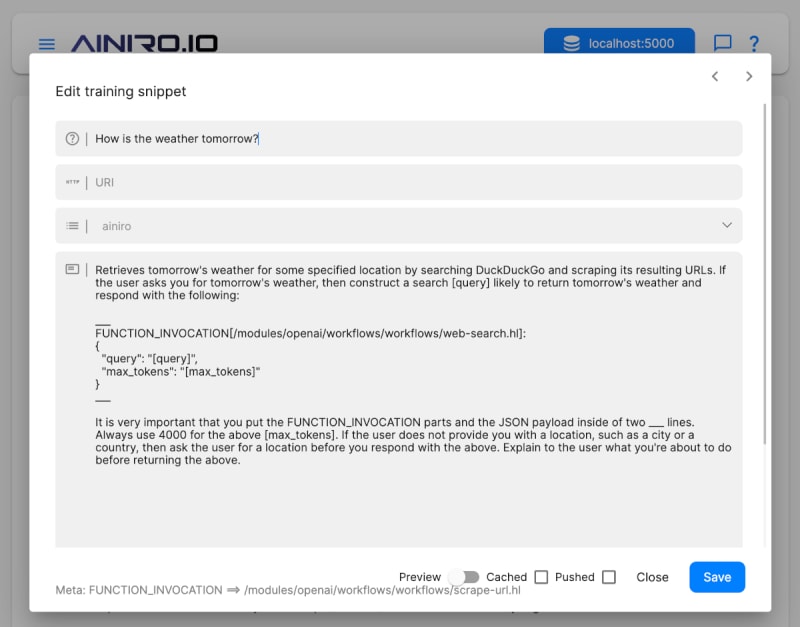
The whole training snippet for our weather logic looks like this.
Prompt
How is the weather tomorrow?
Completion
Retrieves the weather for some specified location by searching DuckDuckGo
and scraping its resulting URLs. If the user asks about the weather,
then construct a search [query] likely to return the weather and respond
with the following:

___
FUNCTION_INVOCATION[/modules/openai/workflows/workflows/web-search.hl]:
{
  "query": "[query]",
  "max_tokens": "[max_tokens]"
}
___

It is very important that you put the FUNCTION_INVOCATION parts and the JSON
payload inside of two ___ lines. Always use 4000 for the above [max_tokens].
If the user does not provide you with a location, such as a city or a country,
then ask the user for a location before you respond with the above. Explain to
the user what you're about to do before returning the above.
If you look carefully at the above screenshot, you will see how I didn't provide a location first, so the chatbot asks the user for a city or a country before it actually returns the function invocation.
When OpenAI returns, we check if it returned ___ (3 underscore characters), and if it did, we check if there are any function invocations in one of its sections. If there are function invocations, and these are declared on the specific type/model, we execute these functions, and invoke OpenAI afterwards with the result of the function invocation.
This allows us to have OpenAI dynamically assemble "code" that executes on your cloudlet, for then to transmit the result of executing the code bask to OpenAI again, and have it answer your original question. The last part is important to understand, since when an AI function is invoked, the backend actually invokes OpenAI twice. Once to generate the function invocation "code", and another time to answer the original question based upon whatever the function invocation returned.
The cloudlet again will transmit the result of the function invocation as JSON to OpenAI, allowing OpenAI to semantically inspect it, and answer the original query, using the function invocation's result as its primary source for information required to answer the question.
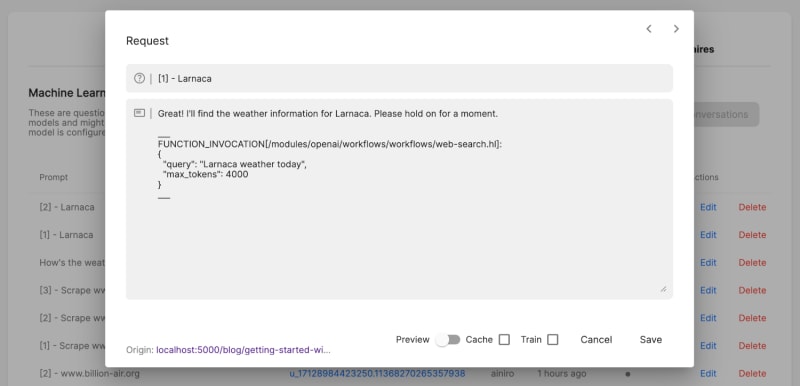
You can actually see this process in your History tab (starting from version 19.7.2, not yet released) by seeing you've got multiple requests for a single question, resembling the following.
- [1] - Larnaca
- [2] - Larnaca
The first history request above is when the user answers "Larnaca", and this invocation returns the function invocation. The second request is the result OpenAI generated based upon the JSON payload the function transmitted to OpenAI that was created by invoking the function. You can see how this should look like in your history tab in the following screenshot.
Notice - The above screenshot illustrates a feature not yet released, scheduled for being released next Sunday.
Since we are keeping up to a maximum of 15 session items while invoking OpenAI, this allows the user to ask follow up questions based upon the result of a function invocation, such as for instance "How is the UV index for tomorrow?"
How to declare an AI function
AI functions have to be declared on your type/model. This is a security feature, since without this, anyone could prompt engineer your chatbot, and have OpenAI return malicious functions, that somehow harms your system. There are 3 basic ways to declare functions on your type, these are as follows.
- Using the UI and clicking the "Add function" on your type while having selected the training data tab in your machine learning component
- Manually create a training snippet that contains a function declaration resembling the above training snippet
- Adding a system message rule to your type's configuration
Number 1 and 2 above are probably easily understood, and illustrated in the above example code for an AI function training snippet. However, it should resemble the following.
Adding AI Functions to your System Message
Having AI functions as training snippets is probably fine for most use cases. The above training snippet for instance will probably kick in on all related questions, such as ...
- How's the weather today?
- How is the weather going to be tomorrow?
- Check the weather in Oslo?
- Etc ...
However, for some "core AI functions", it might be better to add these as a part of your system instruction instead. Examples can be for instance "Search the web" or "Scrape a website", etc. These are "core" functions, and you might imagine the user asking questions such as.
- Search for Thomas Hansen Hyperlambda and create a 2 paragraph summary
The above might not necessarily be able to find a training snippet with a prompt of "Search the web", so it might be better to add such AI functions into your system message, as a core part of your chatbot's instructions. On our AI chatbot we have done this with the following rule added to our system message.
**How to search the web**

If the user asks you to search the web, then inform the user of what you
are about to do, and create a search query that is relevant to the user's
request, and do not return follow up questions, but instead end your
response with the following:

___
FUNCTION_INVOCATION[/modules/openai/workflows/workflows/web-search.hl]:
{
  "query": "[query]",
  "max_tokens": 4000
}
___

It is very important that you put the FUNCTION_INVOCATION parts and the
JSON payload inside of two ___ lines. If the user does not tell you what
to search for, then ask the user for what he or she wants to search for
and use as [query] before responding with the above.
To add the above as a part of your system message, just click your machine learning type's "Configuration" button, and make sure you add the above text at a fitting position into your chatbot's system message field. Below is a screenshot of how we did this for our search the web function.
Low-Code and No-Code AI functions
In addition to manually constructing AI functions, you can also use our No-Code and Low-Code parts to automatically add AI functions to your type.
- Click training data
- Filter on the type you want to add a function to
- Click "Add function"
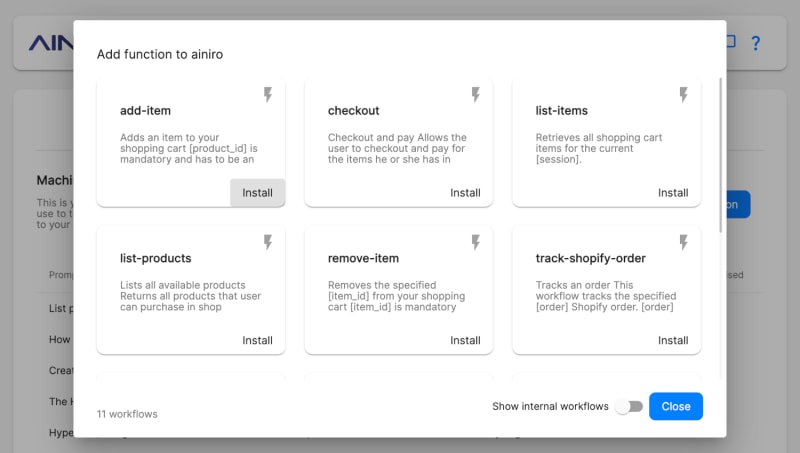
This brings up a form resembling the following.
These are pre-defined AI functions, and what functions you've got in your cloudlet depends upon what plugins you've installed. However, the core of Magic has a list of basic AI functions, such as the ability to sending the owner of the cloudlet an email, etc.
If you need more AI functions, check out your "Plugins", and install whatever plugin happens to solve your need for AI functions. Notice, documenting AI functions in plugins could be improved. If you're looking for a specific AI function, you can send me an email, and I will show you which plugin you need, and/or create a new AI function for you that solves your problem.
Creating your own AI functions
In addition to the above, you can also create your own AI functions using Hyperlambda workflows. A Hyperlambda workflow is basically the ability to dynamically create Hyperlambda code, without having to manually write code, using Low-Code and No-Code constructs. You can manually write code, and add to your workflow, but coding is optional.
Creating a Hyperlambda Workflow is outside of the scope of this article, but as long as you put your Hyperlambda file inside a module folder named "workflows", the above "Add function to type/model" dialogue will allow the user to automatically install your AI function into a type/model. If you want to know more about Hyperlambda workflows you can check out the following tutorial.
Notice, when you create your Hyperlambda workflows you need to think. Because by default any anonymous user can execute the workflow's code on your cloudlet, so you need to make sure the user is not allowed to execute code that somehow might be maliciously constructed by prompt engineering your chatbot. The above is a really great example of how to create a workflow, but it's also a terrible example of an AI function, since allowing people to register in your AI chatbot, is probably not a good idea - At least not the way it's implemented in the above tutorial.
Prompt Engineering and AI is the Real No-Code Revolution
Most of the work related to creating AI functions is in fact prompt engineering and not coding. This allows you to leverage your prompt engineering skills to construct really complex functionality, arguably replacing your coding abilities with your prompt engineering skills.
In the future I anticipate that 90% of the work related to AI functions, and creative use cases, will not originate from software developers, but rather from prompt engineers and No-Code devs, that are able to intelligently assemble and combine pre-defined functions together, to solve complex problems, without having to code.
However, to facilitate for this revolution, we (devs) need to create basic building block functions, that No-Code devs can assemble together, without having to code. This allows No-Code devs to prompt engineer our basic building blocks together, creating fascinating results with complex functionality. Below is an example of how prompt engineering can be used inside of the chatbot itself, to create "complex functionality", leveraging AI to generate some result.
The above is probably an example that is within reach of 90% of the world's "citizens" to understand, arguably becoming the "democratisation of software development", which again of course is the big mantra of the No-Code movement.
The No-Code revolution isn't about No-Code, it's about AI and prompt engineering
Wrapping up
I haven't had this much fun since I was 8 years old. AI functions is the by far coolest thing I've worked on for a very, very, very long time. By intelligently combining AI functions together, we can basically completely eliminate the need for a UI, having the AI chatbot completely replace the UI of at least in theory any application you've used so far in your life.
Then later as we add the Whisper API on top of our AI chatbot, you're basically left with "an AI app" you can speak to, through an ear piece, completely eliminating the need for a screen.
AI functions is something we take very seriously at AINIRO, and definitely one of our key focal areas in the future - Due to the capacity these have for basically becoming a "computer revolution", where your primary interface for interacting with your comnputer becomes your voice, and/or natural language.
In addition, our AI functions feature also makes "software development" much more available for the masses, including those with no prior coding skills - So it becomes a golden opportunity for software developers and No-Coders to collaboratively work together, to create complex functionality, solving real world problems, while democratising software development for the masses.
To put the last statement into perspective, realise that roughly 0.3% of the world's population can create software, while probably 95% of the world's population can prompt engineer, and apply basic logic to an AI chatbot, creating beautiful software solutions in the process. Hence ...
The No-Code Revolution is AI and prompt engineering, and we're in the middle of it all ... 😊


Top comments (0)