
This release kicked off this week in time for re:Invent and I put together a quick write up. Any questions, feel free to ping me via my contact form or better yet, just pop a question at me via the Twitters @Adron.
Authenticator

The new authenticator is a component that adds a full authentication flow for your app with coordinated boilerplate. This covers vue.js, angular, and react frameworks. The component has a customizable UI (as you'd expect), includes social logins for Google, Facebook, Apple, and Amazon. The initial setup is zero-configuration, and does have password manager support, along with show/hide confirm password forms.
The zero configuration works based on your Amplify CLI setup. To use this component grab the latest version of Amplify 6.4.0.
npm
npm install -g @aws-amplify/cli@latest
yarn
yarn global add @aws-amplify/cli@latest
Once that runs it will update your aws-exports.js with the latest backend configuration for the Authenticator. So, zero configuration you have to add, but there's configuration back there if you need to or want to dig in.
There is then an initial state for the component that sets a user up for sign in, sign up, or resetting their password. You might start with some code to get the component in your page like this.
export default function App() {
  return (
    <Authenticator>
      {({ signOut, user }) => (
        <main>
          <h1>Hello {user.username}</h1>
          <button onClick={signOut}>Sign out</button>
        </main>
      )}
    </Authenticator>
  );
}
Then to set the initial state add the following parameter.
export default function App() {
  return (
    <Authenticator initialState="signUp">
      {({ signOut, user }) => (
        <main>
          <h1>Hello {user.username}</h1>
          <button onClick={signOut}>Sign out</button>
        </main>
      )}
    </Authenticator>
  );
}
Setting many of the other options to your needs includes adding additional parameters to the Authenticator component like;
Social providers
export default function App() {
  return (
    <Authenticator socialProviders={['amazon', 'apple', 'facebook', 'google']}>
      {({ signOut, user }) => (
        <main>
          <h1>Hello {user.username}</h1>
          <button onClick={signOut}>Sign out</button>
        </main>
      )}
    </Authenticator>
  );
}
Sign up attributes
export default function App() {
  return (
    <Authenticator signUpAttributes={[]}>
      {({ signOut, user }) => (
        <main>
          <h1>Hello {user.username}</h1>
          <button onClick={signOut}>Sign out</button>
        </main>
      )}
    </Authenticator>
  );
}
Login mechanisms
export default function App() {
  return (
    <Authenticator loginMechanisms={['username']}>
      {({ signOut, user }) => (
        <main>
          <h1>Hello {user.username}</h1>
          <button onClick={signOut}>Sign out</button>
        </main>
      )}
    </Authenticator>
  );
}
There are lots of other features too, give the docs a quick read for the full details. For more details on the overall authentication worflow check out these docs.
In-App Messaging

This library is, sadly for my vue.js app, only available for react native. A quick install will get you started.
npm install -E aws-amplify@in-app-messaging aws-amplify-react-native@in-app-messaging amazon-cognito-identity-js @react-native-community/netinfo @react-native-async-storage/async-storage @react-native-picker/picker react-native-get-random-values react-native-url-polyfill
Then install pod dependencies for iOS.
pod install
An example looks like this.
import 'react-native-get-random-values';
import 'react-native-url-polyfill/auto';

import { AppRegistry } from 'react-native';
import App from './App';
import { name as appName } from './app.json';

AppRegistry.registerComponent(appName, () => App);
Then import the awsconfig vis aws.exports.js.
import Amplify from 'aws-amplify';
import awsconfig from './src/aws-exports';

Amplify.configure(awsconfig);
Then integrate the Amplify React Native UI component if your app's root component.
import {
  InAppMessagingProvider,
  InAppMessageDisplay
} from 'aws-amplify-react-native';

const App = () => (
  <InAppMessagingProvider>
    {/* Your application */}
    <InAppMessageDisplay />
  </InAppMessagingProvider>
);
re: from the docs, here's an app.jsx example.
import React, { useEffect } from 'react';
import { SafeAreaView, Button } from 'react-native';
import { Analytics, Notifications } from 'aws-amplify';
import {
  InAppMessagingProvider,
  InAppMessageDisplay
} from 'aws-amplify-react-native';

const { InAppMessaging } = Notifications;

// To display your in-app message, make sure this event name matches one you created
// in an In-App Messaging campaign!
const myFirstEvent = { name: 'my_first_event' };

const App = () => {
  useEffect(() => {
    // Messages from your campaigns need to be synced from the backend before they
    // can be displayed. You can trigger this anywhere in your app. Here we are
    // syncing just once when this component (your app) renders for the first time.
    InAppMessaging.syncMessages();
  }, []);

  return (
    <SafeAreaView>
      <InAppMessagingProvider>
        {/* This button has an example of an analytics event triggering the in-app message. */}
        <Button
          onPress={() => {
            Analytics.record(myFirstEvent);
          }}
          title="Record Analytics Event"
        />

        {/* This button has an example of an In-app Messaging event triggering the in-app message.*/}
        <Button
          onPress={() => {
            InAppMessaging.dispatchEvent(myFirstEvent);
          }}
          title="Send In-App Messaging Event"
        />

        <InAppMessageDisplay />
      </InAppMessagingProvider>
    </SafeAreaView>
  );
};

export default App;

Custom Resources w/ AWS CDK or Cloudformation
René (@renebrandel) wrote a blog post on extending the Amplify backend with custom AWS resources using AWS CDK or CloudFormation. The post is avilable here but I'll give you a quick summary.
The new CLI comand amplify add custom will get almost any of the AWS services added to an Amplify backend. The core tech here is backed with AWS Cloud Development Kit (CDK) or CloudFormation. For example if you want to pull in AWS SNS as custom resource, this is a very quick and concise way to do just that.
Again, check out René's post to really get into it and check out some of the possibilities.
Overriding Amplify Backend Resources with CDK
Amplify sets up various capabilities out of the box in many situations such as project-level IAM roles, Cognito Auth, or S3 resources. As with the previous section, this one I'll keep short as René (@renebrandel) has wrote a great blog post about this capability too titled "Override Amplify-generated backend resources using CDK". If you're interesting in nixing (overriding) any of these features and using another choice, this is your go to.
Prototype a Fullstack App without an AWS Account
Not specifically related to the release, this capability that Christian Nwamba AKA Codebeast wrote up in a blog post will show you how to do just that. The docs focused around what he details in the post are avilable here.
GraphQL Transformer v2
This I saved for last, it's in my wheelhouse after all. Some of the features of the new v2 drop include; deny-by-default auth, lambda authorizor, customizable pipeline resolvers, and OpenSearch aggregations and use-scoped queries. The accomplished blogger, as mentioned in this very blog post, blogging legend René continues with "AWS Amplify announces the new GraphQL Transformer v2. More feature-rich, flexible, and extensible.".
The first thing René brings up in the post is more explicit data modeling. I've stolen two of the screen shots from that post as examples and motivation to click through and check out the post. But I'll also elaborate.

With the new explicit data modeling options, we've got @primaryKey and @index added as directoves to configure primary and secondary indexes from schema for your Dynamo Database. The directives in AppSync GraphQL really makes for a powerful schema definition capability to push via code first or to map from database to GraphQL scehma.
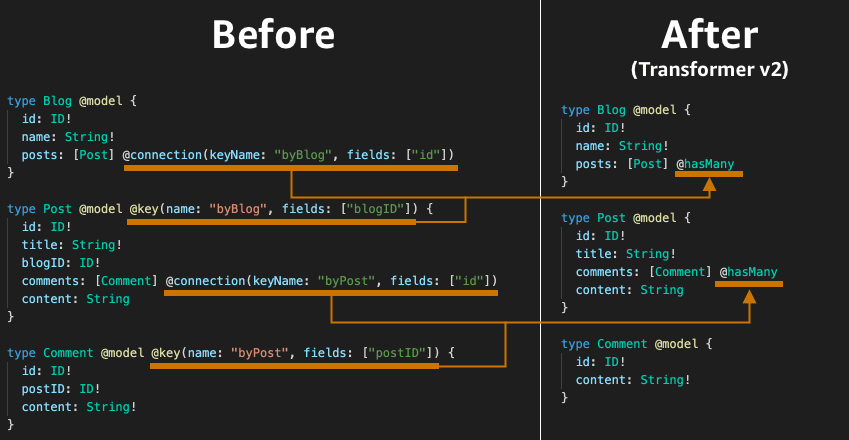
The other part that is hugely important is the ability in schema to draw relationships that add referential integrity to your schema and the inherent data. There are now @hasOne, @hasMany, @belongsTo, and @manyToMany directives. I'm really looking forward to some data schema and modeling build outs in the near future. I'll be sure to put together some tutorials and content detailing some of the design considerations and where and how to get all the schema hacks working best for your particular app data builds.
Thanks & Curated Follows
That's it for this post. I'm always endeavoring to bring interesting tech and blog about it, but another way to get the quickest updates, links, details, and information about these releases is to follow the following people in the Twittersphere. They're all in the cohort I run with at AWS with the Amplify team. I owe thanks to each for helping me find the following information and details included in this blog entry.

Top comments (0)