How to create a GitHub open source repo recommendation system web app with MLflow, Sagemaker, and Booklet.ai.
TL;DR: We built a COVID-19 Project Recommendation System to help people discover open source projects in the community. Read on to see how we built it.
I’ve been so inspired by how much the open-source community has contributed during the COVID-19 pandemic. GitHub recently published a dataset of over 36K (!!) open-sourced repos where folks have contributed their time and code towards the community.
As I was browsing the list of projects available, I was overwhelmed by the passion that developers, data scientists, and other technical communities have poured into projects around the world. From an app to track symptoms to extensive analysis on existing datasets, the long list of projects is truly inspiring.
I found myself (virtually) discussing with friends about how we can contribute to these efforts. As we discussed building an analysis or tracking app, we realized it would be more impactful to contribute to COVID-19 open source efforts that are already underway. This led me to the idea of helping people find these great projects that are relevant to their skill sets, as easily as possible.
Given the sheer volume, finding a project to contribute to can prove challenging. There is such a wide range of projects, covering many different languages and topics. To make this easier, we built a recommendation system. Given a set of languages and keywords that you are interested in, you can find a few projects that may be relevant to your input. You can try out the COVID-19 Project Recommendation System, or read along to see how it was built! You can also access the full notebook for this project on GitHub.

You may find some similarities between this demo and an end-to-end lead scoring example that I posted. If you read that blog post as well, thank you! Feel free to skip the sections that you have already covered.
Disclaimer: I am one of the co-founders of Booklet.ai, which is a free tool used as part of this demo.
Prerequisites
This will be a technical tutorial that requires a bit of coding and data science understanding to get through. To get the most out of this, you should have at least a bit of exposure to:
- Python (we will stay within Jupyter notebooks the whole time)
- Natural Language Processing (we will use a simple CountVectorizer)
- The command line (yes, it can be scary, but we just use a few simple commands)
- AWS (we will help you out on this one!)
Also, you should have a few things installed to make sure you can move quickly through the tutorial:
An AWS username with access through awscli (we will cover this below!)
Python 3 of some kind with a few packages:
- Pandas pip install pandas
- MLflow pip install mlflow
- SKlearn pip install scikit-learn
- NLTK pip install nltk
- Docker (quick and easy to install here)
Before we begin…
We’re going to touch on a variety of tools and ideas. Before we dive right in, it’s important to take a step back to understand what’s happening here. There are a few tools that we will be using:
- Jupyter Notebook: A common way to code with Python for Data Scientists. Allows you to run python scripts in the form of a notebook and get results in-line.
- MLflow: An open source model management system.
- Sagemaker: A full-stack machine learning platform from AWS.
- Booklet.ai: A model web app builder.
Here is a diagram that outlines how these different tools are used:

We will utilize Python within a Jupyter notebook to clean the Github data and train a model. Next, we will send that model to MLflow to keep track of the model version. Then, we will send both a docker container and the model into AWS Sagemaker to deploy the model. Finally, we will use Booklet to present a demo for the model.
Let’s dive in!
Python: Training the Model
About the Data
We are utilizing the dataset from the covid-19-repo-data repo on Github. It contains 36,000+ open source projects that are related to Covid-19, as well as metadata associated with each. To learn more about the dataset, check out the data dictionary.
Importing and Cleaning the Data
First, you’ll need to clone the GitHub repo to pull the data onto your machine:
git clone https://github.com/github/covid-19-repo-data.git
After pulling the most recent data file into your working directory, you’ll want to import the tsv (tab seperated values) using pandas:
There are a large variety of projects listed within the GitHub dataset, but we want to find projects that are most likely to benefit from having additional contributors. To do that, we are going to setup a few filters:
- It must have at least one merged PR
- It must have both a ReadMe and a Description
- It must have a primary language name listed (repos that are mostly text, such as a list of articles, might not have a programming language listed)
- It must have at least 2 distinct contributors
Here’s how we can apply those filters with pandas:
We plan to use a text-based approach to recommending projects, utilizing a combination of the repo description, topics, and primary language as our core bag-of-words. In order to simplify our text processing, we are going to remove punctuation and limit to only english-speaking repo descriptions (more languages might be added later!). To do this, we will need to:
- First, detect the language using the langdetect package and limit to only english-detected descriptions.
- Next, we will check for descriptions that only contain latin characters. Before we do this, we will need to turn emojis into strings using the emoji package (emoji’s aren’t latin?). We will use this to exclude descriptions that don’t have only-latin characters as a backup to the langdetect method above.
- Finally, we will remove punctuation from the repo description, topics, and primary language, and then combine all of those into space separated string.
To do the tasks above, we will setup a few helper functions that will be applied to the text within the dataset:
Next, we will use these functions to work through the clean-up and filtering:
After running all of these filters above, we now have about 1400 projects to recommend. Much smaller than our original set, but hopefully still enough to help users discover interesting projects that can be contributed to.
Building and Running the Vectorizer
As we discussed, we will recommend projects based on a bag-of-words consisting of the description, topics, and primary language. We need to take this large string of words, and turn it into a form that can be used for a recommendation algorithm. To do this, we will create a Vectorizer (also called a Tokenizer) that turned our strings into a sparse vector indicating which words are present in the string.
To keep things simple, we will use sklearn’s CountVectorizer. Before we run the vectorizer, there are a few important inputs to discuss:
Lemmatizing is the process of taking multiple forms of a single word and converting them into a single “lemma” of the word. For example, ‘case’ and ‘cases’ will both be converted to ‘case’. This is important to reduce the noise and sheer number of words considered when creating the vector. Here we create a LemmaTokenizer class using the WordNetLemmatizer() from the nltk package:
Stop words are a list of words that we will remove before creating the vector. These are words that aren’t directly adding value to our recommendation, such as “us”, “the”, etc. Sklearn has a nice pre-built list of stop words that we can use. Also, we’ll remove words that are very common among our use-case and won’t differentiate between projects, such as “covid19” or “pandemic”. Here we combine the pre-built list with our hand-curated list specific to this dataset:
Now we can build the vectorizer and run it on our list of projects. This created a large, sparse matrix which is vectorizing each bag-of-words in our dataset:
Building the Recommender
To recommend projects, we will take in a set of languages and keywords, turn that into a bag-of-words, and find the most similar repositories using their bag of words. First, we’ll let’s check out the code, and then we can break it down:
- First, we take the inputted text fields and turn them into a single bag-of-words.
- Next, we use the same vectorizer from before to transform that bag-of-words into a vector representing the text. It is important to us the same transformer from before, so that the vector will represent the same set of text as the rest of the repositories.
- Then, we use cosine_similarity to map the vector from our inputted string to the entire list of repositories. This allows us to understand how “similar” each individual repo’s bag-of-words is to our inputted bag of words. Here is a great article if you want to read more about cosine similarity!
- Finally, we take the top 10 most similar repositories and return it as a DataFrame.
To turn this recommendation function into a form that can be deployed (we’ll cover this more in a minute), we are going to utilize MLflow’s pyfunc class. We need to create a class that has all of the necessary inputs for our prediction, and then runs the prediction and returns the result in the correct format:
We can now test out our new class. We can create an object based on the class, with all of our inputs, and make sure the output populates as expected:
You should see a dictionary-formatted DataFrame — nice!
MLflow: Managing the Model
What is MLflow?
Before we go setting this up, let’s have a quick chat about MLflow. Officially, MLflow is “An open source platform for the machine learning lifecycle.” Databricks developed this open source project to help machine learning builders more easily manage and deploy machine learning models. Let’s break that down:
Managing models: While building an ML model, you will likely go through multiple iterations and test a variety of model types. It’s important to keep track of metadata about those tests as well as the model objects themselves. What if you discover an awesome model on your 2nd of 100 tries and want to go back to use that? MLflow has you covered!
Deploying models: In order to make a model accessible, you need to deploy the model. This means hosting your model as an API endpoint, so that it is easy to reference and score against your model in a standard way. There is a super long list of tools that deploy models for you. MLflow isn’t actually one of those tools. Instead, MLflow allows easy deployment of your managed model to a variety of different tools. It could be on your local machine, Microsoft Azure, or AWS Sagemaker. We will use Sagemaker in this tutorial.
Setting up MLflow
The MLflow tracking server is a nice UI and API that wraps around the important features. We will need to set this up before we can use MLflow to start managing and deploying models.
Make sure you have the MLflow package installed (check out the Pre-reqs if not!). From there, run the following command in your terminal:
mlflow ui
After this, you should see the shiny new UI running at http://localhost:5000/
If you run into issues getting this setup, check out the MLflow tracking server docs here. Also, if you’d prefer not to setup the tracking server on your own machine, Databricks offers a free hosted version as well.
Logging the model to MLflow
Since we already created the pyfunc class for our model, we can go ahead and push this model object to MLflow. To do that, we need to first point Python to our tracking server and then setup an experiment. An experiment is a collection of models inside of the MLflow tracking server.
Before we send the model object to MLflow, we need to setup the Anaconda environment that will be used when the model runs on Sagemaker. In this case, we need to utilize both the default Anaconda, as well as conda-forge. The reason for using conda-forgeis so that we can also download the nltk_data alongside our nltk package. Normally, you can download the data within the script, but in this case, we need to make sure that data is stored alongside the package for use when we deploy the model. More details on nltk_data can be found here. Also, for more information about Anaconda, here’s a detailed overview.
Now, we can go ahead and log the model to MLflow. We use this command to send the class that we created, as well as all of the inputs to that class. This ensures everything needed to run the model is all packaged up together.
Testing a Local Deployment
Before we move on to deployment, we’ll want to test deploying the model locally. This allows us to understand any errors that might pop up, before having to go through the process of actually creating the endpoint (which can take a while). Luckily, MLflow has a nice local emulator for Sagemaker: the mlflow sagemaker run-local command. We setup a little helper function so you can copy and paste the run-local script directly into your terminal:
Once you’ve run that in your terminal (it might take a minute), you can test the local endpoint to make sure it is operating as expected. First, we setup a function to easily call the endpoint, and then we pass in our DataFrame, in a JSON orientation:
You should see the same result as you did when you tested the class earlier on! If you run into an error, head over to your terminal and you should see the stack trace so you can debug.
Sagemaker: Deploying the Model
What is Sagemaker?
Sagemaker is a suite of tools that Amazon Web Services (AWS) created to support Machine Learning development and deployment. There’s a ton of tools available within Sagemaker (too many to list here) and we will be using their model deployment tool specifically. There are some great Sagemaker examples in their GitHub repo here.
Setting up Sagemaker
First things first, you need to get permissions worked out. AWS permissions are never simple, but we will try to keep this easy! You’ll need to setup two different settings: a user for yourself and a role for Sagemaker.
The first is a user account so that you can access AWS as you send the model to Sagemaker. To do this, you’ll need to head over to the Identity and Access Management (IAM) console and setup a user account with Administrator permissions. If your security team pushes back, “Sagemaker Full Access” should work too! At the end of the setup flow, you’ll be given an AWS Access Key ID and a AWS Secret Access Key. Make sure to save those! They are not accessible after that first time. Now, head to your terminal and type aws configure. This will prompt you to enter your AWS keys that you just collected. Once you have that setup, you’ll now have AWS access from both the terminal and from Python! Here are more details from AWS.
The second is a role (which is essentially a user account for services within AWS) for Sagemaker. To set this up, head to the roles section of IAM. You’ll want to assign this role to Sagemaker and then pick the policy called “SagemakerFullAccess.” At the end of this process, you’ll get something called an ARN for this role! We’ll need this for deployment so keep this handy. More details from AWS here.
Finally, we need to push an MLflow docker container into AWS. Assuming you have the permissions setup correctly above and docker installed (see prerequisites section for docker setup), you’ll want to run the following command in your terminal:
mlflow sagemaker build-and-push-container
This will push a docker container into AWS, which will be used during deployment.
Deploying to Sagemaker
Now that we have everything setup, it’s time to push our model to Sagemaker!
The deploy function usually takes a 5 to 10 minutes to complete and the status is checked every so often with this function until completion. Once the deployment is complete, you’ll be able to find a model listed in the Sagemaker UI.
Booklet.ai: Turn the Model into a Web App
Woot woot, your model is deployed! Our next step is to make sure the recommendations can be accessed by anyone, easily. We want anyone to be able to select preferred languages and keywords and then see a few recommended repos. There are a few options on how to move forward from here:
- You can share the code to invoke your model directly. This requires the user to spin up a python environment and invoke the model directly in Sagemaker utilizing properly configured credentials. Here is a tutorial.
- You can also create a custom web app that creates an interface to interact with your model, using something like Flask. Here is a tutorial for that method.
At this point, we were anxious to get the model in the hands of users as fast as possible. We created Booklet.ai to make this last step of building a web app quick and easy.
What is Booklet.ai?
Booklet creates a web app for your ML model without any code changes or extra libraries to install. Here’s an overview of how Booklet works:
- Grant Booklet.ai read-only access to a limited number of AWS Sagemaker actions.
- Choose the Sagemaker endpoints you’d like to integrate with Booklet in our UI.
- Booklet hosts a responsive web app that takes HTML form input, formats the data, invokes your Sagemaker endpoint, and displays the result within the web app. You can return the output as-is or use Nunjucks to format your output in any way you’d like.
Signup and Grant Access to Sagemaker
Booklet is free to use for your first ML Web App. Head over to the signup page to create an account.
You’ll also need to grant read-only access to a limited number of Sagemaker actions via an IAM role that is associated with our AWS account. Here are the steps:
- Create a new role in the AWS IAM Console.
- Select “Another AWS account” for the Role Type.
- Enter “256039543343” in the Account ID, field (this is the Booklet.ai AWS account id).
- Click the “Next: Permissions” button.
- Click the “Create Policy” button (opens a new window).
- Select the JSON tab. Copy and paste this JSON into the text area.
- Click “Review policy”.
- Name the policy “BookletAWSIntegrationPolicy”.
- Click “Create policy” and close the window.
- Back in the “Create role” window, refresh the list of policies and select the policy you just created.
- Click “Next: Review”.
- Give the role a name such as “BookletAWSIntegrationRole”. Click “Create Role”.
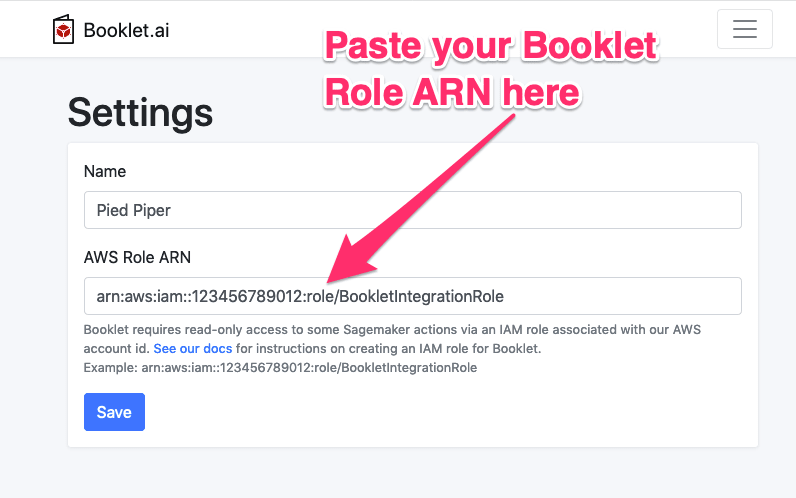
- Copy the Role ARN. It looks like something like “arn:aws:iam::123456789012:role/BookletIntegrationRole”.
With the AWS Role created and the ARN on your clipboard, we’re almost there. In the Booklet.ai settings, paste in the AWS Role ARN and click the “Save” button:
Create the Web App for your Model
Click the “New Model” button within Booklet.ai and choose the Sagemaker endpoint you’d like to wrap in a responsive web app. On this screen you can also configure a friendly model name for display and a description. We need to setup two quick configurations to get the demo ready:
Feature Schema: This configures the inputs that users will send to your ML model. In this case, we want to setup two different fields: one multi-select text field for Programming Language, and one multi-select text field for key words. You can see how we structured this below:
Post-Processing: This configures how the output should be displayed to the users. Booklet uses Nunjucks, a simple Javascript templating language, for this section. In the editing panel, you can reference the structure of the model results (populated from the defaults in the feature schema) and also see your edited output update in real-time.
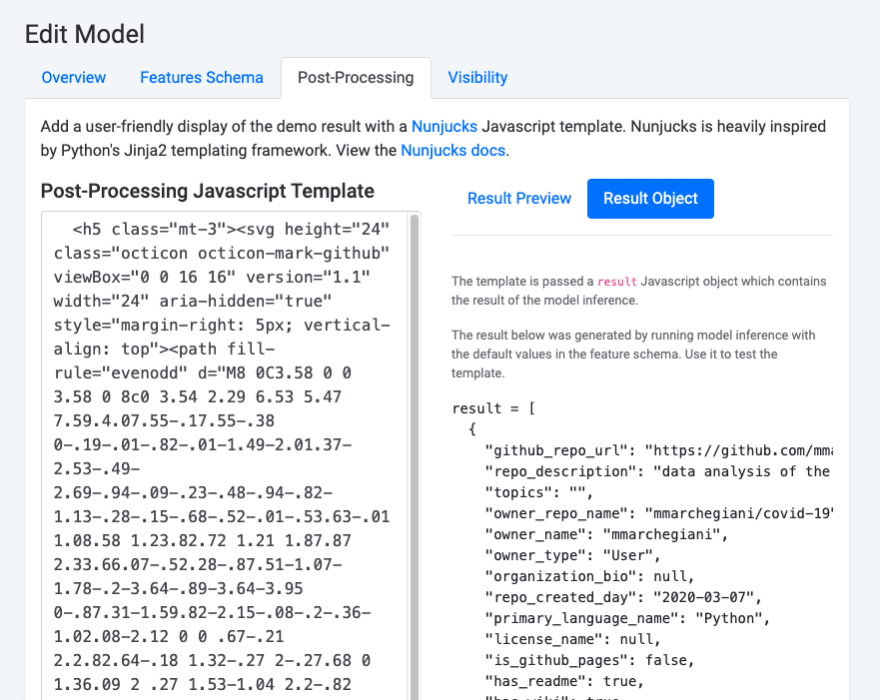
For this model, we want the results to look like a list of Github repos, so we’ve configured the Nunjucks template in that way:
Once you’ve filled out both of these configurations, go ahead and click “Update Model.”
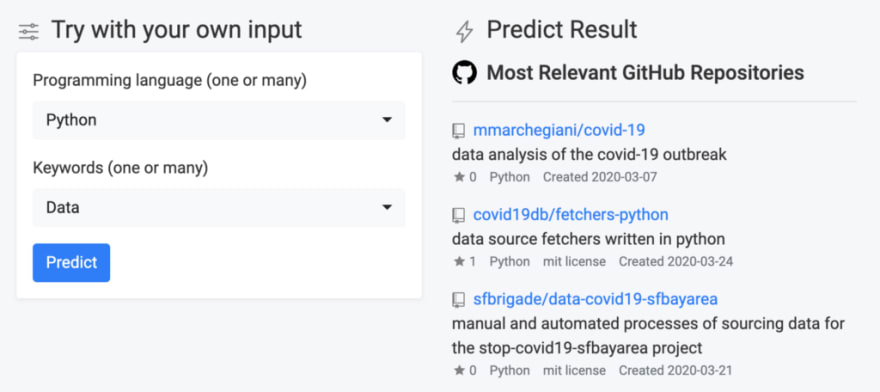
Create the Web App for your Model
Your web app is ready for use!
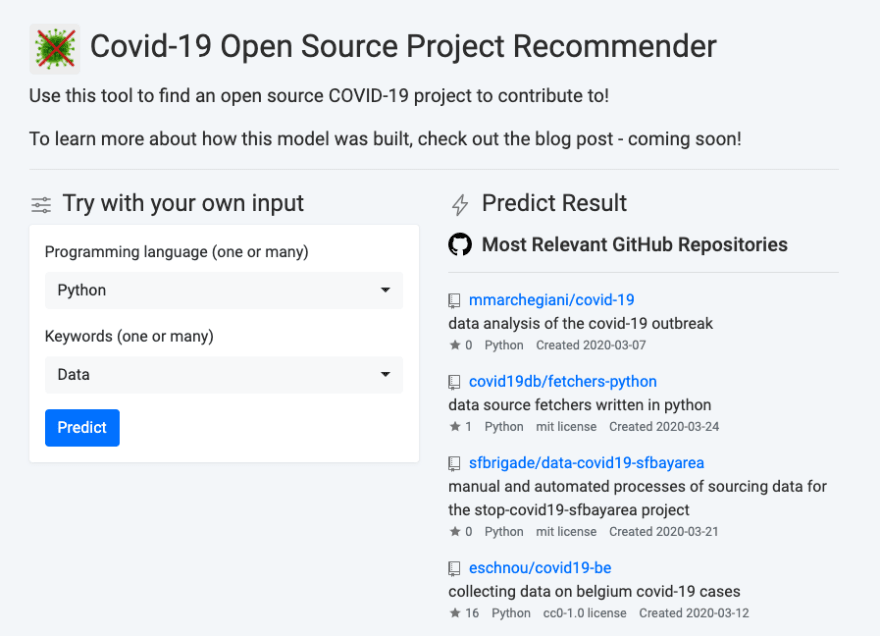
Right now, your model is only accessible to those that are within your org in Booklet. You can also make your model easy to share by heading back into settings and setting your model to public (alongside an easy-to-use URL) so that anyone can access your model.
Closing Thoughts
In this tutorial, you’ve learned how to go from a raw dataset in Github, all the way to a functioning web app. Thanks for following along! If you have any thoughts, questions, or run into issues as you follow along, please drop in a comment below. As a reminder, all of the code for this project can be found on GitHub.
Note from the editors: Towards Data Science is a Medium publication primarily based on the study of data science and machine learning. We are not health professionals or epidemiologists, and the opinions of this article should not be interpreted as professional advice. To learn more about the coronavirus pandemic, you can click [_here](https://www.who.int/emergencies/diseases/novel-coronavirus-2019/situation-reports)._

Top comments (0)