
In the previous article, we learned about creating a TestNG project in Eclipse and how to run our first ever Selenium Test Script. Now that you know how to run a TestNG project Eclipse, it is time to dig deeper into TestNG. So far, you’ve run only a single test script, but in practical scenarios, that simply won’t do. When it comes to Selenium test automation, running one test at a time will not be very beneficial. You will have to run multiple test cases to make the most of a Selenium Grid. In this tutorial, let’s dive deep into how we can execute multiple test files from a single file known as the TestNG XML file. We will also see how we can create and execute a parallel testing suite using a TestNG XML file.
In case you are late to the TestNG tutorial series, here’s a step-by-step guide to install TestNG in Eclipse.
What’s the purpose of a TestNG XML File?
The entire point of using a TestNG framework is to run tests in parallel, i.e. run multiple tests simultaneously. In Java, you have to create test cases separately and then define the test later in the primary method. On the other hand, TestNG allows you to create multiple test cases simultaneously, and that is where the TestNG XML file comes in. A TestNG XML file eases this task, and we can write various test cases all within single or multiple classes using annotations.
Uses of TestNG XML file:
- Seamless parallel execution
- Executing multiple test cases for various Java class files
- Group execution of test cases
- Supports Parameterisation in TestNG and data-driven testing
- Including or excluding a particular test method
- Includes names of class, folders, and methods
- Clearer test summary with separate HTML and extent reports
- TestNG listeners automatically create logs
Creating a TestNG XML File
Now that you understand how vital a TestNG XML file is for running parallel tests in a Selenium Grid, it is time to learn how to create a TestNG XML file. Before we begin, let us go back to the first test we created using TestNG in the previous article and perform the following steps. There are two methods to create a TestNG XML file, feel free to use either of them-
Method 1-
- Right-click on the project folder & towards the bottom of the list, select TestNG and then “Convert to TestNG.”

- A screen like below would appear. Click on Next.

- The next window that pops up will have the refactored source code, which would be applicable after you click Finish.

- A new addition to your project directory would be displayed named as testng.xml.

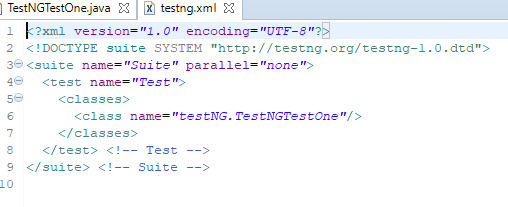
- Double click on testng.xml to open the xml file which looks like below-
Method 2-
- Right-click on Project, then New, and finally select File.

- Next, enter the following file name “testng.xml” and then click on Finish.

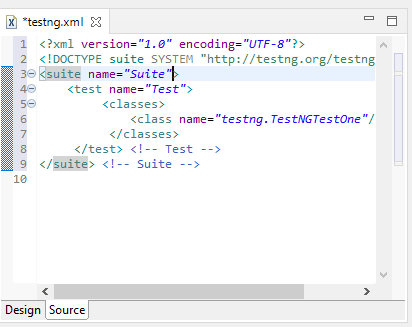
- In this step, you will have to enter the XML code manually. That is how the two methods differ from each other. After entering the XML code, you can select a name for your liking suite and class.
This is what a basic XML file looks like-
<?xml version="1.0" encoding="UTF-8"?>
<!DOCTYPE suite SYSTEM "http://testng.org/testng-1.0.dtd">
<suite name="Suite">
    <test name="Test">
         <classes>
             <class name="testng.TestNGTestOne"/>
          </classes>
     </test> <!-- Test -->
</suite> <!-- Suite -->
Now you can copy the above code (with your choice of names) on the TestNG XML file we’ve created above.
Voila! You have your very first TestNG XML file ready. That is all you have to do to create a TestNG XML file on a Selenium Grid or for Selenium test automation.
Running a TestNG XML File
The hierarchy of an XML file is quite straightforward. It goes something like this- first < suite > tag, second < test > tag and lastly, < classes > tag. As mentioned above, you can give any name to the suite and test tag, but you have to be careful while naming classes since it is a combination of the Package name and Test name.
Since suite is the topmost hierarchy, this is where multiple test classes can be placed. For example, we have three test classes, one for opening Google, another for searching on Google, and one to open Gmail. All these three classes can be defined under the same test tag for execution.
This example will help you understand it better.
Here, I have created two Java classes- one that opens up Google & verifies its title and another one which again opens Google & searches for a string.
First Class File-
package testNG;
import org.testng.annotations.Test;
import org.testng.annotations.BeforeMethod;
import org.openqa.selenium.WebDriver;
import org.openqa.selenium.chrome.ChromeDriver;
import org.testng.Assert;
import org.testng.annotations.AfterMethod;
public class TestNGTestOne {
    WebDriver driver;
  @Test
  public void f() {
      System.out.println("Start test");
    //Setting up the chrome driver exe, the second argument is the location where you have kept the driver in your system
      System.setProperty("webdriver.chrome.driver", "E:\\chromedriver.exe");
    //Setting the driver to chrome driver
      driver = new ChromeDriver();
      String url = "https://www.google.com";
      driver.get(url);
      //Capturing the title and validating if expected is equal to actual
      String expectedTitle = "Google";
      String actualTitle = driver.getTitle();
      Assert.assertEquals(actualTitle, expectedTitle);
  }
  @BeforeMethod
  public void beforeMethod() {
          System.out.println("Starting the browser session");
  }
   @AfterMethod
  public void afterMethod() {
      System.out.println("Closing the browser session");
      driver.quit();
  }
 }
Second Class File-
package testNG;
import org.openqa.selenium.By;
import org.openqa.selenium.Keys;
import org.openqa.selenium.WebDriver;
import org.openqa.selenium.WebElement;
import org.openqa.selenium.chrome.ChromeDriver;
import org.testng.annotations.AfterMethod;
import org.testng.annotations.BeforeMethod;
import org.testng.annotations.Test;
 public class TestNGTestTwo {
    WebDriver driver;
      @Test
      public void f() {
              System.out.println("Start test");
            //Setting up the chrome driver exe, the second argument is the location where you have kept the driver in your system
              System.setProperty("webdriver.chrome.driver", "E:\\chromedriver.exe");
            //Setting the driver to chrome driver
              driver = new ChromeDriver();
              String url = "https://www.google.com";
              driver.get(url);
              //Searching the values on google
              WebElement txtBox = driver.findElement(By.xpath("//input[@class='gLFyf gsfi']"));
              txtBox.sendKeys("Lambda Test");
              txtBox.sendKeys(Keys.ENTER);
              }
      @BeforeMethod
      public void beforeMethod() {
              System.out.println("Starting the browser session");
      }
      @AfterMethod
      public void afterMethod() {
              System.out.println("Closing the browser session");
              driver.quit();
      }
}
Next, we will create the TestNG XML file that uses both the above-defined test cases.
<?xml version="1.0" encoding="UTF-8"?>
<!DOCTYPE suite SYSTEM "http://testng.org/testng-1.0.dtd">
<suite name="Test Suite">
  <test name="Google Test">
    <classes>
    <class name="testNG.TestNGTestOne"/>
    <class name="testNG.TestNGTestTwo"/>
    </classes>
  </test> <!-- Test -->
</suite> <!-- Suite -->
In the XML above, you can see two class names are written under the test name tag. These are the classes that I would want to run using the TestNG XML file. Also, note that I named my test “Google Test” and suite “Test Suite” respectively. Go ahead and choose any name as per your convenience for these two.
The next step is to run the project using the XML file. Right-click on the testng.xml file and navigate to “Run As >> TestNG Suite.”

By doing this, you would not have to run the classes individually; instead, we will be executing both the classes by a simple click. The output after the execution would look like below-

You can see for yourself that the test classes mentioned in the XML ran successfully, and with it, you can now create your own test suite and run multiple tests all in one go and subsequently get the results.
Parallel Testing Using TestNG.XML File On Selenium Grid Cloud
Now that you have executed your TestNG.xml file successfully. It is pivotal to note the changes you need to make into the TestNG.xml for Selenium test automation over a cloud-based Grid. Because at the end of the day you want a more practical approach and configuring hundreds of browsers and operating systems in your nodes doesn’t look feasible enough.
You can leverage a cloud Selenium Grid such as LambdaTest which provides 2000+ real browsers and operating systems online. That way, you only need to focus on writing better Selenium automation scripts.
So let me show you how you can leverage testng.xml to run parallel testing with Selenium on LambdaTest.
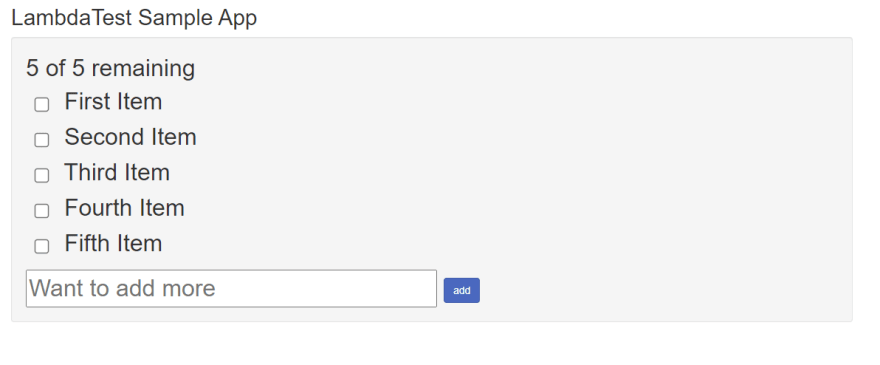
We will take a sample to-do application for the demo. The Selenium testing script will go to the Sample to-do application and click on the checkboxes to indicate the items are done and will add them to the list. After adding it would verify if the items are added.
Let us have a look at our Java test file.
import java.net.MalformedURLException;
import java.net.URL;

//TestNG Todo : Sample App
import org.openqa.selenium.By;
import org.openqa.selenium.JavascriptExecutor;
import org.openqa.selenium.remote.DesiredCapabilities;
import org.openqa.selenium.remote.RemoteWebDriver;
import org.testng.annotations.AfterTest;
import org.testng.annotations.BeforeTest;
import org.testng.annotations.Test;


public class TestNGToDo {
  public String username = "examplelambdatest";
  public String accesskey = "1234abcd9876";
  public RemoteWebDriver driver = null;
  public String gridURL = "@hub.lambdatest.com/wd/hub";
  boolean status = false;

  @BeforeTest
  @org.testng.annotations.Parameters(value={"browser","version","platform"})
  public void setUp(String browser, String version, String platform) throws Exception {
     DesiredCapabilities capabilities = new DesiredCapabilities();
      capabilities.setCapability("browserName", browser);
      capabilities.setCapability("version", version);
      capabilities.setCapability("platform", platform); // If this cap isn't specified, it will just get the any available one
      capabilities.setCapability("build", "LambdaTestSampleApp");
      capabilities.setCapability("name", "LambdaTestJavaSample");
      capabilities.setCapability("network", true); // To enable network logs
      capabilities.setCapability("visual", true); // To enable step by step screenshot
      capabilities.setCapability("video", true); // To enable video recording
      capabilities.setCapability("console", true); // To capture console logs
      try {
          driver = new RemoteWebDriver(new URL("https://" + username + ":" + accesskey + gridURL), capabilities);
      } catch (MalformedURLException e) {
          System.out.println("Invalid grid URL");
      } catch (Exception e) {
          System.out.println(e.getMessage());
      }
  }

  @Test
  public void testSimple() throws Exception {
     try {
            //Change it to production page
          driver.get("https://lambdatest.github.io/sample-todo-app/");

            //Let's mark done first two items in the list.
            driver.findElement(By.name("li1")).click();
          driver.findElement(By.name("li2")).click();

           // Let's add an item in the list.
            driver.findElement(By.id("sampletodotext")).sendKeys("Yey, Let's add it to list");
          driver.findElement(By.id("addbutton")).click();

            // Let's check whether the items we added are in the list.
          String enteredText = driver.findElementByXPath("/html/body/div/div/div/ul/li[6]/span").getText();
          if (enteredText.equals("Yey, Let's add it to list")) {
              status = true;
          }
      } catch (Exception e) {
          System.out.println(e.getMessage());
      }
  }


  @AfterTest
  public void tearDown() throws Exception {
     if (driver != null) {
          ((JavascriptExecutor) driver).executeScript("lambda-status=" + status);
          driver.quit();
      }
  }
}
To make your Selenium test script run over LambdaTest Selenium Grid, you will need to declare a few changes to the script. This would involve specifying your LambdaTest username, your LambdaTest access key and the HubURL in the remote webdriver, for routing your test script to LambdaTest Selenium Grid.
driver = new RemoteWebDriver(new URL("https://" + username + ":" + accesskey + gridURL), capabilities);
All of these details can be found on your LambdaTest automation dashboard.

By far I am sure you’ve realized the importance of using TestNG.xml for running scripts on cloud Selenium Grid. It is simple really, you don’t want to write down hundreds of test files to test the same scenario over hundreds of browser drivers. Which is why you will need a TestNG.xml file which will allow you to run a single test file over numerous combinations of parameters and values specified in it.
For this purpose, you invoked the Parameters annotations in TestNG. – @org.testng.annotations.Parameters(value={“browser”,”version”,”platform”})
Now you need to provide values to these parameters in your testng.xml file. Then you will be able to run a single test across several browsers, simultaneously.
//TestNG.xml
<?xml version="1.0" encoding="UTF-8"?>
<!DOCTYPE suite SYSTEM "http://testng.org/testng-1.0.dtd">
<suite thread-count="3" name="LambaTestSuite" parallel="tests">

  <test name="WIN8TEST">
  <parameter name="browser" value="firefox"/>
  <parameter name="version" value="62.0"/>
  <parameter name="platform" value="WIN8"/>
    <classes>
      <class name="LambdaTest.TestNGToDo"/>
    </classes>
  </test> <!-- Test -->

  <test name="WIN10TEST">
  <parameter name="browser" value="chrome"/>
  <parameter name="version" value="79.0"/>
  <parameter name="platform" value="WIN10"/>
    <classes>
      <class name="LambdaTest.TestNGToDo"/>
    </classes>
  </test> <!-- Test -->
  <test name="MACTEST">
  <parameter name="browser" value="safari"/>
  <parameter name="version" value="11.0"/>
  <parameter name="platform" value="macos 10.13"/>
    <classes>
      <class name="LambdaTest.TestNGToDo"/>
    </classes>
  </test> <!-- Test -->

</suite>
If you go to your LambdaTest platform now. You will notice that the same test has been triggered over multiple browsers + operating systems combinations. Just as we specified in our TestNG.xml file.
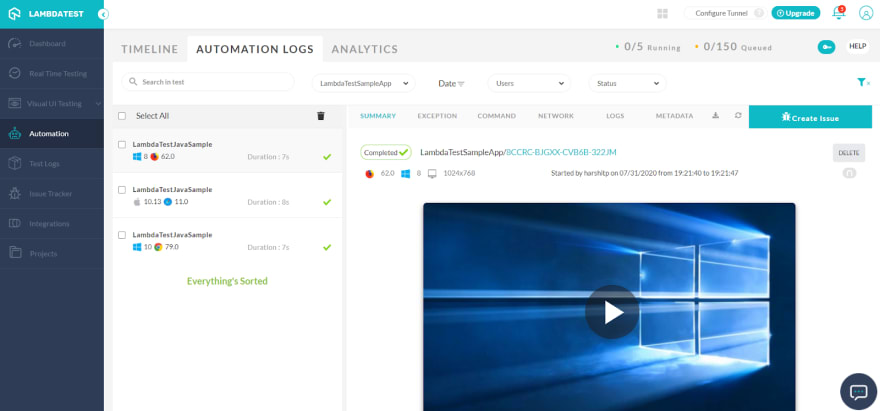
This is the reason why Parallel testing is one of the most in-demand features of Selenium test automation.
A Selenium Grid would really boost up your test build practices. Instead of creating new test cases for individual environments, you can leverage testng.xml to define those environments as parameters and simply run a test on various parameters.
Why break your back when you can run parallel tests on a Selenium Grid cloud?
LambdaTest provides a cloud Selenium Grid where you can run your Selenium test scripts over 2000+ real browsers in parallel.
In our upcoming posts, we will learn about TestNG reports and how we can use the different types provided by the framework. Stay tuned and Happy TestNG! 😉

Top comments (0)