
In the last article, we installed TestNG in Eclipse and did some environment set up for the same. Subsequently, we saw how we could convert our existing Java projects into TestNG projects in Eclipse. In this article, we will create a TestNG project from scratch and write our very first test script using TestNG. We will begin by setting up a TestNG project first and then move on to writing the scripts.
Before getting started, we will quickly list down the prerequisites for getting started with a TestNG project, so that you can continue without any hiccups. Here’s what you need to have installed in your system-
- Eclipse IDE
- Download Selenium WebDriver and Client for Java. – Visit the official website and hit the download button for Java file.
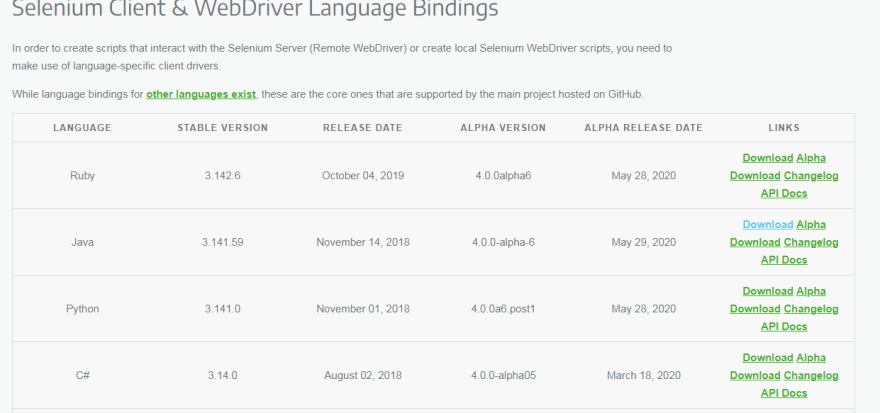
Download and extract these Selenium bindings. We will be using these to add External JAR files later in this Selenium TestNG tutorial.
Create TestNG Project In Eclipse
First of all, you will need to launch Eclipse and then follow the steps below to create a new TestNG project.
Step 1: Navigate to File > New > Java Project.

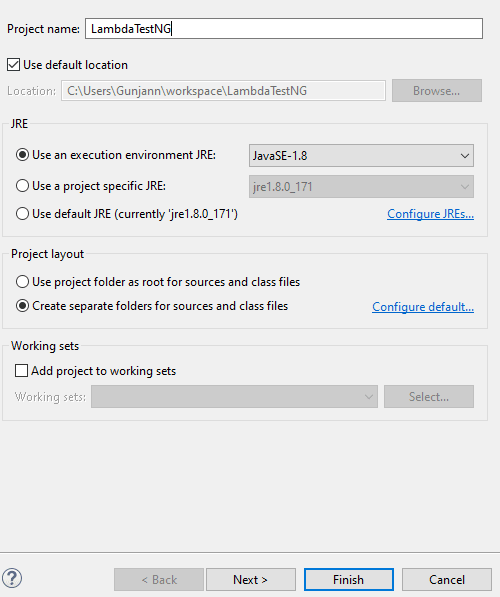
Step 2: Give your project a name for example, ‘ LambdaTestNG ’ and click on Next.
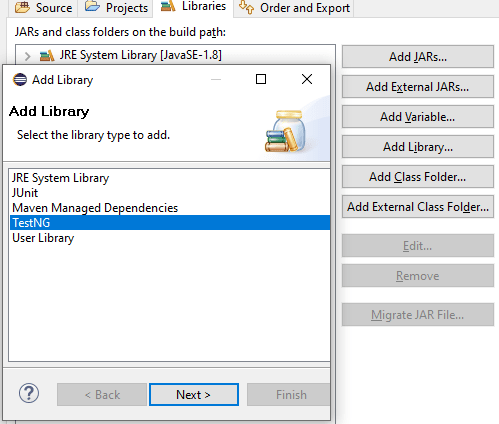
Step 3: On the next screen, you will see the Java settings for your new project. To make it a TestNG project just navigate to the Libraries tab and click on the Add Library button.

Step 4: Choose TestNG from the list of libraries and click Next.
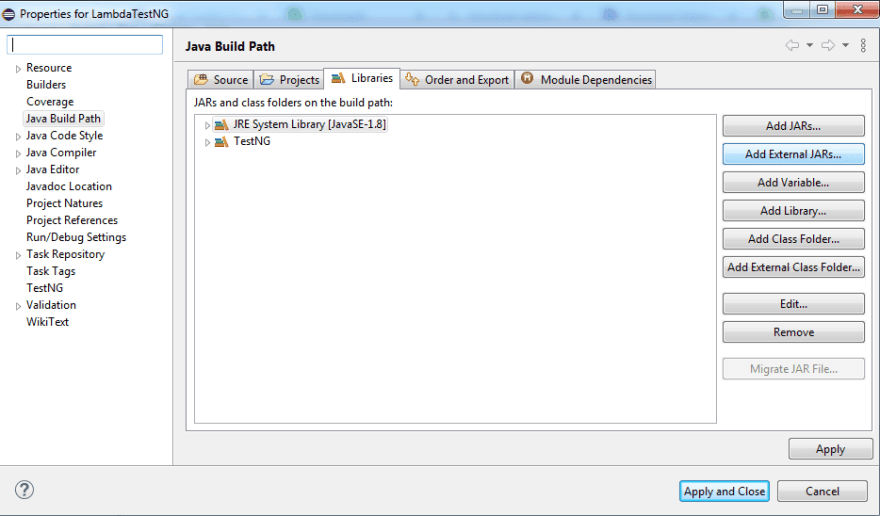
Step 5: Now, you will see TestNG added to your project libraries. Click on Finish and you are all set with your testNG project.

Your Java project has been created successfully and you will be able to see it by clicking on the Package Explorer button on the left panel.

Adding Selenium JAR files To Selenium TestNG Project
Step 1: Next, you need to add the Selenium API JAR files to your TestNG project “LambdaTestNG”. Right-click on the Project and then hit the Properties.
Step 2: Now, you need to perform JAR selection from the Selenium Java language bindings which you downloaded in your systems. Navigate or choose the path where you have downloaded the Selenium Java language bindings. Add all the JAR files (even the ones inside the libs folder).
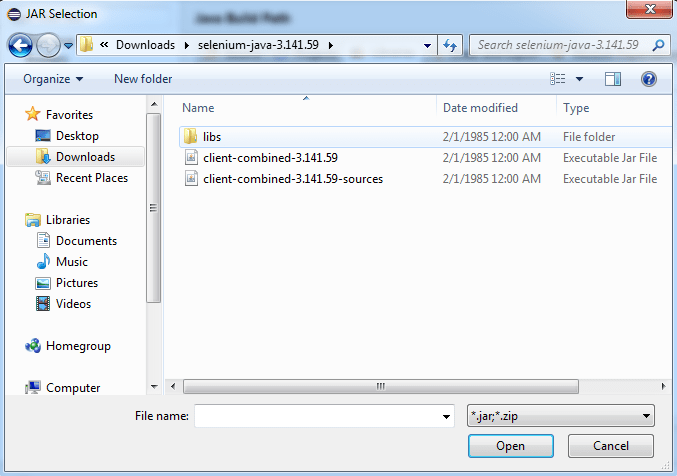
Step 3: After adding all JAR files, hit the button to Apply and Close.

Awesome, now you will notice a folder for Referenced Libraries in the project LambdaTestNG.

With these steps, your java project is now all set to execute TestNG, the only thing you will have to do is import the Selenium libraries and browser driver(make sure to use the driver compatible with your system browser version) to run Selenium code.
Creating a TestNG class in Eclipse
Creating a TestNG class is as easy as creating a Java class. All you need to do is follow the steps mentioned below and have your first testNG class ready.
Step 1: Navigate to src from the project folder and right-click the same. You will see TestNG as an option in the dropdown towards the bottom. Click on it and you will now see two sub-options to either create a TestNG class or convert the class to TestNG. As we are creating a new TestNG class, you need to select the first option.

Step 2: Generally, the source folder name is auto-filled but if it is not, you can simply browse through the same. Next, you can give any name to your class, for example, ‘ TestNGTestOne ’ and its package. For now, we will keep the basic annotations selected @BeforeMethod and @AfterMethod. However, Annotations can be configured at a later stage as well depending upon your test scenario. If you wish to configure them now, you can refer to the TestNG annotations tutorial.

Step 3: You will now see a class( TestNGTestOne.java ) in your project directory with default methods, viz f(), as well as beforeMethod() and afterMethod() that you can see were checked in the screenshot above.

You are now all set to write code in your first TestNG class, but before doing so let me quickly brief you about the TestNG annotations that we can see in the class we just created.
- @test annotation implies that the method is a test method and any code written under it constitutes to be a test case.
- @BeforeMethod implies that the method beneath should be running before the test method.
- @AfterMethod, just as the name suggests implies that the method should run after the test method.
Now we will write our first script using Selenium and TestNG.
Writing Our First Test Case Using Selenium and TestNG
Test Scenario: We will write a simple test script wherein we will just open up a browser, navigate to Google, verify the title, and then quit the browser session. You will see the utility of the @BeforeMethod and @AfterMethod annotations as well.
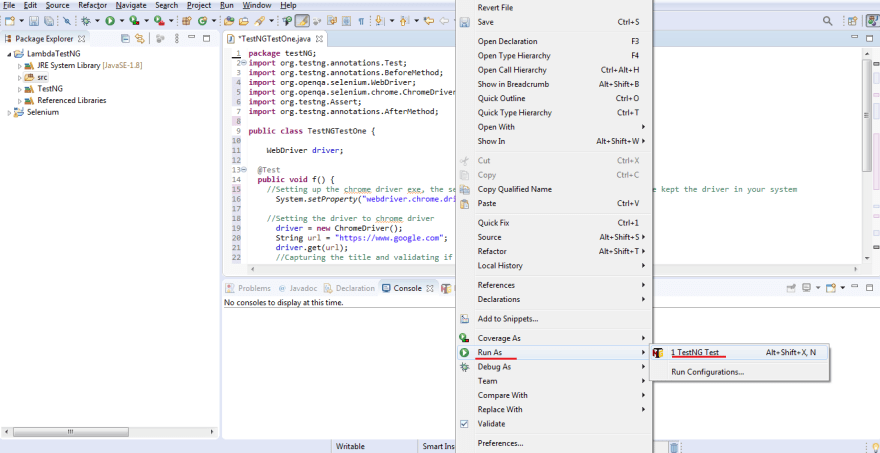
Here is the java test file “ TestNGTestOne.java ”.
package testNG;
import org.testng.annotations.Test;
import org.testng.annotations.BeforeMethod;
import org.openqa.selenium.WebDriver;
import org.openqa.selenium.chrome.ChromeDriver;
import org.testng.Assert;
import org.testng.annotations.AfterMethod;

public class TestNGTestOne {

    WebDriver driver;

  @Test
  public void f() {
    //Setting up the chrome driver exe, the second argument is the location where you have kept the driver in your system
      System.setProperty("webdriver.chrome.driver", "E:\\Softwares\\chromedriver.exe");

    //Setting the driver to chrome driver
      driver = new ChromeDriver();
      String url = "https://www.google.com";
      driver.get(url);
      //Capturing the title and validating if expected is equal to actual
      String expectedTitle = "Google";
      String actualTitle = driver.getTitle();
      Assert.assertEquals(actualTitle, expectedTitle);
    }
  @BeforeMethod
  public void beforeMethod() {
      System.out.println("Starting the browser session");
  }

  @AfterMethod
  public void afterMethod() {
      System.out.println("Closing the browser session");
      driver.quit();
  }
}
Running Selenium TestNG Script
Right-click on the test script and navigate to Run As >> TestNG Test.
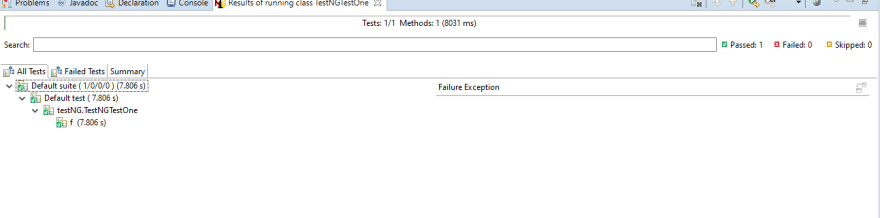
After running the test script, as shown above, you can verify the results of the test. This can be seen either on the TestNG reports or the console itself.
TestNG Reports and Results
As we mentioned above, once you have executed the test shown above you will be able to see its corresponding results either in the Eclipse Console or under TestNG reports under the test-output folder that gets created automatically as soon as you run your first test in the project directory.
Results through Console
You have two options to view your results via the eclipse console which are displayed as two tabs viz, Console and Results of running class < your class name >
Console–

TestNG Results–
Results through TestNG Reports
TestNG offers a rich space for detailed reports of your test scripts that are visible under the test-output folder. We shall discuss briefly it as it is a huge topic altogether. These reports can be seen here:

As you can see there are a number of different reports that can be seen and used for subsequent reporting. We shall discuss more about these reports in our upcoming posts. For now, you can go back to any website you like and practice creating a basic test script using the TestNG framework & cover up the basics as shown in this article. In the next post, we will jump on to understand more about the TestNG XML file.
Bonus Pointer: Use A Cloud Selenium Grid For Parallel Testing
Kudos on creating the TestNG project in Eclipse and running the Selenium TestNG script. Right now you have triggered the Selenium TestNG script using a Selenium WebDriver in your own machine but that isn’t a scalable approach. It’s okay if you’re a novice at Selenium testing. However, after some time your test suites are bound to get bigger as you may have to run automated browser testing over dozens or maybe hundreds of browsers + OS combinations.
Doing so with Selenium WebDriver can consume a lot of time and effort because the tests will be queued and executed one after another.
This is where you can leverage a Selenium Grid which can allow you to run these test cases in parallel. So read this Selenium Grid tutorial and fasttrack your Selenium testing experience like a pro!
If you’re already familiar with Selenium Grid and have it set up in your system, even then there are going to be scale issues. You will need to expand the Selenium Grid with new devices and browsers that would be launched in the market. And that would require a lot of investment in hardware and maintenance of your local Selenium Grid. Which is why it is recommended to use a cloud Selenium Grid like LambdaTest.
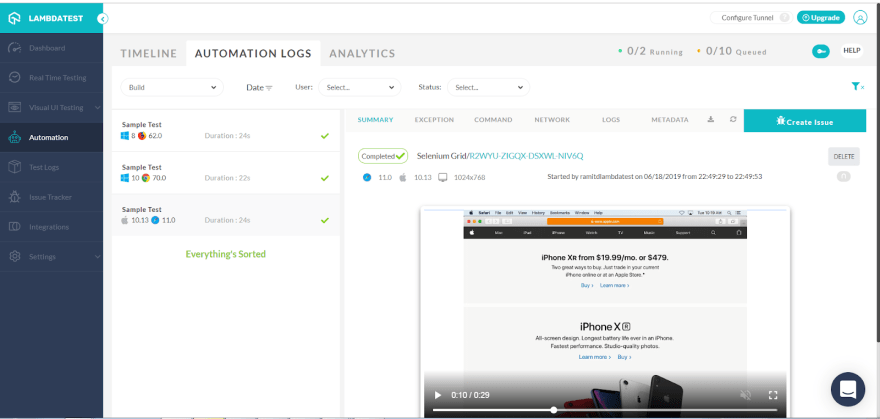
LambdaTest will help you trigger your Selenium test cases over 2000+ real browsers and operating systems. That way, you won’t even have to worry about which browsers are new in the market or maintaining your in-house Selenium infrastructure so you could focus on writing better Selenium testing scripts.
In order to run your same script on LambdaTest Selenium Grid, you will need to sign up with LambdaTest(Its FREE) and do a couple of changes to your project setup. Run your TestNG scripts on Selenium Grid Cloud. Happy Testing!

Top comments (0)