
venv is a package shipped with Python 3, which you can run using python3 -m venv (although for some reason some distros separate it out into a separate distro package, such as python3-venv on Ubuntu/Debian). It serves the same purpose as virtualenv, but only has a subset of its features see a comparison here. — source
What is the benefit of using wrapping your code into a virtual environment?
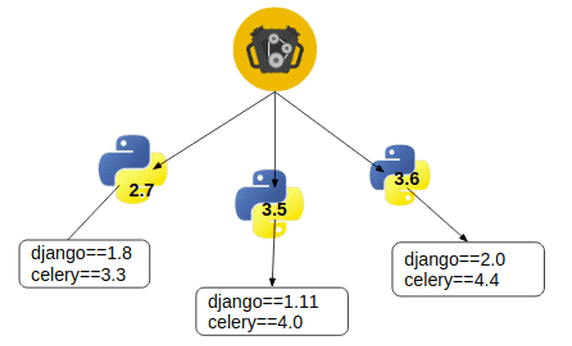
- it isolates the project-related libraries and it doesn’t access the globally installed libraries. We can think of it as if the project would live on its own island, isolated from the rest of the world, having its own little things going on 🌴
Creating aliases
Before we move on, let’s create some aliases for convenience of use.
If you type which python in terminal, it will print out the path for the python executable, which should be something like this /usr/local/bin/python3.
Then, open ~/.bashprofile you can type cat ~/.bashprofile to open it directly in terminal or use any other way suitable for you. And add there the following line:
alias python=”/usr/local/bin/python3”
Basically, we created an alias python for python3, and what it will do is each time you will be using python command it will be referring to python3, which I find neat. And, of course, you can skip this step if you want to.
Creating a virtual environment
Creation of virtual environments is done by executing the command venv:
In my case, I already had some script saved in folder in Desktop, so I wanted to sort wrap it in the venv.
➜ script git:(master) python -m venv /Users/user/Desktop/script
In the example above I refer to the script using the absolute path, however the relative path like ~/Desktop/script should also work.
Activating the virtual environment
To activate virtual environment type the following command:
➜ script git:(master) ✗ source /Users/user/Desktop/script/bin/activate
And let’s say we have a requirements.txt file, which specifies all the dependencies required to successfully running the python project, now all those dependencies/libraries will be installed and accessible only within this virtual environment.
Note
If you exit the terminal, next time you want to run your project you will need to source ~/.bashprofile AND re-enable the virtual environment (using activate command from above).
That’s all Folks! ☕


Top comments (2)
Yes, setting up aliases on your bash profile is neat.
I usually set up something like below for the project I am working on so that with one command it activates the venv and also opens up the project in my favorite editor sublime text. You can also have
code .if you use vs code.Hey Srikanth, thanks for the valuable tip, I appreciate it!