
Originally published on ScraperAPI.
eBay is one of the largest eCommerce platforms in the world. With over 1 billion active listings on its site, it is also one of the largest data gold mines for pricing analysis, online purchase trends, and more. However, before analyzing their data, you need to extract it.
Today, we’ll build an eBay web scraper using Node.JS and Cheerio and show you the step-by-step process behind it – from idea to execution.
Is It Legal to Scrape eBay?
Yes, scraping eBay is totally legal if you’re not accessing data behind login walls or personal data without consent.
There’s still a lot of discussion around the legality of web scraping, and the fact that there are so many conflicting interests makes it hard to find reliable information. However, as it is today, it all depends on the type of data you’re scraping, how you’re extracting it, and its end-use.
In this article and all our tutorials, we’ll only show you ethical web scraping processes, so you can be confident you can apply these strategies without repercussions.
It’s important to know and understand the legal nuances of web scraping, so we build a complete guide to ensure legal and ethical web scraping practices.
Now, let’s start coding, shall we?
Scrape eBay Product Data with Cheerio
If you’ve been following our tutorial series, by now, we’ve gone through the basics of web scraping in JavaScript and built a more complex LinkedIn scraper using a for loop and the network tab in chrome’s DevTools.
Note: You don’t need to read those first to understand this tutorial, but it might help to get a clearer picture of our thought process.
To build on top of that, we’ll create an async function to scrape the name, price, and link of 4k TVs on eBay and then export the data into a CSV using the Object-to-CSV package.
. Understanding eBay’s URL Structure
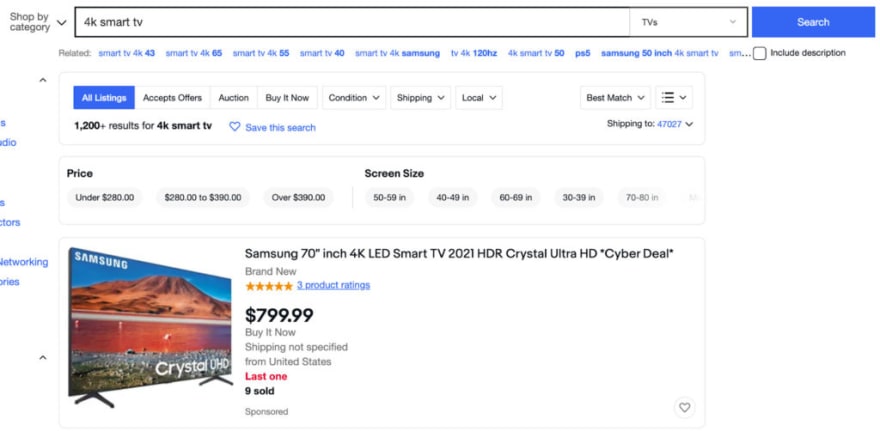
Let’s go to https://www.ebay.com/ and search for “4k smart tv” on the search bar to grab our initial URL.
It sends us to the following URL:
https://www.ebay.com/sch/i.html?_from=R40&_trksid=p2380057.m570.l1312&_nkw=4k+smart+tv&_sacat=0
If we were to scrape just this page, we could stop at this point and start writing our code. However, we want to see how it changes when moving through the pagination to understand how we can tell our script to do the same.
At first glance, it seems like the _sacat parameter stores the page number, so if we change it, it would be enough. Because eBay uses a numbered pagination, we can just click on the “Next” button and see how the URL changes.

Here’s the resulting URL:
https://www.ebay.com/sch/i.html?_from=R40&_nkw=4k+smart+tv&_sacat=0&_pgn=2
This is quite different from what we had before. So let’s go back and see if it returns to the previous version.
https://www.ebay.com/sch/i.html?_from=R40&_nkw=4k+smart+tv&_sacat=0&_pgn=1
No, it uses the “new” version of the URL when we use the pagination. This is great! All we need to do is change the _pgn parameter, and it will move to the next page. We confirmed this by just changing the number in the addressed bar.
Awesome, we’ll use this new version as our base URL for the HTTP request and later on to allow us to scrape every page in the series.
. Testing for JavaScript
Now that we have a consistent URL structure to work with, we need to test the website’s source code and make sure the data we want is available in the HTML and not injected through JavaScript – which would change our whole approach.
Of course, we already told you we were using Cheerio, so you know we’re not dealing with JavaScript, but here’s how you can test this for any website in the future.
Go to the page you want to scrape, right-click and click on “View Page Source”.

It will show you the site’s source code before any AJAX injection. We’ll copy the name and look for it in the Page Source for the test.

And next is the price.

We did the same with a few other products just to be sure, and we could find the element every time.
This step will tell us if we can go ahead and access the data using Axios and Cheerio or if we’ll need to use a tool like ScraperAPI’s JavaScript rendering to load the JS or a headless browser like Puppeteer.
3. Sending Our HTTP Request with Axios
The fun part begins! Let’s create a new folder for our project, open it on VScode (or your favorite editor) and start it with npm init -y to create the initial package.json file. From there, we can install Axios, a great and simple tool to send HTTP requests with Node.js, with npm install axios.
To send and test the request, let’s create a new file called index.js (original, we know), require Axios at the top, and create an async function. Inside it, we’ll send our request using Axios and store the response’s data inside a variable called html for clarity.
const axios = require('axios');
(async function () {
const response = await axios('https://www.ebay.com/sch/i.html?_from=R40&_nkw=4k+smart+tv&_sacat=0&_pgn=1');
const html = await response.data;
})();
Because we’re using async, we now have access to the await operator which is “used to wait for a Promise,” making it a great tool for web scraping, as our code will be more resilient.
Let’s console.log() the html variable to verify that our request is working:
console.log(html)

Ah yes! A bunch of nonsense, as expected.
. Parsing the Raw HTML with Cheerio
Before extracting our elements, we need to parse the raw data we downloaded to give it a structure we can navigate. That’s where Cheerio comes in!
We’ll create a new variable and pass html to cheerio using cheerio.load():
const $ = cheerio.load(html);
From there, let’s head back to the website to find our selectors.
Note: Don’t forget to install Cheerio with npm install cheerio before using it.
5. Picking the Right Selectors
The first thing we’re looking for is the element that contains all the data we’re looking for. So every product seems to be contained within a card, right?

We want to grab the element that contains all cards so we can then iterate through the list and extract the information we want (name, price, and URL – to refresh your memory).

This ul element wraps all product cards, so it is a great starting point to explore the HTML structure a little bit more.
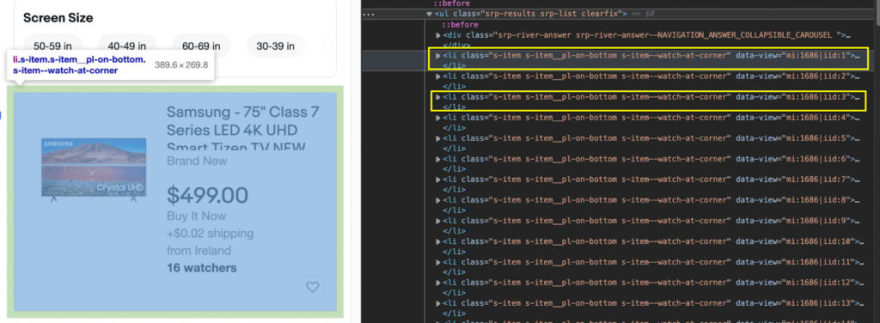
Like we thought, every product card is a li element within the ul. All we need to do is grab all the li elements and assign them to a variable, effectively creating an array we can then go through to extract the data.
For testing, let’s open the browser’s console and use the li element’s class and see what gets returned:

Unlike Python’s Scrapy, Cheerio doesn’t have a built-in shell for testing, but we can use the console to test the selectors without having to send a request every time. We did the same thing with the rest of the elements.
We’ll pick the only h3 tag inside of each element within the list for the name.

In the case of the price, it’s wrapped within a span element with the class “s-item__price.”

Lastly, for the URL we needed to do something a little different. Although the a tag had a class we could use, it was shared by other elements outside our list. Notice how it returned 64 nodes instead of 59, which is the correct number of li elements.

Technically it would still work for us because we’ll be telling our scraper to look for the element inside the list. However, just to be sure, we’ll be going up in the hierarchy and grabbing the div containing the URL and then moving down to the a tag itself like this: 'div.s-item__info.clearfix > a'.

6. Extracting eBay Data
So the logic would be like this:
// Pick all li elements
// Go through each element within the list and extract the:
// tvName, tvPrice, tvLink
Let’s put it all together now, as we already know the selectors:
const tvs = $('li.s-item.s-item__pl-on-bottom.s-item--watch-at-corner');
tvs.each((index, element) => {
   const tvName = $(element).find('h3')

   const tvPrice = $(element).find('span.s-item__price')

   const tvLink = $(element).find('div.s-item__info.clearfix > a')
})
However, we’re not done yet. We need to add a new method at the end of each string, otherwise, we’ll be getting the entire HTML information which isn’t what we want.
We want the text inside the element for the name and price, so all we need to do is add the text() method at the end. For the URL, we want the value stored inside the href attribute, so we use the attr() method and pass the attribute we want the value from.
const tvs = $('li.s-item.s-item__pl-on-bottom.s-item--watch-at-corner');
tvs.each((index, element) => {
   const tvName = $(element).find('h3').text()

   const tvPrice = $(element).find('span.s-item__price').text()

   const tvLink = $(element).find('div.s-item__info.clearfix > a').attr('href')
})
We could log each variable to the console but we would be getting a lot of messy data. Instead, let’s give it some structure before testing the scraper.
*7. Pushing the Extracted Data to an Empty Array *
This is actually quite an easy process that will help us to organize the data and making it ready to export.
First, we’ll create an empty array outside our function.
const scrapedTVs = [];
From inside the function, we can call this variable and use the push() method to add all elements to our empty array. We’ll add the following snippet of code inside tvs.each(), right after the tvLink variable:
  scrapedTVs.push({

       'productName': tvName,

       'productPrice': tvPrice,

       'productURL': tvLink,

   })
Run the test with a console.log(scrapedTVs) and see what we get:
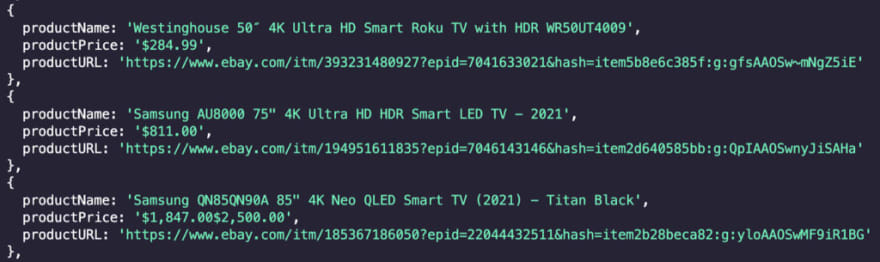
Nothing can beat the feeling of our code working! Our data is structured and clean. In perfect shape to be exported.
8. Exporting Our Data to a CSV
Exporting data into a CSV is made super simple with the ObjectsToCsv package. Just npm i objects-to-csv and add it to the dependencies at the top.
const ObjectsToCsv = require('objects-to-csv');
ObjectsToCsv has an easy syntax:
const csv = new ObjectsToCsv(scrapedTVs)
await csv.toDisk('./test.csv', { append: true })
console.log("Saved to CSV")
To create initiate the export, we need to create a new ObjectsToCsv() instance and pass it our dataset. Then, we’ll await the promise to resolve and save the result into a CSV file by giving it the path. We’re also setting append to true (it’s false by default) because we’re going to be adding more data to it from each page of the pagination.
For testing, we’ll log “Saved to CSV” to the console:

*9. Scrape eBay’s Pagination *
We already know we can scrape all pages inside the pagination by changing the _pgn parameter in the URL. So for this project, we can implement a for loop that changes this number after every iteration.
But we also need to know when to stop. Let’s head back to the website and see how many pages the pagination has.

It caps at 21. However, if we push the URL and add a 22 in the parameter, the page still responds with a page, but it loads the last page of the series, in other words, page 21.
We now can write the three statements for the for loop and put everything inside of it:
let pageNumber = 1 //to set the initial state
pageNumber <= 21 //it'll run as long as pageNumber is less or equal to 21
pageNumber += 1 //after running, pageNumber increments by 1
Here’s how it should look like:
for (let pageNumber = 1; pageNumber <= 21; pageNumber += 1) {
}
If we put all our previous code inside this for loop (which is inside of our async function), it’ll keep running until it meets the condition and breaks. Still, there are two changes we need to make before we call it for the day.
First, we need to add the pageNumber variable inside the URL, which can be done using ${} and a backtick (`) to surround the string. Like this:
https://www.ebay.com/sch/i.html?_from=R40&_nkw=4k+smart+tv&_sacat=0&_pgn=${pageNumber}
The second change we’ll want to make is sending our request through ScraperAPI servers to handle IP rotation and headers automatically. To do so, we’ll need to create a free ScraperAPI account. It’ll provide us with an API key and the string we’ll need to add to the URL for it to work:
http://api.scraperapi.com?api_key=51e43be283e4db2a5afb62660xxxxxxx&url=https://www.ebay.com/sch/i.html?_from=R40&_nkw=4k+smart+tv&_sacat=0&_pgn=${pageNumber}
This way we can avoid any kind of anti-scraping mechanism that could block our script.
*10. eBay Web Scraper Finished Code *
Here’s the finished code ready to use:
//Dependencies
const axios = require('axios');
const cheerio = require('cheerio');
const ObjectsToCsv = require('objects-to-csv');
//Empty array
const scrapedTVs = [];
(async function () {
//The for loop will keep running until pageNumber is greater than 21
for (let pageNumber = 1; pageNumber <= 21; pageNumber += 1) {
   //Sends the request, store the data and parse it with Cheerio

   const response = await axios(`http://api.scraperapi.com?api_key=51e43be283e4db2a5afb62660xxxxxxx&url=https://www.ebay.com/sch/i.html?_from=R40&_nkw=4k+smart+tv&_sacat=0&_pgn=${pageNumber}`);

   const html = await response.data;

   const $ = cheerio.load(html);


   //Grabs all the li elements containing the product cards

   const tvs = $('li.s-item.s-item__pl-on-bottom.s-item--watch-at-corner');

  //Goes through every element inside tvs to grab the data we're looking for

   tvs.each((index, element) => {

       const tvName = $(element).find('h3').text()

       const tvPrice = $(element).find('span.s-item__price').text()

       const tvLink = $(element).find('div.s-item__info.clearfix > a').attr('href')

       //Pushes all the extracted data to our empty array

       scrapedTVs.push({

           'productName': tvName,

           'productPrice': tvPrice,

           'productURL': tvLink,

       })

   });

   //Saves the data into a CSV file

   const csv = new ObjectsToCsv(scrapedTVs)

   await csv.toDisk('./scrapedTVs.csv', { append: true })

   //If everything goes well, it logs a message to the console

   console.log('Save to CSV')
}
})();
Note: Keep in mind that you’ll need to replace the API key in the code for your own key for it to work.
Great work! You now have a fast and effective eBay web scraper ready to be deployed.
To make it even more powerful, you could use the _nkw parameter inside the URL to make it easier to add a new term to the search, and with ScraperAPI by your side, you won’t have to worry about your IP getting blocked. However, that’s something we’ll leave to your imagination.

Oldest comments (0)