Implementing In-App Purchases: A Guide for Developers
Hi, this is zm soft. I registered as developers at the end of 2023 and started releasing apps. I have also released an app for developers to help each other through closed testing, so please check it out if you're interested. The captures implemented this time are from when this app was created. If you're curious about the content, please try installing it.
Have you implemented in-app purchases in your apps? For app developers, it is most rewarding when users are satisfied with the app, and in return, we receive compensation. This moment also signifies that the development efforts have been worthwhile. In this article, I want to discuss how to realize this.
Contents
- What Are In-App Purchases?
- Setting Up on Play Store
- Implementation Work
- Requesting Purchases
- Testing
- Summary
What Are In-App Purchases?
As you may know, in-app purchases are classified into two types:
- Consumable items
- Subscription items
Both access items preset in the Play Store via the Google Play Billing Library, paying a percentage of the proceeds as a fee to Google. Implementation-wise, both are similar, but there are unique considerations for subscription items. I will explain these, including my own experiences.
Setting Up on Play Store
Registering Items
Firstly, items must be registered since they cannot be displayed otherwise. You can change the price and name later, so any temporary setup will do. However, the ID cannot be changed later, so if you're considering using a test item in the production environment, it's a good idea to use recyclable IDs like [product_1,2,3...] or [sub_1,2,3...]. Registration is available under Monetize -> In-app products and Subscriptions for consumable and subscription items, respectively. You can register items using the Create xx button.

Basically, all you have to do is follow the input screen, but what was confusing was the price setting for subscription items. I couldn't figure out how to set prices for all regions at once. I thought I would have to enter each region individually, but I found that I could just go to [Set prices] - [Country / region] - [Set price].
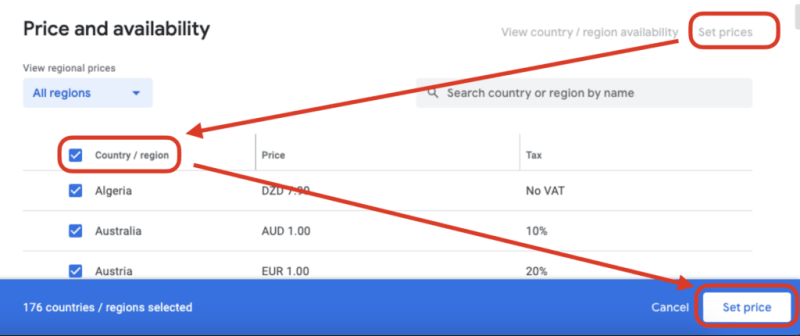
button, the following dialog box will appear and you can set the batch.

Registering Test Accounts
Next, register test accounts. Be aware that actual payments will be incurred if you conduct tests without registering. You can register test accounts by setting up a mailing list. Users included in that mailing list will then proceed with payments using test card information. Registration is done by setting Settings -> License testing in the initial screen (developer screen) after logging into the PlayConsole. Please note that this is not the app settings screen of the PlayConsole.

When a user registers on the mailing list and goes through the application purchase process, the billing information is displayed as a "test card," allowing the user to test the application without actually paying for it.
Implementation Work
The following tasks are necessary on the app side:
- Incorporating libraries
- Connecting to the Store and retrieving item information
- Implementing the item display screen
- Requesting purchases
- Handling purchase completion
Incorporating Libraries
To incorporate libraries, the following are necessary:
- Modifying
build.gradle - Modifying
android.manifest
An example modification for build.gradle is as follows:
dependencies { implementation "com.android.billingclient:billing:6.0.0" }
An example modification for android.manifest is as follows:
<manifest xmlns:android="http://schemas.android.com/apk/res/android"
    xmlns:tools="http://schemas.android.com/tools">
    <uses-permission android:name="com.android.vending.BILLING" />
</manifest>
Connecting to the Store and Retrieving Item Information
By initializing the BillingClient and executing startConnection, communication with the store becomes possible. You can obtain information on each item by using queryProductDetailsAsync. For more details, please refer to the official documentation.
Implementing the Item Display Screen
Once you have obtained the information for the items, the next step is to display this information in a list format to allow users to make purchases. The display itself is simply a representation based on the retrieval results. However, there are important considerations to keep in mind when handling subscription-type items. Compliance with the Subscription Policy is necessary. In my case, my app updates were consecutively rejected for the following two reasons:
- Incomplete localization of prices and conditions
- Insufficiency in the description of offer conditions
Firstly, regarding the incomplete localization of prices and conditions, the issue was with the display of periods (e.g., $10/month). The criticism was for not translating the "month" part when operated in a region setting for a language that was not supported for multilingualism. When retrieving information using the BillingClient, the part about the amount is obtained as a string in formattedPrice, which includes unit information, thus eliminating the need for translation within the app. Conversely, the period information is notified in an ISO8601 format like P1M, which needs to be translated within the app. I addressed this by implementing exhaustive conversion processes for each language as follows:
fun formatBillingPeriod(billingPeriod: String, languageCode: String): String {
    return when(languageCode) {
        "en" -> {
            when (billingPeriod) {
                "P1W" -> "weekly"
                "P1M" -> "monthly"
                "P3M" -> "every 3 months"
                "P6M" -> "every 6 months"
                "P1Y" -> "annually"
                else -> "unknown"
            }
        }
        "ja" -> {
            when (billingPeriod) {
                "P1W" -> "週間"
                "P1M" -> "月額"
                "P3M" -> "3ヶ月ごと"
                "P6M" -> "6ヶ月ごと"
                "P1Y" -> "年額"
                else -> "不明"
            }
        }
        "fr" -> {
            when (billingPeriod) {
                "P1W" -> "hebdomadaire"
                "P1M" -> "mensuel"
                "P3M" -> "tous les 3 mois"
                "P6M" -> "tous les 6 mois"
                "P1Y" -> "annuel"
                else -> "inconnu"
            }
        }
        "es" -> {
            when (billingPeriod) {
                "P1W" -> "semanal"
                "P1M" -> "mensual"
                "P3M" -> "cada 3 meses"
                "P6M" -> "cada 6 meses"
                "P1Y" -> "anual"
                else -> "desconocido"
            }
        }
        "de" -> {
            when (billingPeriod) {
                "P1W" -> "wöchentlich"
                "P1M" -> "monatlich"
                "P3M" -> "alle 3 Monate"
                "P6M" -> "alle 6 Monate"
                "P1Y" -> "jährlich"
                else -> "unbekannt"
            }
        }
        else -> "unknown"
    }
}
Next is the insufficiency in the description of offer conditions. The issue became clear after viewing images sent as feedback. The parts outlined in red were identified as missing:

Although I understood the feedback, I was initially unsure about the specific phrasing required for compliance.
Issue found: Violation of Subscriptions policy
Your app does not comply with the Subscriptions policy.
- Your offer does not clearly and accurately describe the terms of your trial offer or introductory pricing, including when a free trial will convert to a paid subscription, how much the paid subscription will cost, and that a user can cancel if they do not want to convert to a paid subscription.
Consequently, I referred to the wording used in other apps as a guide. Since there seems to be a set of standard phrases used for this purpose, following proven precedents appeared to be a better approach than devising something new.
Requesting Purchases
Finally, if an item is selected from the screen, the last step is the actual purchase process. Executing the purchase flow for the obtained item will bring up the real purchase screen.
Testing
Testing can be performed without incurring charges by logging in and running the test with the test account that was initially prepared. There are two things to keep in mind here
- Purchase flow execution must be done in the app registered with the store.
- The period of time for subscription-type items is set uniquely.
First, the purchase flow cannot be executed with debug-built apps because an error message will appear on the purchase screen.
Next, for subscription-type items, when you proceed to the actual purchase screen, the payment with the test card is displayed. At this time, the renewal period is displayed on the purchase screen, but this renewal period is different from the period actually set for the item. In my case, it was displayed as 5 minutes. It seems to be a specification for the renewal behavior of subscriptions, which displays an extremely short fixed period of time. (I thought I had made a mistake and reviewed the settings for a while.)
At the end
Implementing in-app purchases may seem daunting at first, but by breaking down the process into manageable steps, it becomes much more approachable. From setting up your items in the Play Store to handling the purchase flow in your app, each step is crucial for a seamless user experience. Keep in mind the importance of testing to catch any issues before your app goes live.


Top comments (0)