
Socket programming + Tkinter GUI
 on [Unsplash](https://unsplash.com?utm_source=medium&utm_medium=referral)](https://res.cloudinary.com/practicaldev/image/fetch/s--TSHY0rD9--/c_limit%2Cf_auto%2Cfl_progressive%2Cq_auto%2Cw_880/https://cdn-images-1.medium.com/max/800/0%2AGgSj8u7KwTit1IBa)
I’ve recently delved into the wonderful world of computer networking. One of the fun projects I’ve created is a simple chatroom application that facilitates real-time messaging between different clients.
At any point in this tutorial, you may refer to my source code in GitHub. The aim of this tutorial is to introduce some basic networking theory while providing practical socket programming experience. If, at any point, you find that you are already comfortable with the relevant theory, please feel free to skip ahead!
Prerequisites
You should know basic Python. Other than that, nothing! In the process of creating this application, you will also learn basic computer networking and client-server architecture.
We are going to use Tkinter and sockets, both of which are available in the Python standard library. There is nothing you need to install!
Client-Server Architecture
 on [Unsplash](https://unsplash.com?utm_source=medium&utm_medium=referral)](https://res.cloudinary.com/practicaldev/image/fetch/s--vUoX0dxT--/c_limit%2Cf_auto%2Cfl_progressive%2Cq_auto%2Cw_880/https://cdn-images-1.medium.com/max/800/0%2A7BucOLCRTOJ_m66S)
The client-server architecture is a basic computing model where the client requests services from the server, while the server processes these requests and provides services to the clients.
In fact, your web browser is a client requesting web services from Medium’s web server through the HyperText Transfer Protocol (HTTP) right now! Medium’s web server processes your request and returns HTML documents, CSS stylesheets, JavaScript files and images so that your web browser can display the website the way it is.

Furthermore, a server can serve multiple clients! In our application, we want many clients to be talking in real-time. The client software will send a message to the chatroom server, and the chatroom server will broadcast our message to all other connected clients.
Protocols, Protocols, Protocols
Communications over networks use what we call a protocol stack — building higher-level, more sophisticated conversations on top of simpler, more rudimentary conversations. Network layers can be represented by the OSI model and the TCP/IP model. Each network layer corresponds to a group of layer-specific network protocols.
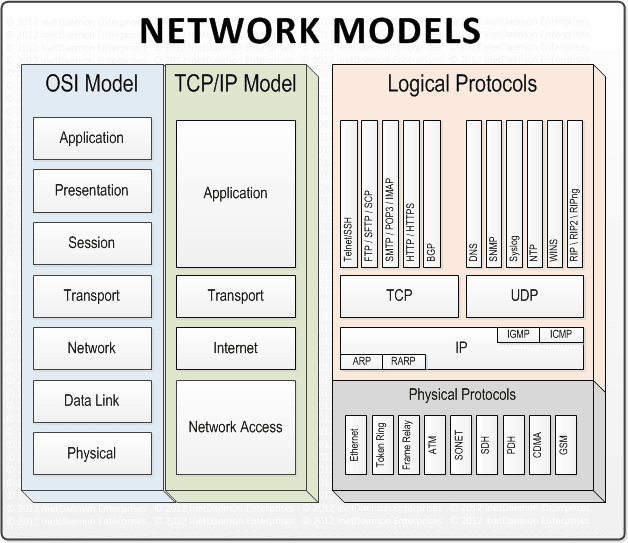
For the purpose of this application, we need not concern ourselves with many of the lower-level protocols. But we do need to know that we are using something called the Transmission Control Protocol(TCP).
TCP and UDP are transport-layer protocols — they govern how data is sent from one point to another. We are building on top of TCP, which means we do not need to care about how data is sent, only what and where data is sent.
The main difference between TCP and UDP is that TCP guarantees reliable delivery, without any information lost, duplicated, or out-of-order. UDP does not guarantee the same and leaves it up to the application layer to handle dropped packets. It requires the server to acknowledge receipt of data.
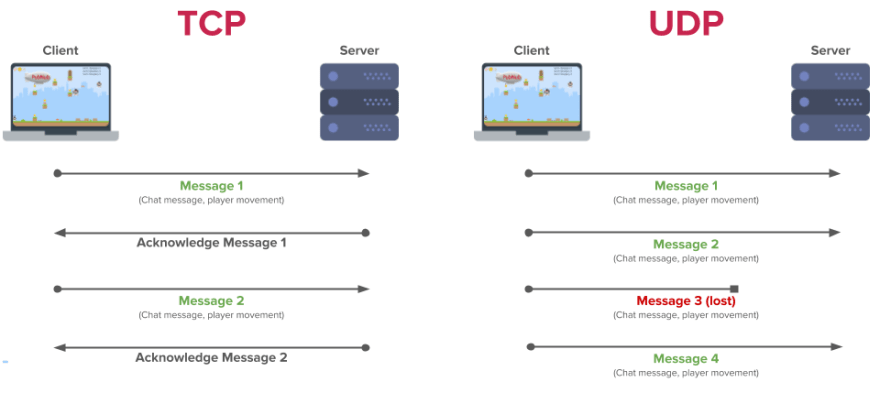
UDP is normally used for time-sensitive transmissions where a dropped packet is preferred to waiting for lost packets to be re-transmitted. Imagine a real-time voice call, for example. If a packet has been lost, it won’t make sense to wait for that piece of audio to arrive because, by the time it does, it would already be too old. Furthermore, you would probably still be able to piece the conversation together without that packet of audio.
TCP, on the other hand, would have kept stubbornly resending that piece of lost audio even though it is already too old to be of any use. However, for most other applications, this aspect of TCP is extremely valuable. In our chat application, we don’t want to have to deal with lost packets because we always want to receive complete messages without any errors.
Chatroom Server
Let’s begin with our server script. We start by defining a Server class in server.py.
#!/usr/bin/env python3

import threading
import socket
import argparse
import os

class Server(threading.Thread):

    def __init__(self, host, port):
        super().__init__()
        self.connections = []
        self.host = host
        self.port = port

    def run(self):
        pass
Threading Basics
Note that we are using multithreading to allow multiple pieces of code to run concurrently. Our Server class inherits from Python’s threading.Thread class, thus creating a thread. We need to define the logic for our Server thread in the run() method. When start() is called on the Server object, run() will be executed in parallel to the main thread.
Socket Basics
A socket is an IP address + port number pair. An IP address identifies a host. However, a host can have many different applications running at the same time. How does your operating system (OS) know that an HTTP response is meant for your web browser, and not Call of Duty: Modern Warfare? Port numbers are used to identify the particular application that should receive the data. Call of Duty: Modern Warfare uses the TCP port range 27014–27050, for example.
Thus, any communication between two network devices needs a socket pair:
Source (IP: Port Number) → Destination (IP: Port Number)
Creating a Socket
Let’s start defining our thread logic. Add the following to the run() method.
def run(self):

    sock = socket.socket(socket.AF_INET, socket.SOCK_STREAM)
    sock.setsockopt(socket.SOL_SOCKET, socket.SO_REUSEADDR, 1)
    sock.bind((self.host, self.port))

    sock.listen(1)
    print('Listening at', sock.getsockname())
First, we created a socket.socket object. socket takes two arguments: the address family and the socket type. The AF_INET address family is used for IP networking. The SOCK_STREAM socket type is used for reliable flow-controlled data streams, such as those provided by TCP. UDP, on the other hand, requires a packet-based socket type, SOCK_DGRAM.
Next, we set the SO_REUSEADDR option. You can read more about socket options in the Linux manual page socket(7). This option allows the server to use the same port after an old connection was closed (normally, you would have to wait for a few minutes).
Then, we use bind() to bind the socket object to a socket address on the server machine. bind() takes in a tuple, in the format
(IP Address (str), Port Number (int))
Note that a machine can have many external IP interfaces: you can find yours by using the ifconfig command at the terminal (or ipconfig for Windows).

You should know that the very first result I got, the lo0 interface, is a very special one. This is the loopback interface, which is only reachable by other programs running on the same machine. It has an IP address of 127.0.0.1 and is only locally significant within your own machine. It has the hostname ‘localhost’ and provides a safe testing environment.
Within the bind() command, we can specify any IP interface (even the loopback interface!), or we can use an empty string '' as a wildcard to indicate that we are willing to receive packets arriving at the server via any of its network interfaces. In our program, we will leave this up to the user, as you will see later.
Finally, we use the listen() to indicate that this is a listening socket. TCP uses two types of sockets: listening sockets and connected sockets. After calling listen() on the socket, this becomes a listening socket and can only facilitate establishing TCP connections through handshakes, but not the actual transfer of data. We will need to create an entirely new socket whenever a client connects, in order to send and receive data. Let’s continue:
Accepting Connections
def run(self):

    ...

    while True:

        # Accept new connection
        sc, sockname = sock.accept()
        print('Accepted a new connection from {} to {}'.format(sc.getpeername(), sc.getsockname()))

        # Create new thread
        server_socket = ServerSocket(sc, sockname, self)

        # Start new thread
        server_socket.start()

        # Add thread to active connections
        self.connections.append(server_socket)
        print('Ready to receive messages from', sc.getpeername())
We create an infinite loop to listen for new client connections. The accept() call will wait for a new client to connect and when it does, returns a new connected socket along with the socket address of the connected client.
A few more methods to introduce: getpeername() returns the socket address on the other end of the connection (in this case, the client) while getsockname() returns the socket address to which the socket object is bound.
We need a way to communicate with each individual client, but at the same time, we need to be listening for new connections from other potential clients. The way we do this is by creating a new ServerSocket thread (we will define this later) every time a new client connects, and this thread runs alongside the Server thread. The server also needs a way to manage all active client connections, so it stores the active connections as ServerSocket objects in self.connections.
‘Broadcasting’
How our little chatroom app will work is:
A client sends a message to the server from the command line or GUI.
The server receives and processes the message.
The server sends the message to all other connected clients.
The clients will display the message in the command line or GUI.
Let’s add the ‘broadcasting’ functionality from step 3 to the Server class. I use the word ‘broadcasting’ with caution because a broadcast refers to a completely different concept in the context of computer networking. We are really sending many unicasts, which are one-to-one transmissions to each individual connected client.
class Server(threading.Thread):

    ...

    def run(self):

        ...

    def broadcast(self, message, source):

        for connection in self.connections:

            # Send to all connected clients except the source client
            if connection.sockname != source:
                connection.send(message)
Note that self.connections is a list of ServerSocket objects representing active client connections. We will define the ServerSocket class below.
Sending and Receiving
The ServerSocket class will facilitate communications with individual clients.
#!/usr/bin/env python3

...

class ServerSocket(threading.Thread):

    def __init__(self, sc, sockname, server):
        super().__init__()
        self.sc = sc
        self.sockname = sockname
        self.server = server

    def run(self):

        while True:
            message = self.sc.recv(1024).decode('ascii')
            if message:
                print('{} says {!r}'.format(self.sockname, message))
                self.server.broadcast(message, self.sockname)
            else:
                # Client has closed the socket, exit the thread
                print('{} has closed the connection'.format(self.sockname))
                self.sc.close()
                server.remove_connection(self)
                return

    def send(self, message):
        self.sc.sendall(message.encode('ascii'))
Again, we create an infinite loop. This time, instead of listening for new connections, we are listening for data sent by the client.
When recv() is called, it will wait for data to arrive. If no data is available, recv() will not return (it ‘blocks’) and the program pauses until data arrives. Calls like accept() and recv() that make the program wait until some new data has arrived, allowing it to return, are called blocking calls. Data is sent and received over the network as bytestrings, and hence need to be encoded and decoded using encode() and decode() respectively.
recv() takes in one argument, bufsize, which specifies the maximum amount of data to be received at once.
send(), on the other hand, sends data from the socket to its connected peer.
One problem with both send() and recv() is that there is a slight possibility that only part of the data is sent or received, because the outgoing or incoming buffers are almost full, so it queues whatever data it could, while leaving the rest of the data unprocessed. This becomes problematic when send() returns, but in fact, some of the data is still left unsent. We could put send() in a loop, or we could use sendall() as a simple way to say “I want to send all of the data”.
Closed Sockets
One thing you would notice in the above code is that we are able to tell if the client has closed its end of the connection. When the client socket is closed, recv() returns an empty string '' immediately, similarly to how read() behaves when an end-of-file is reached.
Thus, when we see that recv() returns an empty string (in the else statement), we close() our side of the connection as well, remove the ServerSocket thread from the list of active connections, and end the thread.
Final Touches
#!/usr/bin/env python3

...

def exit(server):

    while True:
        ipt = input('')
        if ipt == 'q':
            print('Closing all connections...')
            for connection in server.connections:
                connection.sc.close()
            print('Shutting down the server...')
            os._exit(0)

if __name__ == '__main__':
    parser = argparse.ArgumentParser(description='Chatroom Server')
    parser.add_argument('host', help='Interface the server listens at')
    parser.add_argument('-p', metavar='PORT', type=int, default=1060,
                        help='TCP port (default 1060)')
    args = parser.parse_args()

    # Create and start server thread
    server = Server(args.host, args.p)
    server.start()

    exit = threading.Thread(target = exit, args = (server,))
    exit.start()
We allow the user to specify the host address and port number at the command line and enter ‘q’ at any point from the command line to terminate the program.
You can now run your server script!

Chatroom Client
The server doesn’t really do much without a client connecting to it. Let’s create a client.py file:
#!/usr/bin/env python3

import threading
import socket
import argparse
import os

class Send(threading.Thread):

    def __init__(self, sock, name):
        super().__init__()
        self.sock = sock
        self.name = name

    def run(self):

        while True:
            message = input('{}: '.format(self.name))

            # Type 'QUIT' to leave the chatroom
            if message == 'QUIT':
                self.sock.sendall('Server: {} has left the chat.'.format(self.name).encode('ascii'))
                break

            # Send message to server for broadcasting
            else:
                self.sock.sendall('{}: {}'.format(self.name, message).encode('ascii'))

        print('\nQuitting...')
        self.sock.close()
        os._exit(0)

class Receive(threading.Thread):

    def __init__(self, sock, name):
        super().__init__()
        self.sock = sock
        self.name = name

    def run(self):

        while True:
            message = self.sock.recv(1024)
            if message:
                print('\r{}\n{}: '.format(message.decode('ascii'), self.name), end = '')
            else:
                # Server has closed the socket, exit the program
                print('\nOh no, we have lost connection to the server!')
                print('\nQuitting...')
                self.sock.close()
                os._exit(0)
While creating the server script, I hope I have made much of the theory clear to you. The same rules apply here, except we have a Send thread that is always listening for user input from the command line. We will add a GUI later, but it follows much of the same logic. Any data received will be displayed on the client interface, and any data sent will be processed by the server to be broadcast to other connected clients.
Again, we make use of multithreading. This time, it is to let the sending and receiving operations run alongside each other. This way, our chatroom is real-time (instead of alternating between send() and recv() calls).
Connecting to the Server
#!/usr/bin/env python3

...

class Client:

    def __init__(self, host, port):
        self.host = host
        self.port = port
        self.sock = socket.socket(socket.AF_INET, socket.SOCK_STREAM)

    def start(self):
        print('Trying to connect to {}:{}...'.format(self.host, self.port))
        self.sock.connect((self.host, self.port))
        print('Successfully connected to {}:{}'.format(self.host, self.port))

        print()
        name = input('Your name: ')

        print()
        print('Welcome, {}! Getting ready to send and receive messages...'.format(name))

        # Create send and receive threads
        send = Send(self.sock, name)
        receive = Receive(self.sock, name)

        # Start send and receive threads
        send.start()
        receive.start()

        self.sock.sendall('Server: {} has joined the chat. Say hi!'.format(name).encode('ascii'))
        print("\rAll set! Leave the chatroom anytime by typing 'QUIT'\n")
        print('{}: '.format(name), end = '')
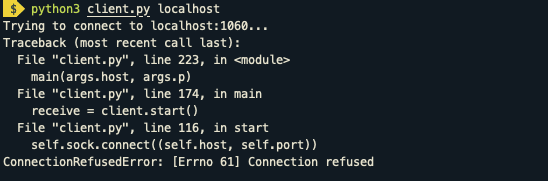
The client calls the connect() method to connect to a specified socket address (again, in the form of a tuple) of the server. If the specified socket is not ready to receive connections (e.g. you did not run the server script yet), the connect() call will fail.
Final Touches
#!/usr/bin/env python3

...

if __name__ == '__main__':
    parser = argparse.ArgumentParser(description='Chatroom Server')
    parser.add_argument('host', help='Interface the server listens at')
    parser.add_argument('-p', metavar='PORT', type=int, default=1060,
                        help='TCP port (default 1060)')
    args = parser.parse_args()

client = Client(args.host, args.p)
    client.start()
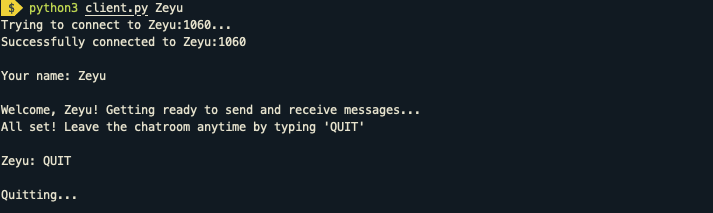
Testing our Command-Line App
What we have done is built a fully-functioning command-line chatroom.
You can run your server script by giving it any of your machine’s IP interfaces (you can also use your hostname!). If you like, you can just use ‘127.0.0.1’ or ‘localhost’ if you are only going to be testing this on one machine.


Same rules apply for the client script. Open a separate terminal window and run client.py.

Open up three or more terminal windows, and you can have multiple clients! Alternatively, grab another machine connected to the same LAN and run client.py from there. If it is in a different LAN, your firewall might block it.
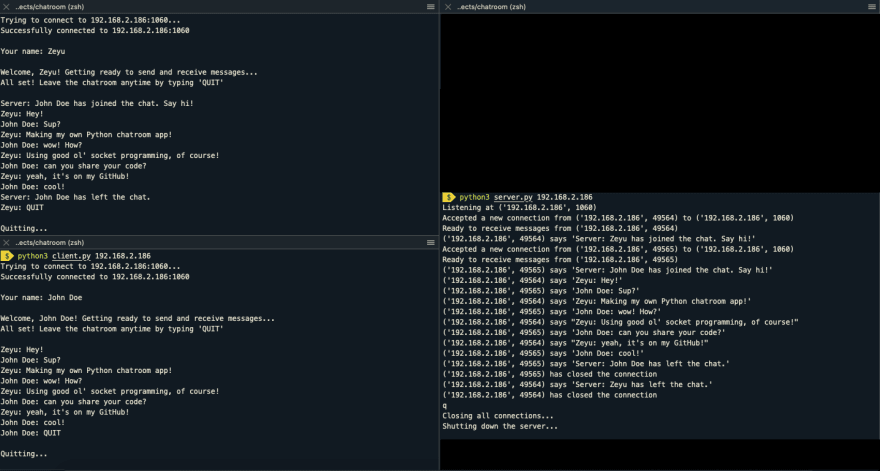
In the above screenshot, I am running three terminal windows, with two clients connected to the same server.
Creating a GUI
We are not quite done yet. A command-line app is nice and all, but how about making a GUI? We are going to use Tkinter, which is included in the Python standard library.
We just need to make a few adjustments to our client.py, and add some more code to create the GUI. You can learn more about Tkinter by reading its documentation, but that is beyond the scope of this tutorial.
The complete client.py code is available below:
and for reference, the complete server.py code:
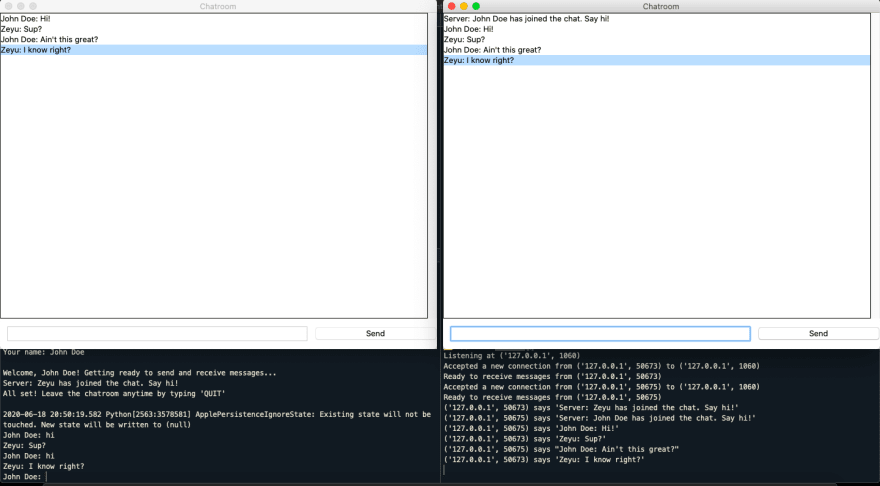
The Final Product
Run server.py and client.py the same way as you did before. After entering your name, the GUI will pop up!
I have designed this so that you can use either the command line or the GUI to interact with the application so that it is easier to debug and see what is going on behind the scenes.
Conclusion
That’s all! I hope that you’ve enjoyed reading this as much as I have enjoyed writing it. The world of computer networking is really quite interesting and this was only the tip of the iceberg.
If you have any questions, please feel free to let me know in the comments.

Top comments (2)
Thank you for sharing this! I do have one question though! I am using VSCode and python 3.6.9 and for some reason tkinter will not work. I tried sudo apt-get install python3-tk, but I got the error :
import _tkinter # If this fails your Python may not be configured for Tk
ModuleNotFoundError: No module named '_tkinter'.
Wondering if you have some insight as solutions have said to just use the sudo apt. command. Shouldn't tkinter be a part of Python3 already? or is this possibly a VScode issue?
Thanks -
Liv
This is awesome.