Cloud Run is a fully managed service by Google Cloud that allows you to run containerized applications in a scalable environment without the need to manage the underlying infrastructure. It combines the simplicity of serverless with the flexibility of containers, enabling rapid deployments, precise pay-as-you-go billing, and automatic scaling based on demand. Ideal for web applications, APIs, or background processing tasks, Cloud Run streamlines development and deployment while ensuring a seamless user experience.
Cloud Run enables you to run multiple revisions of your application in parallel and intelligently split traffic between them. Revision tags allow you to access specific versions in preview mode for testing or demonstration purposes.
However, it's important to note that anyone who knows or can predict the URL of a Cloud Run service can access it, as these URLs are publicly accessible by default. This is especially critical for revision tag URLs, which are often used for previewing specific versions and are not meant to be publicly accessible. To address this, it is common practice to place the Cloud Run service behind a load balancer. This setup not only centralizes traffic management but also enables the use of Identity-Aware Proxy (IAP) to secure access. With IAP, you can enforce authentication and authorization, ensuring that only authorized users or systems can access the revision tag URLs, adding an essential layer of security to your deployment.
Placing a Cloud Run service behind a load balancer, while providing enhanced security, can introduce additional complexity—particularly when dealing with revision tags. Configuring the URL map to correctly route traffic to specific revision tags requires careful setup and maintenance. Each tag URL needs to be explicitly mapped, which can become cumbersome as the number of revisions and tags grows or changes. This complexity can also impact the flexibility and speed of deployment, making it important to weigh the trade-offs between security and operational simplicity when adopting this approach.
What are URL masks?
Serverless Network Endpoint Groups (NEGs) in Cloud Run provide URL masks, which enable you to configure custom routing for incoming requests. URL masks enable you to define specific paths that route traffic to distinct Cloud Run revisions or services, providing flexibility in managing traffic distribution. This feature is especially useful when using load balancers, as it helps manage traffic across different versions of an application without having to update the url map.
URL masks let you use placeholders to dynamically route requests to the right service/revision tag, with this kind of syntax:
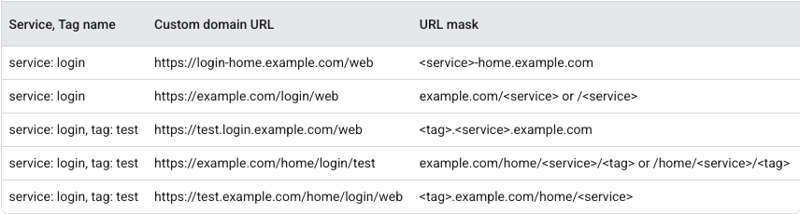
Let’s demonstrate the power of URL Masks
Scenario: we have two services, named Hello and Hola, and both of them have two tagged revisions, but traffic is sent to only one, as the other tag is a preview version only accessible with access restrained by IAP(IAP configuration will not be a part of this demonstration):
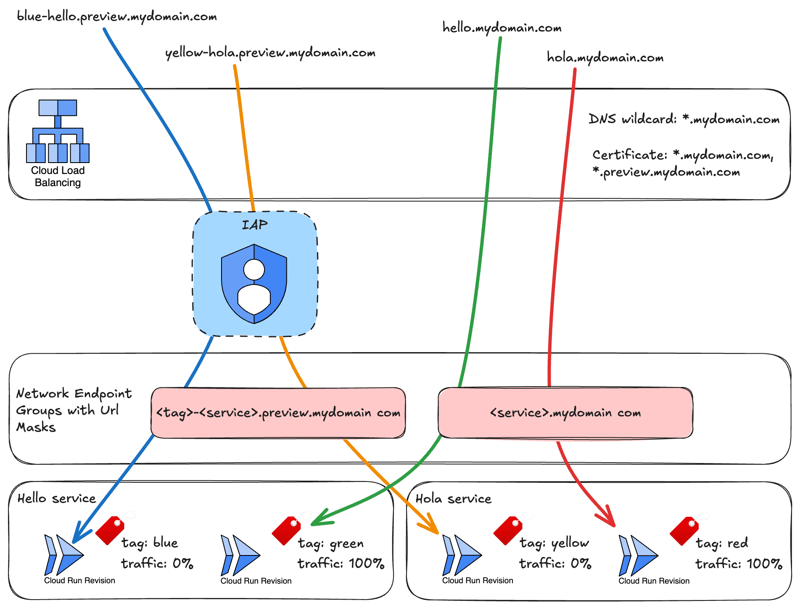
We will deploy this infrastructure with gcloud cli, but you can use terraform as well.
Deploying Cloud Run Services with Tagged Revisions
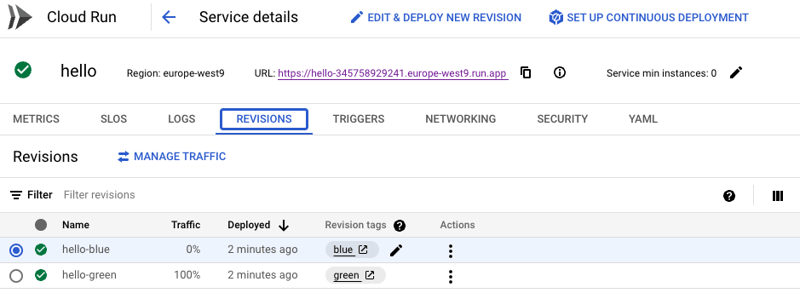
Let's start with the hello service with 2 revisions respectively named/tagged green and blue.
PROJECT="your-project-id"
REGION="any-googlecloud-region"

gcloud config set project $PROJECT

# Deploy the "hello" Cloud Run service
gcloud run deploy hello \
    --region $REGION \
    --image us-docker.pkg.dev/cloudrun/container/hello \
    --revision-suffix green --tag green \
    --set-env-vars COLOR=green --allow-unauthenticated

# Create "blue" revision without traffic
gcloud run deploy hello \
    --region $REGION \
    --image us-docker.pkg.dev/cloudrun/container/hello \
    --revision-suffix blue --tag \
    --no-traffic --set-env-vars COLOR=blue
This service should be accessible directly from the public url(green will be served) and both revisions can be accessed through their revision tag url:
We want our services to be deployed behind a load balancer, and not directly accessed from the internet, so we will disable external access:
# Disable external access
gcloud run services update hello \
    --region $REGION \
    --ingress=internal-and-cloud-load-balancing
And now, the hola service and its 2 revisions:
# Deploy the "hola" Cloud Run service
gcloud run deploy hola \
    --region $REGION \
    --image us-docker.pkg.dev/cloudrun/container/hello \
    --revision-suffix red --tag red \
    --set-env-vars COLOR=red \
    --allow-unauthenticated \
    --ingress=internal-and-cloud-load-balancing

# Create "yellow" revision without traffic
gcloud run deploy hola \
    --region $REGION \
    --image us-docker.pkg.dev/cloudrun/container/hello \
    --revision-suffix yellow --tag yellow \
    --no-traffic --set-env-vars COLOR=yellow
Managing our domain name
By combining URL masks with a DNS wildcard, you can fully automate your URL mapping process. This setup allows you to dynamically route traffic to various revision tags without manual intervention, streamlining deployment and minimizing errors. With this combination, you can efficiently manage large-scale applications with multiple revisions, ensuring both security and scalability while reducing operational complexity.
We reserve an IP address so we can know it and use sslip.io to get a domain with a wildcard DNS based on our IP, and then create the self-signed SSL certificate that our load balancer will use later:
# Reserve a regional IP for the load balancer
gcloud compute addresses create hello-ip --global
IP_ADDRESS=$(gcloud compute addresses describe hello-ip --global --format="get(address)")
DOMAIN="${IP_ADDRESS}.sslip.io"

# Generate self-signed SSL certificate
openssl genrsa -out wildcard.key 2048
openssl req -new -key wildcard.key -out wildcard.csr -subj "/CN=*.$DOMAIN"
openssl x509 -req -days 365 -in wildcard.csr \
    -signkey wildcard.key \
    -out wildcard.crt \
    -extfile <(printf "subjectAltName=DNS:*.$DOMAIN,DNS:$DOMAIN,DNS:*.preview.$DOMAIN")

# Create SSL certificate in Google Cloud
gcloud compute ssl-certificates create hello-certificate \
    --certificate wildcard.crt \
    --private-key wildcard.key \
    --global
Configuring Serverless NEGs for URL Masks
Now that we know our base domain name, we can create our serveless network endpoint groups with the url masks, as defined in the diagram, as well as the backend services that will be used by the load balancer:
# Create a serverless NEG for tagged revisions
gcloud compute network-endpoint-groups create preview-neg \
    --region=$REGION \
    --network-endpoint-type=SERVERLESS \
    --cloud-run-url-mask="<tag>-<service>.preview.${DOMAIN}"

# Create backend service and attach NEG
gcloud compute backend-services create preview-backend \
    --global \
    --load-balancing-scheme=EXTERNAL_MANAGED
gcloud compute backend-services add-backend preview-backend \
    --global \
    --network-endpoint-group=preview-neg \
    --network-endpoint-group-region=$REGION

# Create a serverless neg for services
gcloud compute network-endpoint-groups create service-neg \
    --region=$REGION \
    --network-endpoint-type=SERVERLESS \
    --cloud-run-url-mask="<service>.${DOMAIN}"
gcloud compute backend-services create service-backend \
    --global \
    --load-balancing-scheme=EXTERNAL_MANAGED
gcloud compute backend-services add-backend service-backend \
    --global \
    --network-endpoint-group=service-neg \
    --network-endpoint-group-region=$REGION
Setting Up Load Balancing for Secure Routing
Finally, we create a load balancer to expose securely our dynamic URLs:
# Create the url map with the "service" access as default
gcloud compute url-maps create hello-urlmap --default-service service-backend --global
# Add a path matcher for preview urls
gcloud compute url-maps add-path-matcher hello-urlmap \
  --path-matcher-name=preview-matcher \
  --default-service=preview-backend \
  --new-hosts="*.preview.$DOMAIN"

# Create the target proxy
gcloud compute target-https-proxies create hello-target-proxy --url-map=hello-urlmap --ssl-certificates=hello-certificate --global

# Create the forwarding rule
gcloud compute forwarding-rules create hello-forwarding-rule \
  --address=$IP_ADDRESS \
  --global-address \
  --ip-protocol=TCP \
  --load-balancing-scheme=EXTERNAL_MANAGED \
  --ports=443 \
  --target-https-proxy=hello-target-proxy \
  --global-target-https-proxy \
  --global
After a few minutes, the services will be accessible through these URLs:
https://hello.${IP_ADDRESS}.sslip.io/ # green
https://green-hello.preview.${IP_ADDRESS}.sslip.io/
https://blue-hello.preview.${IP_ADDRESS}.sslip.io/

https://hola.${IP_ADDRESS}.sslip.io/ # red
https://red-hola.preview.${IP_ADDRESS}.sslip.io/
https://yellow-hola.preview.${IP_ADDRESS}.sslip.io/
Demo scripts are available:
Going Further: Securing and Optimizing
Protecting the Backend Service with IAP
To enhance the security of your Cloud Run deployment, you can use Identity-Aware Proxy (IAP) to protect your backend services. IAP acts as a gatekeeper, ensuring that only authenticated and authorized users or systems can access your Cloud Run services. By enabling IAP, you can restrict access to specific revision tags or service versions, providing an additional layer of security for your application. This is particularly useful when you want to prevent unauthorized access to your preview environments.
It's important to note that the same IAP configuration applies to all services accessed via your URL map/URL mask combination. Since IAP is enforced at the backend service level, any service or revision mapped through this configuration will inherit the same access controls, ensuring a consistent and secure authentication policy across all your deployed versions.
Additionally, to use IAP, your services must be accessed over HTTPS, meaning you need a valid SSL/TLS certificate. If you've used a DNS wildcard for your load balancer configuration, a wildcard certificate is essential for securing all your subdomains. This ensures secure communication while maintaining the flexibility to manage multiple services and revision tags under the same domain.
Managing Costs with Tagged Revisions
While revision tags offer significant advantages in managing versions and traffic, it’s important to keep an eye on the associated costs, especially when using features like min instances > 0. Setting a minimum number of instances ensures that a certain number of instances are always running, even when traffic is low, which avoids cold starts but can lead to increased costs. This is especially important when working with revision tags, as each tagged revision will incur charges based on the minimum instance settings, even if no traffic is routed to it. If you're using revision tags in a staging or preview environment, be mindful of these settings to avoid unexpected costs. Carefully managing the number of active instances for each revision tag can help optimize costs while maintaining the required service levels.
Viewing Revision Tag URLs
With the URL mask pattern, it can be difficult to predict and construct dynamically generated URLs, as it won't appear with a simple link in the Google Cloud console. I have developed a simple tool to visualize the available URLs: Cloud Run Revision Tag URL Viewer.


Top comments (0)