
Introduction
In the wake of the COVID-19 pandemic, more and more offline call scenarios are being moved and implemented online, such as online learning, online doctor consultation, online conferences, online dating, and other scenarios. So, you may wonder how many developers and what technical capabilities you need if you want to integrate voice and video calls into your app. And I guess you'll find your answer after finishing reading this.
This article shows how to use ZEGOCLOUD's ZEGOCall SDK to quickly integrate the voice/video call feature into your app or build a voice/video call app without any development experience and involving developers.
Features
What can ZEGOCall SDK provide
The ZEGOCall SDK provides plenty of features, such as Google login, an online user list, voice and video calls, offline notifications, and more. And the open-source sample code and the technical documentation for those features are fully available for you.

The following table shows ZEGOCall SDK's features:
| Feature | Description |
|---|---|
| Voice and Video call | Support making one-to-one or group outbound voice and video calls. |
| Call invitation | Support making outbound calls to online and offline users. |
| Device configuration | Support enabling and disabling the microphone and camera, and switching between the front-facing camera and rear camera. |
| Video configuration | Support configuring the video resolution, frame rate, bitrate, and more. |
| Audio configuration | Support configuring sound quality, sound effects, and more. |
| View configuration | Support configuring the view to be displayed during a call as needed. |
| Real-time quality analysis |
|
When do you need the ZEGOCall SDK
- For a green-hand developer: when trying to start a new project
- For an enterprise: when trying to build a voice/video chat app
- When trying to add a voice/video call feature into an existing app
To meet different needs, ZEGOCLOUD's ZEGOCall SDK uses a layered architecture. Details are as shown in the figure below:

The demo app of ZEGO Call has already integrated the features required by a video call application, you can compile it directly into an app and make it goes live.
And we also provide two different SDKs for you: the CallUIKit and the Call SDK.
Choose to integrate the CallUIKit: If you want to customize the business logic and maintain the user list on your own. And voice/video call interactions and UI are implemented by the CallUIKit.
Choose to integrate the Call SDK: If you want to customize the UI on your own. The transmission of underlying data, voice/video call connection, and others are implemented by the Call SDK.
How to integrate the ZEGOCall SDK
Step 1. Create a ZEGOCLOUD account
- Create an account in ZEGOCLOUD Official.

Step 2. Create a new project
- Create a project in ZEGOCLOUD Admin Console.

Step 3. Create a Firebase project
Create a Firebase project in the Firebase console. For more details, see Firebase Documentation.

Step 4. Deploy the Firebase Cloud Functions
ZEGO Call uses the Firebase Cloud Functions as the business server by default, we recommend you activate and deploy it before integrating the ZEGOCall SDK.
1.Create a new Realtime Database in Firebase.

2.Edit the rules of the Realtime Database by adding the following:
{
  "rules": {
        ".read": "auth.uid != null",
        ".write": "auth.uid != null",
  }
}

3.Install the CLI via npm.
```
npm install -g firebase-tools
```
4.Run the firebase login to log in via the browser and authenticate the firebase tool.

5.Run firebase init functions. The tool gives you an option to install dependencies with npm. It is safe to decline if you want to manage dependencies in another way, though if you do decline you'll need to run npm install before emulating or deploying your functions.

6.Download the Cloud function sample code.

7.Copy the firebase.json, functions\index.js files and functions\token04 folder in the sample code to your cloud function project, overwrite files with the same name.


8.Modify the index.js file, fill in the AppID and ServerSecret you get from ZEGOCLOUD Admin Console correctly.

9.In Firebase CLI, run the firebase deploy --only functions command to deploy the cloud functions.

Step 5. Copy file into the project
To integrate the ZEGOCallUIKit, do the following:
1.Download the Sample codes, import the zegocall and zegocalluikit modules to your project root directory (Create a new project if you don't have an existing project).
2.Add the following code to the settings.gradle file:
```gradle
include ':zegocall'
include ':zegocalluikit'
```
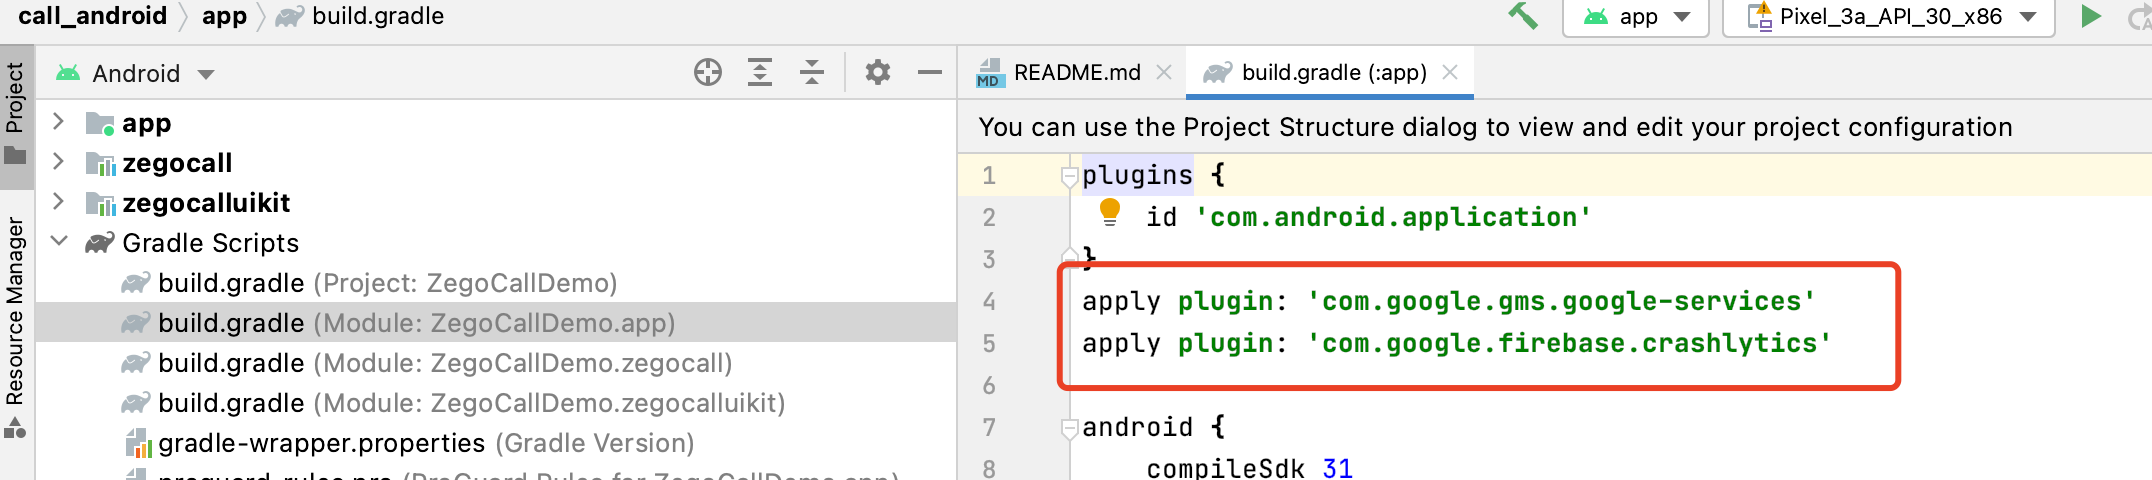
3.Modify the build.gradle file of your application (in the app folder), add the following code:
```groovy
...
apply plugin: 'com.google.gms.google-services'
apply plugin: 'com.google.firebase.crashlytics'
android {
...
}
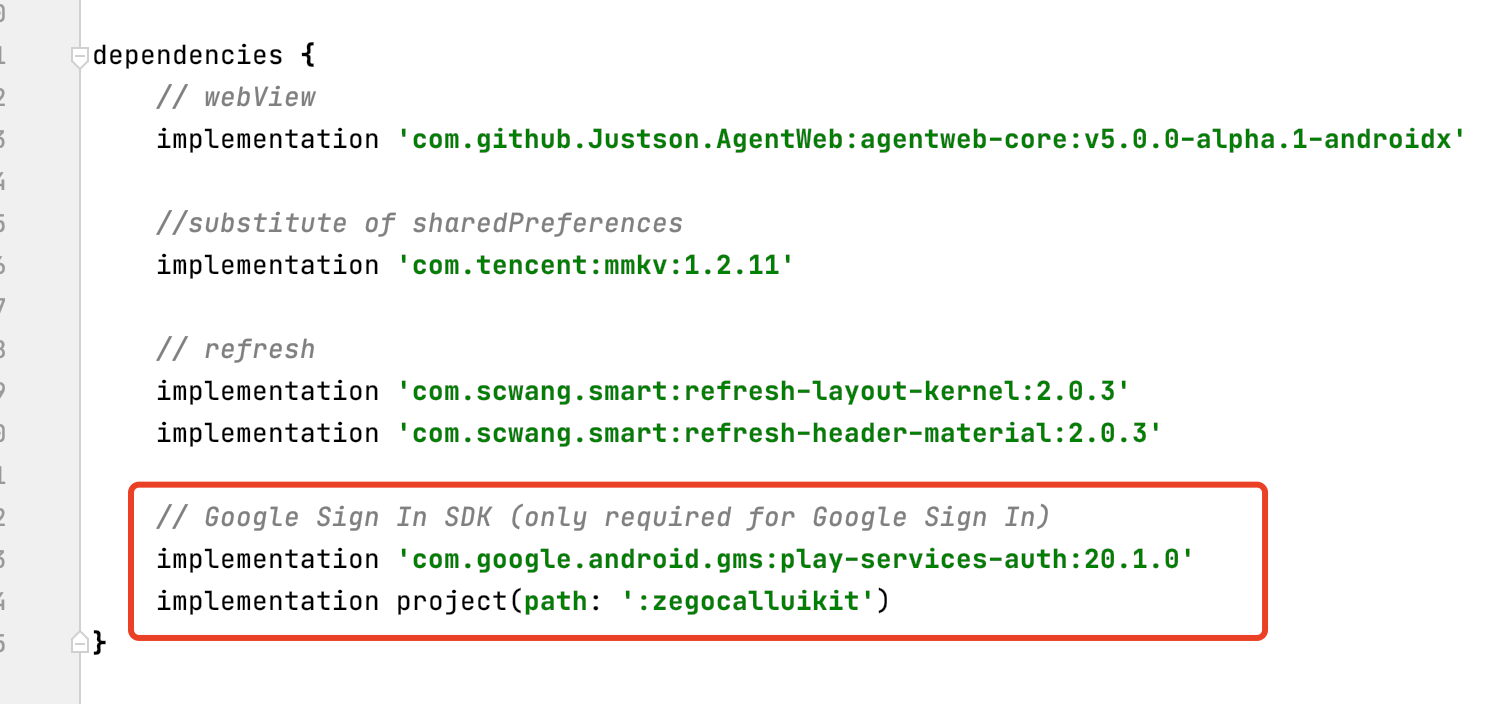
dependencies {
...
// Google Sign In SDK (only required for Google Sign In)
implementation 'com.google.android.gms:play-services-auth:20.1.0'
implementation project(path: ':zegocalluikit')
}
```
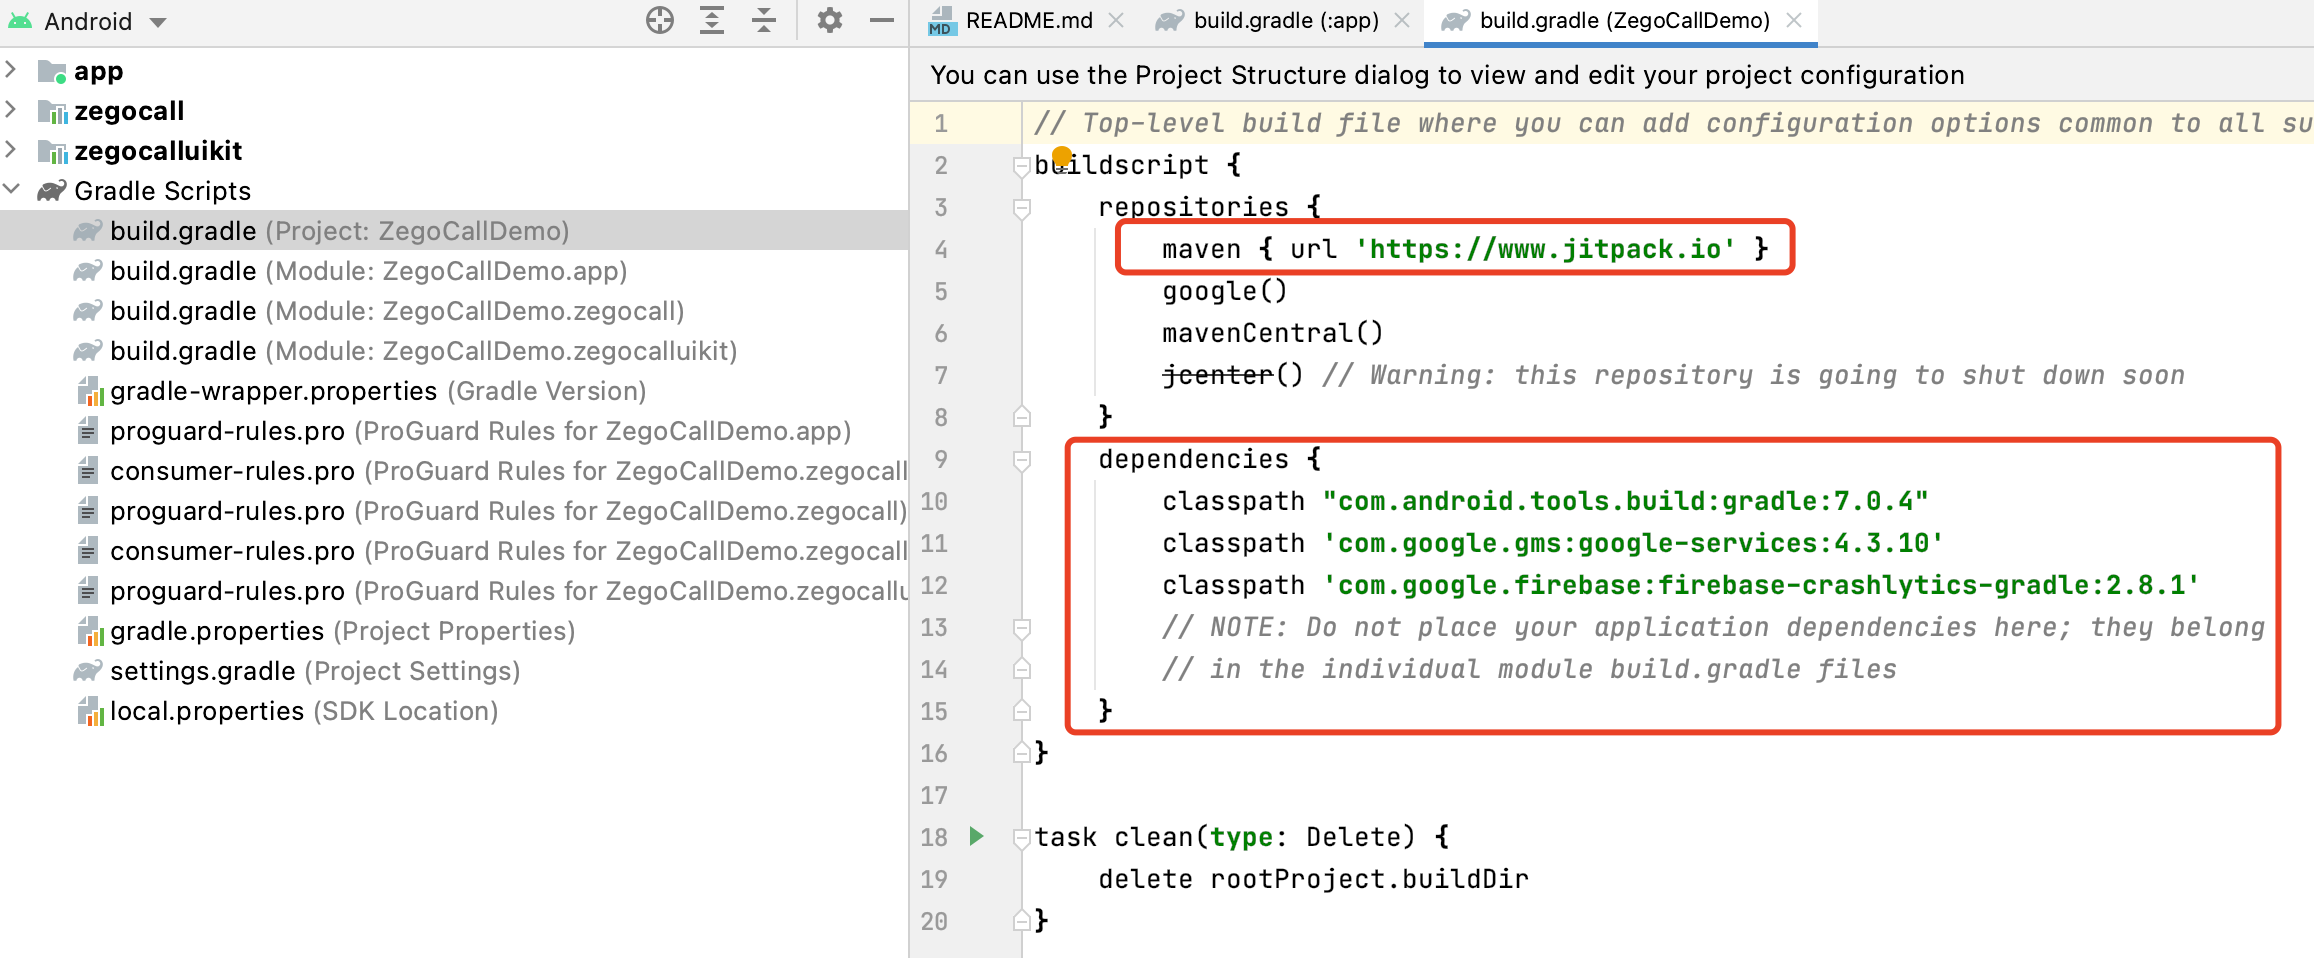
4.Modify the build.gradle file of your project, add the following code:
<div class="mk-hint">

If your Android Studio version is higher than "bumblebee 2021.1.1 patch 1", please modify the maven configuration in the `setting.gradle`.

</div>
```groovy
buildscript {
    repositories {
        maven { url 'https://www.jitpack.io' }
        ...
    }
    dependencies {
        ...
        classpath 'com.google.gms:google-services:4.3.10'
        classpath 'com.google.firebase:firebase-crashlytics-gradle:2.8.1'
    }
}
```
5.Add Firebase to your project by referring to the Add Firebase to your Android project: Step 2-3, and make sure you have downloaded and added the google-services.json file to your app directory.
6.Click Sync now.
Step 6. Initialize the ZEGOCallUIKit
To initialize the ZEGOCallUIKit, get the ZegoCallManager instance, pass the AppID of your project.
// Initialize the ZEGOCallUIKit. We recommend you call this method when the application starts.
// appID is the AppID you get from ZEGOCLOUD Admin Console.
// The last parameter refers to the Application object of the this project.
ZegoCallManager.getInstance().init(appID, this, new ZegoTokenProvider() {
    @Override
    public void getToken(String userID, ZegoTokenCallback callback) {
     //imply with your own methed to get zego RTC token
     // String rtcToken = "";
    //  callback.onTokenCallback(errorCode, rtcToken);
        }
    });
Step 7. Get a Token
After deploying the Firebase Cloud Functions, here we get a Token by calling the client API methods of Firebase Cloud Functions:
private void getTokenFromCloudFunction(String userID, long effectiveTime) {
    Map<String, Object> data = new HashMap<>();
    data.put("id", userID);
    data.put("effective_time", effectiveTime);

    FirebaseFunctions.getInstance().getHttpsCallable("getToken")
        .call(data)
        .continueWith(new Continuation<HttpsCallableResult, Object>() {
            @Override
            public Object then(@NonNull Task<HttpsCallableResult> task) throws Exception {
                return task.getResult().getData();
            }
        })
        .addOnCompleteListener(new OnCompleteListener<Object>() {
            @Override
            public void onComplete(@NonNull Task<Object> task) {
                if (!task.isSuccessful()) {
                    Exception e = task.getException();
                    if (e instanceof FirebaseFunctionsException) {
                        FirebaseFunctionsException ffe = (FirebaseFunctionsException) e;
                        FirebaseFunctionsException.Code code = ffe.getCode();
                        Object details = ffe.getDetails();
                    }
                    return;
                }
                HashMap<String, String> result = (HashMap<String, String>) task.getResult();
                String token = result.get("token");
            }
        });
}
Step 8. User login
ZEGO Call does not provide user management capabilities yet. You will need to have users log in to Firebase and then call the setLocalUser method to set user information to CallUIKit based on the login result.
Firebase provides multiple login authentication modes. The following uses Google login as an example.
For more modes, refer to the Firebase official.
// init google sign in
GoogleSignInOptions gso = new GoogleSignInOptions.Builder(GoogleSignInOptions.DEFAULT_SIGN_IN)
        .requestIdToken(CLIENT_ID)
        .requestEmail()
        .build();
GoogleSignInClient mGoogleSignInClient = GoogleSignIn.getClient(this, gso);

// when button is clicked,invoke this
private void signIn() {
    Intent signInIntent = mGoogleSignInClient.getSignInIntent();
    startActivityForResult(signInIntent, RC_SIGN_IN);
}

// overwrite onActivityResult to get google sign in result
@Override
public void onActivityResult(int requestCode, int resultCode, Intent data) {
    super.onActivityResult(requestCode, resultCode, data);

    // Result returned from launching the Intent from GoogleSignInApi.getSignInIntent(...);
    if (requestCode == RC_SIGN_IN) {
        Task<GoogleSignInAccount> task = GoogleSignIn.getSignedInAccountFromIntent(data);
        try {
            // Google Sign In was successful, authenticate with Firebase
            GoogleSignInAccount account = task.getResult(ApiException.class);
            AuthCredential credential = GoogleAuthProvider.getCredential(account.getIdToken(), null);
            FirebaseAuth.getInstance().signInWithCredential(credential)
                .addOnCompleteListener(new OnCompleteListener<AuthResult>() {
                    @Override
                    public void onComplete(@NonNull Task<AuthResult> task) {
                    if (task.isSuccessful()) {
                        // Sign in success, update UI with the signed-in user's information
                        Log.d(TAG, "signInWithCredential:success");
                        FirebaseUser currentUser = FirebaseAuth.getInstance().getCurrentUser();
                        ZegoCallManager.getInstance().setLocalUser(currentUser.getUid(), currentUser.getDisplayName());
                    } else {
                        // If sign in fails, display a message to the user.
                        Log.w(TAG, "signInWithCredential:failure", task.getException());
                    }
                }
            });
        } catch (ApiException e) {
            // Google Sign In failed, update UI appropriately
            Log.w(TAG, "Google sign in failed", e);
        }
    }
}
Step 9. Make outbound calls
To make an outbound voice call, call the callUser method and set the zegoCallType parameter to ZegoCallType.Voice.
For Android 6.0 or later, some important permissions must be requested both at runtime and declared statically in the file AndroidMainfest.xml, you can add the following code to do so (requestPermissions is a method of an Android Activity).
For more information, refer to the Request app permissions.
// shows how to request camera and audio permission at run time
String[] permissionNeeded = {
        "android.permission.CAMERA",
        "android.permission.RECORD_AUDIO"};

if (Build.VERSION.SDK_INT >= Build.VERSION_CODES.M) {
    if (ContextCompat.checkSelfPermission(this, "android.permission.CAMERA") != PackageManager.PERMISSION_GRANTED ||
        ContextCompat.checkSelfPermission(this, "android.permission.RECORD_AUDIO") != PackageManager.PERMISSION_GRANTED) {
        requestPermissions(permissionNeeded, 101);
    }
}
You can make a call after getting the access permission of the camera and microphone.
// userInfo refers to the user info(ID and name) of the user you want call.
// ZegoCallType.Voice indicates that you make a voice call.
ZegoCallManager.getInstance().callUser(userInfo, ZegoCallType.Voice);
To make an outbound video call, call the callUser method and set the zegoCallType parameter to ZegoCallType.Video.
// userInfo refers to the user info(ID and name) of the user you want call.
// ZegoCallType.Video indicates that you make a video call.
ZegoCallManager.getInstance().callUser(userInfo, ZegoCallType.Video);
After making a call, the CallUIKit shows the UI of the current state automatically for both the callee and caller (integrated the CallUIKit is required), and, you can operate on the UI for further operations.
The following displays when the caller calls the method to make a call (make a voice call for illustration)

Step 10. Listen for the incoming calls
To receive in-time notifications when receiving incoming calls, call the startListen method to listen for the call invitations. The corresponding UI displays and you can operate on the UI for further calling responses.
// Listen for the call invitations.
// Pass the current Activity.
ZegoCallManager.getInstance().startListen(this);
When the app is running in the frontend: the following black pop-up prompts automatically when the callee receives an incoming call (make a voice call for illustration)

When the app is running in the backend: the following black pop-up prompts after granting the offline notification permission when the callee receives an incoming call. For more, refer to the document canDrawOverlays.
Different phone vendors may require different settings based on the operating system and version, for example, OPPO, Vivo.
Step 11. Stop listening for the incoming calls
To stop listening for the incoming calls, call the stopListen method. You won't receive notifications after calling this method.
// Stop listening for the incoming calls.
// Pass the same Activity that you used to start listening for the incoming calls.
ZegoCallManager.getInstance().stopListen(this);
Step 12. Offline notifications
The Firebase Cloud Functions has implemented the offline notifications of the firebase cloud message, and it sends a data type fcm message when making outbound calls. For clients to receive offline notifications, integrate the firebase cloud message, and start the app when receiving the offline notifications:
@Override
public void onMessageReceived(RemoteMessage remoteMessage) {

    Map<String, String> data = remoteMessage.getData();

    boolean isAppNotStart = !AppUtils.isAppForeground() && ActivityUtils.getActivityList().isEmpty();
    boolean isDeviceRestart = AppUtils.isAppForeground() && ActivityUtils.getActivityList().isEmpty();
    if (isAppNotStart || isDeviceRestart) {
        if (data.size() > 0) {
            AppUtils.relaunchApp();
        }
    }
}
Step 13. Upload logs
When you encounter problems when using your app, call the uploadLog method to upload logs for us to locate and help you faster.
ZegoCallManager.getInstance().uploadLog(errorCode -> {
    // Callback for the result of upload SDK logs.
});
Step 14. Deinitialize the ZEGOCallUIKit
After finishing using the ZEGO Call, call the unInit method to deinitialize the SDK.
ZegoCallManager.getInstance().unInit();
References
- To know more about ZEGO Call, see ZEGOCLOUD's ZEGOCall SDK.
- To download the ZEGOCall SDK, go to ZEGOCLOUD's ZEGOCall SDK.
- To learn more about what you can build with the real-time audio and video communication capabilities we provide, visit ZEGOCLOUD official website.

Top comments (0)