EC2 (Elastic Compute Cloud):
Amazon EC2 is a web service that provides secure, resizable compute capacity in the cloud. It allows you to provision virtual servers called EC2 instances. Although AWS uses the phrase “web service” to describe it, it doesn’t mean that you are limited to running just web servers on your EC2 instances. You can create and manage these instances through the AWS Management Console, the AWS Command Line Interface (CLI), AWS Software Development Kits (SDKs), or through automation tools.
When launching an EC2 instance, the first setting you configure is which operating system you want by selecting an Amazon Machine Image (AMI).
AMI (Amazon Machine Image):
In the traditional infrastructure world, the process of spinning up a server consists of installing an operating system from installation disks, installation drives, or installation wizards over the network. In the AWS Cloud, this operating system installation is no longer your responsibility, and is instead built into the AMI that you choose. Not only does an AMI let you configure which operating system you want, you can also select storage mappings, the architecture type (such as 32-bit, 64-bit, or 64-bit ARM), and additional software installed.
What Is the Relationship Between AMIs and EC2 Instances?
EC2 instances are live instantiations of what is defined in an AMI, much like a cake is a live instantiation of a cake recipe.
If you are familiar with software development, you can also see this kind of relationship between a Class and an Object.
One advantage of using AMIs is that they are reusable. You can easily re-use one AMI into the other EC2 Instance.
AMI Instance - Life Cycle:
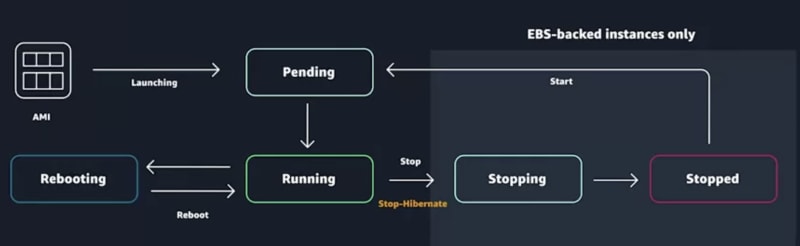
Terminating an EC2 instance is a bad thing. So, you can create more instance when the demand is high and shut down the instance or stopped the instance when the demand is low. Remember, You can only get paid for what, EC2 Instance that are in running position. AWS does not charge usage or data transfer fees for your instance after you stop it.
How to launch EC2 Instance?
Launch an EC2 instance that hosts the employee directory application.
If needed, log in to the AWS Management Console as your Admin user (Other then root user/IAM user).
- In the Services search bar, search for EC2, and open the service by choosing EC2.
- In the navigation pane, under Instances choose Instances.
- Choose Launch instances.
- For Name use
employee-directory-app. Under Application and OS Images (Amazon Machine Image), choose the default Amazon Linux 2023.
Under Instance type, select t2.micro.
Under Key pair (login), choose Create a new key pair.
For Key pair name, paste app-key-pair. Choose Create key pair. The required .pem file should automatically download for you.
Under Network settings and Edit: Keep the default VPC selection, which should have (default) after the network name
Subnet: Choose the first subnet in the dropdown listAuto-assign Public IP: Enable
Under Firewall (security groups) choose Create security group use app-sg for the Security group name and Description.
Under Inbound security groups rules choose Remove above the ssh rule.
Choose Add security group rule. For Type choose HTTP. Under Source type choose Anywhere.
Expand Advanced details and under IAM instance profile choose S3DynamoDBFullAccessRole.
In the User data box, paste the following code:
#!/bin/bash -ex
wget https://aws-tc-largeobjects.s3-us-west-2.amazonaws.com/DEV-AWS-MO-GCNv2/FlaskApp.zip
unzip FlaskApp.zip
cd FlaskApp/
yum -y install python3-pip
pip install -r requirements.txt
yum -y install stress
export PHOTOS_BUCKET=${SUB_PHOTOS_BUCKET}
export AWS_DEFAULT_REGION=<INSERT REGION HERE>
export DYNAMO_MODE=on
FLASK_APP=application.py /usr/local/bin/flask run --host=0.0.0.0 --port=80
In the pasted code, change the following line to match your Region (your Region is listed at the top right, next to your user name):
export AWS_DEFAULT_REGION=<INSERT REGION HERE>
Example:
The following example uses the US West (Oregon) Region, or us-west-2.
export AWS_DEFAULT_REGION=us-west-2
Note: In a later lab, you will modify this user data script again to use your Amazon Simple Storage Service (Amazon S3) bucket. For now, keep ${SUB_PHOTOS_BUCKET} in the script.
- Choose Launch instance.
- Choose View all instances.
The instance should now be listed under Instances.
Wait for the Instance state to change to Running and the Status check to change to 2/2 checks passed.
Note: Often, the status checks update, but the console user interface (UI) might not update to reflect the most recent information. You can minimize waiting by refreshing the page after a few minutes.
How to view your hosted application?
Let's see the running application on the instance in a web browser window.
- Select the instance by selecting its check box.
- Instance information should load on the tabs in the pane.
On the Details tab, copy the Public IPv4 address.
Note: Make sure that you only copy the address instead of choosing the open address link.
- In a new browser window, paste the IP address that you copied. Make sure to remove the ‘S’ after HTTP so you are using only HTTP instead.
You should see an Employee Directory placeholder. Right now, you won’t be able to interact with it yet because the application isn’t connected to a database.
Congratulations! You have successfully created an EC2 instance, which hosts the employee directory application.
How to stop EC2 Instance?
After you finish exploring the instance, you will stop and terminate your instance so that you don’t incur future costs.
- Go back to the AWS Management Console.
- The employee-directory-app instance should still be selected.
- At the top of the console pane, choose Instance state, choose Stop instance, and choose Stop.
The status in the Instance state column will eventually go into the Stopped state.
- Next, you will terminate the instance.
- Make sure that check box next to the instance Name is selected.
- Choose Instance state, choose Terminate instance, and choose Terminate.


Top comments (0)