Dynamsoft Web Capture SDK is a camera-based document scanning SDK implemented in WebAssembly and JavaScript. Comparing to Dynamic Web TWAIN, the classic web scanner SDK, there is no local service installation required, which means the web capture SDK can work in any desktop browser, mobile browser, and WebView. This article guides you through how to build an Angular document scanner app using the web capture SDK from scratch.
Angular Development Environment
- Node.js
-
Angular CLI v13.3.7
npm install -g @angular/cli

ng --version

Angular CLI: 13.3.7
Node: 16.13.1
Package Manager: npm 8.1.2
OS: win32 x64

Angular: 13.3.10
... animations, common, compiler, compiler-cli, core, forms
... platform-browser, platform-browser-dynamic, router

Package                         Version
---------------------------------------------------------
@angular-devkit/architect       0.1303.7
@angular-devkit/build-angular   13.3.7
@angular-devkit/core            13.3.7
@angular-devkit/schematics      13.3.7
@angular/cli                    13.3.7
@schematics/angular             13.3.7
ng-packagr                      13.3.1
rxjs                            7.5.5
typescript                      4.6.4
Creating Angular Document Scanner App Step by Step
We scaffold a new Angular project via ng new command and install Dynamsoft Web Capture SDK in terminal:
ng new angular-document-scanner
cd angular-document-scanner
npm i mobile-web-capture
Then open the angular.json file to configure the assets.
"build":
{
  "builder": "@angular-devkit/build-angular:browser",
  "options": {
    ...
    "assets": [
      "src/favicon.ico",
      "src/assets",
      {
        "glob": "**/*",
        "input": "./node_modules/mobile-web-capture/dist",
        "output": "assets/dynamic-web-twain"
      }
    ...
    ],
  },
  ...
},
When running ng build, all static resource files will be copied to the assets/dynamic-web-twain folder.
The next step is to create a document scanner component, which contains document-scanner.component.css, document-scanner.component.html, document-scanner.component.spec.ts, and document-scanner.component.ts files.
ng generate component document-scanner
The target UI layout includes following elements:
- An
HTMLSelectElementfor selecting the camera sources. For desktop browsers, all USB cameras are listed. For mobile browsers, all front-facing and back-facing cameras are listed. - A button used to trigger document scanning and a button used to download the scanned document.
- An
HTMLDivElementset as the container for storing the scanned and processed document images.
The UI implementation in document-scanner.component.html is as follows:
<div class="document-scanner">
    <h1>Angular Document Scanner</h1>
    <div>
        <label for="videoSource">Video source: </label>
        <select id="videoSource"></select>
        <p></p>
        <button id="scanButton" (click)="scanDocument()">Scan Document</button> <button id="scanButton" (click)="downloadDocument()">Download Document</button>
    </div>

    <h3>Document Container</h3>
    <div id="dwtcontrolContainer"></div>

</div>
Now, we are going to add the corresponding TypeScript code in document-scanner.component.ts.
-
Import the SDK module from
mobile-web-capturepackage.
import Dynamsoft from 'mobile-web-capture'; import { WebTwain } from 'mobile-web-capture/dist/types/WebTwain'; -
In
ngOnInit(), initialize the SDK.
dwtObject: WebTwain | undefined;
videoSelect: HTMLSelectElement | undefined;
sourceDict: any = {};

ngOnInit(): void {
  this.videoSelect = document.querySelector('select#videoSource') as HTMLSelectElement;
  Dynamsoft.DWT.ProductKey = "LICENSE-KEY";
  Dynamsoft.DWT.ResourcesPath = 'assets/dynamic-web-twain';
  Dynamsoft.DWT.Containers = [{ ContainerId: 'dwtcontrolContainer' }];
  Dynamsoft.DWT.UseLocalService = false;
  Dynamsoft.DWT.Load();
  Dynamsoft.DWT.RegisterEvent('OnWebTwainReady', () => { this.onReady(); });
}
Two things need to be noted here:
- Apply for a 30-day trial license and thereafter update the
LICENSE-KEY. - Set the resource path
assets/dynamic-web-twainas we configure above inangular.jsonfile.
- Apply for a 30-day trial license and thereafter update the
-
Once the
OnWebTwainReadyevent is triggered, we get the SDK instance and update the camera source list.
onReady() { this.dwtObject = Dynamsoft.DWT.GetWebTwain('dwtcontrolContainer'); this.updateCameraList(); } updateCameraList() { if (this.videoSelect && this.dwtObject) { this.videoSelect.options.length = 0; this.dwtObject.Addon.Camera.getSourceList().then((list) => { for (var i = 0; i < list.length; i++) { var option = document.createElement('option'); option.text = list[i].label || list[i].deviceId; if (list[i].label) { this.sourceDict[list[i].label] = list[i].deviceId; } else { this.sourceDict[list[i].deviceId] = list[i].deviceId; } if (this.videoSelect) this.videoSelect.options.add(option); } }); } } -
Select a camera source and start document scanning.
scanDocument() { if (this.videoSelect) { let index = this.videoSelect.selectedIndex; if (index < 0) return; var option = this.videoSelect.options[index]; if (this.dwtObject) { this.dwtObject.Addon.Camera.selectSource(this.sourceDict[option.text]).then(camera => { if (this.videoSelect) this.createCameraScanner(this.sourceDict[option.text]); }); } } } async createCameraScanner(deviceId: string): Promise<void> { if (this.dwtObject) { await this.dwtObject.Addon.Camera.closeVideo(); this.dwtObject.Addon.Camera.scanDocument({ scannerViewer: { deviceId: deviceId, fullScreen: true, autoDetect: { enableAutoDetect: true }, continuousScan: { visibility: false, enableContinuousScan: false } } }).then( function () { console.log("OK"); }, function (error: any) { console.log(error.message); }); } } -
After capturing and editing a document image, we can save it to local disk.
downloadDocument() { if (this.dwtObject) { this.dwtObject.SaveAsJPEG("document.jpg", this.dwtObject.CurrentImageIndexInBuffer); } } -
Run the Angular document scanner in desktop and mobile browsers:
ng serve --sslDesktop browser

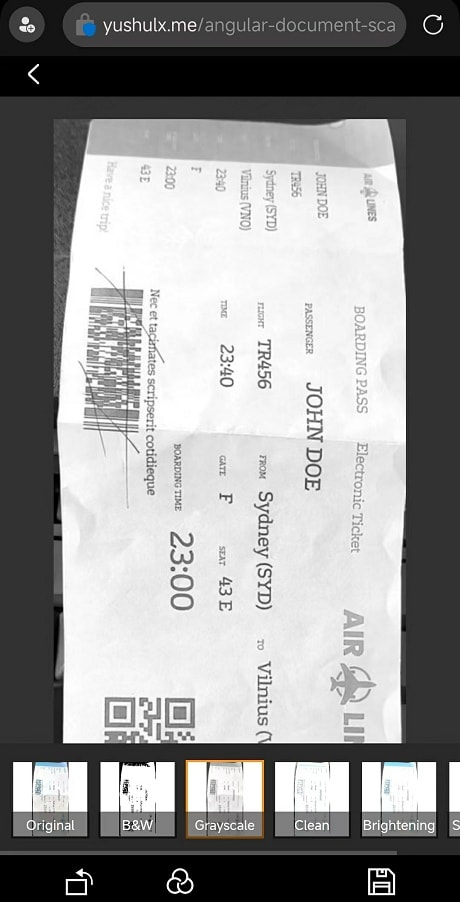
Mobile browser
GitHub Page Deployment
One more thing is to deploy the Angular document scanner project to GitHub pages.
Here are the steps:
-
Open
angular.jsonfile to increase the size budgets. The default budgets setting may cause the error:WARNING in budgets, maximum exceeded for initial.
"budgets": [ { "type": "initial", "maximumWarning": "2.5mb", "maximumError": "5mb" }, ] -
Create a GitHub action workflow:
name: Build and Deploy
on:
  push:
    branches:
      - main
jobs:
  build:

    runs-on: ubuntu-latest

    steps:
    - uses: actions/checkout@v2
    - name: All things angular
      uses: AhsanAyaz/angular-deploy-gh-pages-actions@v1.3.2
      with:
        github_access_token: ${{ secrets.GITHUB_TOKEN }}
        build_configuration: production
        base_href: /angular-document-scanner/
        deploy_branch: gh-pages
        angular_dist_build_folder: dist/angular-document-scanner
You need to replace
angular-document-scannerwith your project name. After the build is done, go to your GitHub
Settings > Pagesto launch the GtiHub page with thegh-pagesbranch. Don't forget to check theEnforce HTTPSoption.
Try the Demo Page
https://yushulx.me/angular-document-scanner/

Latest comments (0)