
Introduction
GitHub is a pretty awesome platform for sharing code. One of the best VCS(Version control Systems) in the world. Being a distributed version control system, it enables you to share code with other developers from your local communities and across the globe. With GitHub, you can create a repository, upload files, and commit your changes.

With all these features, contributing to a project on GitHub and can at times include so many people in the same project and proper identification of the contributors is a must. Commits identification on GitHub is is done using a GPG signature.
What is a GPG signature?
The GPG(GNU Privacy Guard) signature is a digital signature that is generated using a GPG key. GPG signatures are widely used by Linux package managers such as apt to verify the integrity of downloaded files. GPG signatures are also used by GitHub to verify the integrity of commits. As seen above on the picture above the types of commits Partial, Unverified and Verified commits. Let's see how to verify the commits.
Verifying the commits
Generating a GPG key
A commit is verified when the commit is signed by a GPG key. GitHub Blog explains how to generate a GPG key.
- Go to GPG command line tools for your respective operating system and install it.
- On your terminal, type the following command to generate a GPG key.
$ gpg --full-generate-key
- At the prompt, specify the kind of key you want, or press
Enterto accept the default. - At the prompt, specify the key size you want, or press
Enterto accept the default. Your key must be at least 4096 bits. - Enter the length of time the key should be valid. Press
Enterto specify the default selection, indicating that the key doesn't expire or something else depending on your preference. - Verify that your selections are correct.
- Enter your user ID information i.e. GitHub username, email and token.
- Type a secure passphrase.
- Use the
gpg --list-secret-keys --keyid-format=longcommand to list the long form of the GPG keys for which you have both a public and private key. A private key is required for signing commits or tags.
$ gpg --list-secret-keys --keyid-format=long
- From the list of GPG keys, copy the long form of the GPG key ID you'd like to use. In this example, the GPG key ID is
3*4*6*1*5*8...:
$ gpg --list-secret-keys --keyid-format=long
/Users/hubot/.gnupg/secring.gpg
------------------------------------
sec   4096R/3AA5C34371567BD2 2016-03-10 [expires: 2017-03-10]
uid                          Hubot
ssb   4096R/42B317FD4BA89E7A 2016-03-10
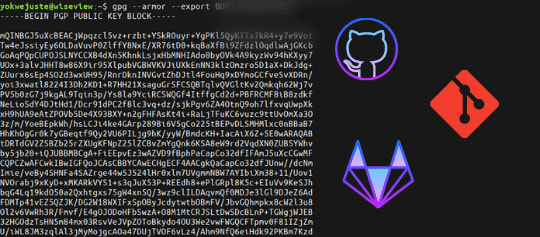
- Copy your GPG key, beginning with
-----BEGIN PGP PUBLIC KEY BLOCK-----and ending with-----END PGP PUBLIC KEY BLOCK-----. - Next, Add the GPG key to your GitHub account
Adding a GPG key to your GitHub account
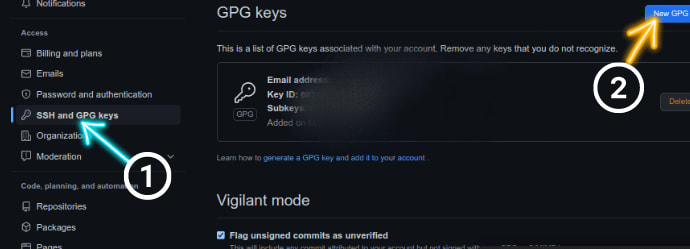
Go to your GitHub account and click on Settings then go to the Access section from the side navbar.

After clicking on the SSH and GPG keys link, click on the New GPG button.
Following the step 10 of the Generating a GPG key Paste the GPG key in the text area and click on the Save button.
- To confirm the action, enter your GitHub password.
Conclusion
With all this setting you're sure of making good and authenticate commits from both your computer and GitHub. You can now commit to your GitHub repository. Thanks for going through this tutorial.


Top comments (0)