Disclaimer: This post is more like my mental notes, this tech is super fresh to me so take with a pinch of salt.
Part of a journey I was on today to learn about Azure Functions and Cosmos DB. The final code for the Azure Functions element can be found on https://github.com/Wabbbit/AzLog
- Part one: Setup, Creating my first function, forwarding NLOG events and deploying to Azure within VS Code.
- Part two: persisting the incoming data using Cosmos DB.
What I want to achieve
Logging is a necessity in any application, I can’t even count the amount of times having some verbose logging has saved me many hours of debugging.
Currently, I almost exclusively use NLOG for .net projects. I typically structure my logging into discrete, separate loggers (i.e. Startup, API, Business logic failures, etc), which are usually configured to dump into .txt and/or the system event log.
This is great for our internal dev/SIT/QAT machines, and also when a client rings up about an error they encounter as they can just provide the appropriate log. The downside of this of course is that we don’t know if a client (With a self-hosted, remote installation) has a fatal error until they contact us, and with some clients the chain of reporting means the system could have been impacted for a short while before we get notified.
What if we could remotely capture major errors? As a proof of concept I will be attempting to use the NLOG web service adapter to talk to a C# Azure Function.
This assumes previous knowledge of working with NLOG and C#, but not Azure.
Creating my first Azure Function.
Prerequisites
Azure functions can be created directly within the Azure Portal, but for this demo I will be using VS Code.
First we need to make sure the system is set up to work with Azure Functions. We will need the following:
- VS Code
-
Azure Functions Core Tools: For this we can use NPM.
npm install -g azure-functions-core-tools. Note that this also exists on choco but has issues with x64 debugging in vscode. - Azure Functions VS Code extension.
- C# VS Code extension.
- and later on, an Azure account so we can deploy
Lets make a function!
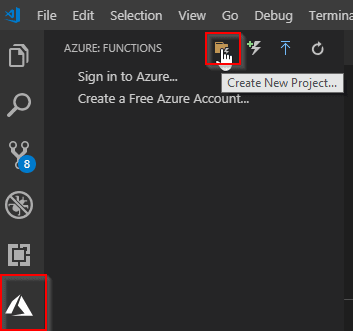
With the Azure Functions extension installed, select the Azure menu and then “Create new project”. Don’t worry about connecting to your Azure subscription yet if you have not done so.
Once a folder is specified, a language must be chosen. I chose C#.
Next, the template for the first function will need to be specified. For this demo I will be using the HttpTrigger which means it will fire when hit on receipt of HTTP Get or Post (Like any standard API)
The next panel will ask for a function name. For this I just chose “Log”.
A new Azure Function will be created. Lets take a look at the files that are created:
- .vscode: All the standard VS Code items which assist in build, debug and required extensions.
- *.csproj: The project file for this Azure Function.
- <function-name>.cs : This is the function that was created by providing a name in the last dialog. This is essentially like a Web API Controller.
Pressing F5 should restore any packages, start a debug session and output the temporary URL into the terminal, like so:
Navigating to that URL with a browser or postman will render something like:
Hooking up NLOG WebService target
Now I have a base function (Even if it doesn’t do anything), I can update NLOG in my project to make a web request with some information.
In my NLOG.config , I need to add a new target between the <targets></targets>
<target type='WebService'
            name='azurelogger'
            url='http://localhost:7071/api/Log'
            protocol='HttpPost'
            encoding='UTF-8' >
      <parameter name='timestamp' type='System.String' layout='${longdate}'/>
      <parameter name='loggerName' type='System.String' layout='${logger}'/>
      <parameter name='loggerLevel' type='System.String' layout='${level}'/>
      <parameter name='message' type='System.String' layout='${message}'/>
    </target>
What we have done here is:
- Create a new NLOG target of type “Web Service” to the URL from the step previously.
- Set up a few parameters to send across with our request, which are NLOG parameters for things like the log message, the time the entry was created, etc.
Now I need to ensure that one of the loggers is set to use the new “azurelogger”. For example:
<rules>
  <logger name="StartupLogger" minlevel="Error" writeTo="event, azurelogger" />
</rules>
Now if I do an IIS Reset where my NLOG config lives, and trigger off an error message manually, the new Azure Function should receive all the information it requires.
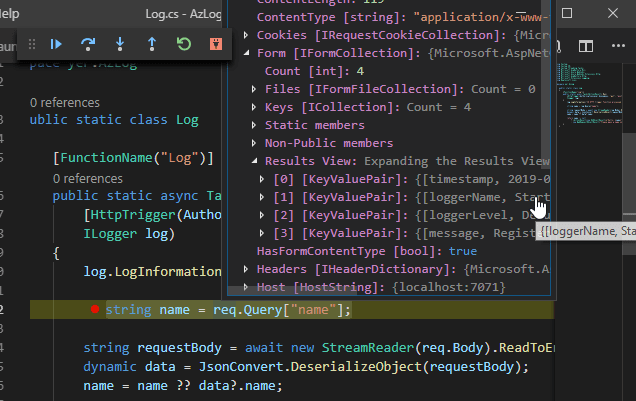
However, as our function doesn’t *do* anything, we can only prove this by debugging the function in VS Code. To do this I placed a breakpoint within the function and inspected the req object.
Here, I can see that all the fields I wanted are present!
Changing function code to accept incoming NLOG params
Fairly trivial – I altered the contents of the function to be as per below. In this code, I simply read the 4 items that my NLOG config is set to provide. I also changed the method name to something a little nicer than Run() as it is more descriptive. However this doesn’t actually control the endpoint name. To explicitly set the endpoint name I also changed the Route from null to “Log”. If I wanted to hit /api/blah instead of api/log I would simply do so by changing the route name.
public static class Log { [FunctionName("Log")] public static async Task\<IActionResult\> **AcceptLogRequest** ( [HttpTrigger(AuthorizationLevel.Anonymous, "get", "post", **Route = "Log**")] HttpRequest req, ILogger log) { log.LogInformation("HTTP trigger fired for log entry."); **string timestamp = req.Form["timestamp"]; string loggerName = req.Form["loggerName"]; string loggerLevel = req.Form["loggerLevel"]; string message = req.Form["message"]; var res = $"{timestamp} | {loggerName} | {loggerLevel.ToUpper()} | {message}"; log.LogInformation(res); //TODO: Persist the data return (ActionResult)new OkObjectResult(res);** } }
Now, if I debug and cause NLOG to log an error, I can see the terminal window and debugger capturing the same information that gets placed in my event log.
Deploying to Azure
I will skip the step of connecting to Azure, which is as simple as just pressing “Sign in” and following the instructions.
To deploy from VS Code, simply select “Deploy to Function App” and then provide a new name of a function to deploy to.
It takes a while to set up a new function app, but when its done, simply click “Deploy to function app”. Thew API will now be accessible via the web (using the azurewebsites url) and Azure dashboard.
Wrap up, until next time…
So far I have a new Azure Function, which is being contacted by the NLOG Web Service target.
Next time I will attempt to persist the incoming logs, using Cosmos DB
The post Remote NLOG logging with Azure Functions (Part one). appeared first on yer.ac | Adventures of a developer, and other things..


Top comments (0)