
I recently hosted my first static website on Amazon S3 and was pleasantly surprised to find that it is completely free if you sign up for an AWS account. The free tier for the first 12 months offers up to 5GB of storage, and even beyond that, the costs are minimal. In this blog post, I will guide you through the simple steps to set up a static website on Amazon S3.
For more information on the amazon free tier I have attached the link here
Step 1: Create an AWS Account
To get started, you'll need to have an AWS account. Once you've signed up, access the AWS Management Console and navigate to the Storage section. Click on Amazon S3 to proceed.
Step 2: Create a Bucket

On the Amazon S3 page, you will see an orange button that says "Create Bucket." Click on it to create a new bucket.
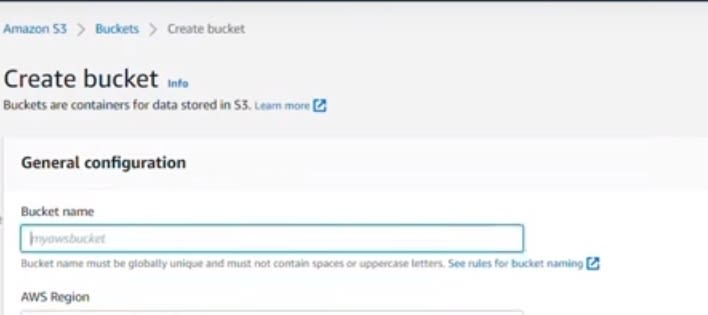
Choose a unique name for your bucket, as it needs to be globally unique. If the name is already taken, you will need to select a different one.
Step 3: Enable Public Access
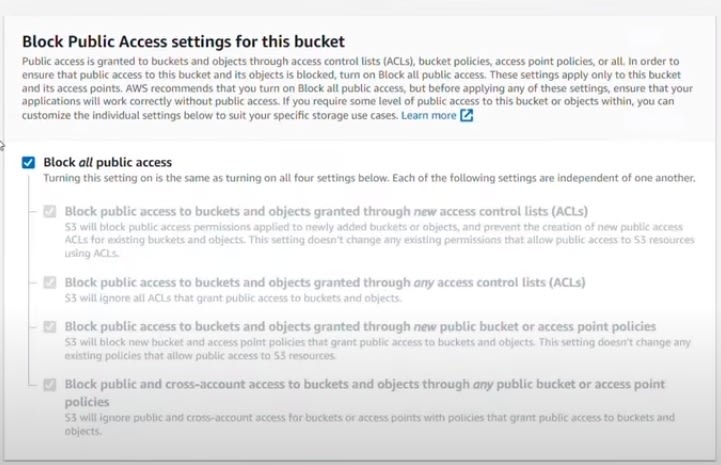
In the bucket settings page, scroll down until you find the "Block all public access (bucket setting)" section. It is essential to uncheck the "Block all public access" option to ensure that your static website is accessible. If you leave that option checked, all public access to the bucket will be blocked, including access to the static website files. By unchecking the option, you give permissions to allow public access to your S3 bucket. You can then configure the bucket to enable static website hosting and set up the required permissions and policies to allow users to access and view your website's content.
Step 4: Configure Static Website Hosting
Now, leave the rest of the settings as they are and click on "Create Bucket" to complete the process. After successfully creating the bucket, click on "Properties" and scroll down to the bottom of the page.

Locate the "Static Website Hosting" section and click on "Edit" to enable it.

In the "Index document" field, enter "index.html," and in the "Error document" field, enter "error.html." Save the changes.

Step 5: Obtain the Website Endpoint
Return to the "Properties" section and scroll down to the "Static Web Hosting" section. Copy the endpoint provided, which represents the URL for your static website.

But after you open it in a new tab you will see the page saying access is denied so that needs to be updated. So return to your console and under the bucket you created click on permission.
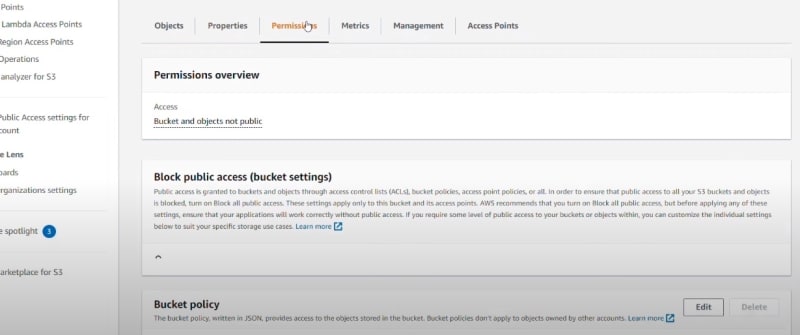
In the permission page scroll down and you will see bucket policy. The use of a bucket policy when hosting a static website on Amazon S3 (Simple Storage Service) is to grant public access permissions to the bucket and its objects. By default, S3 buckets are private, meaning only the bucket owner has access to the bucket and its contents.
To host a static website on S3, you need to make the objects within the bucket publicly accessible. Instead of manually changing permissions for each object, you can use a bucket policy to define the access permissions at the bucket level. The bucket policy allows you to specify who can access the bucket and what actions they can perform.

On the bucket policy click on edit.
{
    "Version": "2012-10-17",
    "Statement": [
        {
            "Sid": "PublicReadGetObject",
            "Effect": "Allow",
            "Principal": "*",
            "Action": [
                "s3:GetObject"
            ],
            "Resource": [
                "arn:aws:s3:::Bucket-Name/*"
            ]
        }
    ]
}
Use this code for your bucket policy. This policy allows anyone (represented by the wildcard "") to perform a "GetObject" action, which grants read access, on any object within the bucket. The "Resource" field specifies the ARN (Amazon Resource Name) of the objects in your bucket. This allows everyone to read/view everything in the bucket. Be sure to update the *Bucket-Name** (enter the the globally unique bucket name you used in step two). After you paste this json code scroll down and click on save changes.
For more information on bucket policy you can check out this link
Step 6: Upload Your HTML Files
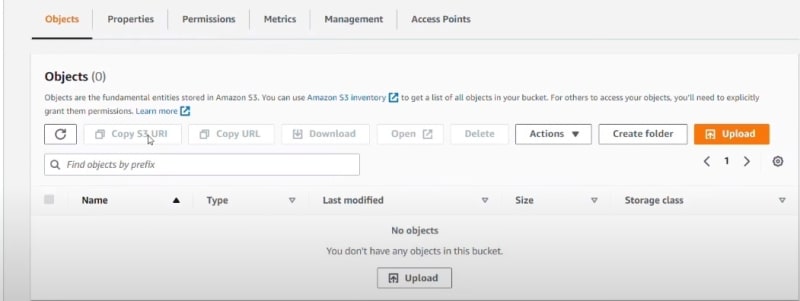
Your S3 bucket is now ready to host your static website. Upload your HTML files to the bucket using the appropriate file upload option. Navigate back to Object and you will find the upload option there.
<!DOCTYPE html>
<html>
  <head>
    <title>My Simple Index Page</title>
  </head>
  <body>
    <h1>Welcome to My Simple Index Page</h1>
    <p>This is a basic HTML file that serves as an index page for a website.</p>
  </body>
</html>
You can create your first static website using the provided sample HTML. Simply copy and paste the HTML code into your notepad and save it as "index.html". Afterward, you can upload it to an S3 server to host your website. Remember, this is just an example, and feel free to use your own HTML code to experiment. Follow these steps to get started with your first static website. Feel free to customize the HTML code or use your own HTML files. Remember, you can also upload CSS files, images, and videos to enhance your website hosted on Amazon S3.
If you want to learn the basics of HTML, you can check the link I provided to gain a basic understanding. click here
Step 7: Access Your Static Website
Please return to the previously opened tab that showed "access denied" and reload it once more. Your static website should now be up and running, displaying the content you uploaded to the S3 bucket.
Conclusion:
Hosting a static website on Amazon S3 is a cost-effective and straightforward solution. With a few easy steps, you can create your S3 bucket, configure the necessary settings, and start hosting your website. The free tier offered by Amazon S3 allows you to take advantage of the flexibility and scalability of cloud storage without incurring any expenses. Not only does this enable individuals to showcase their personal projects or portfolios, but it also empowers businesses to establish a professional online presence without the burden of significant hosting costs. Moreover, with the secure and reliable infrastructure of Amazon S3, website owners can ensure constant availability and seamless user experiences. Therefore, by leveraging the benefits of hosting static websites on S3, individuals and organizations can effectively harness the power of the cloud to publish and share their online content without breaking the bank. So, take advantage of this opportunity and enjoy the benefits of hosting your static website on Amazon S3 for free.


Top comments (0)