Time is precious, and while you’re undoubtedly awesome, you can’t be everywhere at once, right? Picture this: what if you could magically make some of your daily chores handle themselves? Unfortunately, we can’t wave a wand to teleport ourselves from bed to work, but there’s a bunch of tasks that can be made way easier through automation. Ansible Playbooks are a powerful tool – think of them as your minions, ready to tackle your tasks, even when you’re kicking back.
In this blog post, we’re going to explore an ideal developer flow for crafting these playbooks, using a real-life example: checking the weather forecast. We’ll start by setting up a clear framework to visualize your Ansible automation workflow, and then we’ll break down each step for some seriously smooth task automation. From scheduling playbook runs to even using a little AI magic to create them, we’ve got all the bases covered.
By the end of this post, you’ll have everything you need to create your very own Ansible Playbooks and start automating your life. 😎
Let’s jump right in!
1. Visualize your automation workflow
Let’s dive into the world of mastering Ansible Playbook development, with the automation of your morning routine as our guiding example.
To ensure a seamless automation process and avoid any slip-ups, it’s crucial to define the objectives of your playbook upfront. Start by creating a high-level diagram that maps out the complete workflow.
2. Create your playbook
You can either manually create your playbook or have some fun with AI assistance for tasks like weather notifications. In our case, ChatGPT will be our go-to helper. If you want to explore writing playbooks with ChatGPT’s assistance, check out this blog post.
Here’s what we need to achieve:
- Access the OpenWeather public API for our current location and retrieve weather data.
- Define the weather description from the response.
- Generate an email with the weather information.
And here’s the AI-suggested playbook:
---
- name: Check Weather Forecast and Send Email Notification
  hosts: localhost
  gather_facts: false
  vars:
    openweather_api_url: "http://api.openweathermap.org/data/2.5/weather"
    openweather_api_key: "{{ openweather_api_key }}"
    weather_location: "Ljubljana,SI"
    email_from: "weather@email.com"
    email_to: "bob.something@mail.com"
    email_subject: "Weather Forecast"
    email_body: "The weather forecast for {{ weather_location }}: {{ weather_description }}."

  tasks:
    - name: Fetch Weather Forecast
      community.general.uri:
        url: "{{ openweather_api_url }}"
        method: GET
        return_content: true
        body_format: json
        status_code: 200
        validate_certs: true
        follow_redirects: all
        headers:
          Accept: "application/json"
        params:
          q: "{{ weather_location }}"
          appid: "{{ openweather_api_key }}"
      register: weather_response

    - name: Extract Weather Description
      set_fact:
        weather_description: "\"{{ weather_response.json.weather[0].description }}\" "

    - name: Send Email Notification
      mail:
        host: smtp.gmail.com
        port: 587
        from: "{{ email_from }}"
        to: "{{ email_to }}"
        subject: "{{ email_subject }}"
        body: "{{ email_body }}"
        username: "{{ email_from }}"
        password: "{{ email_password }}"
        starttls: yes
      when: weather_response is defined
3. Validate and test your playbook
After playbook creation, it’s essential to verify its reliability and correctness. You can use Steampunk Spotter, an Ansible Playbook platform, for this purpose. Steampunk Spotter provides valuable insights to enhance playbook quality and reliability.
To assess your playbook, use the following command:
spotter scan playbook.yml
This command generates a list of potential issues and recommendations to enhance playbook quality:
4. Fix and fine-tune
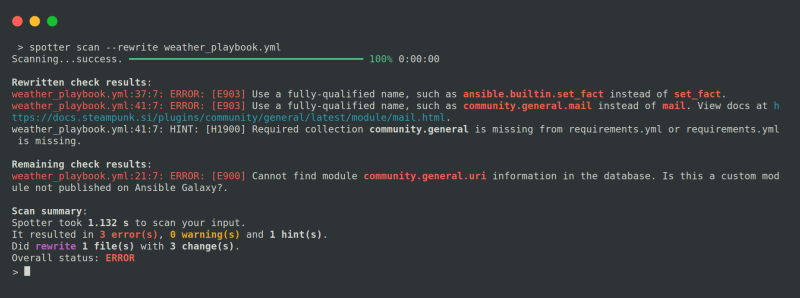
One fantastic feature of Spotter is its ability to apply fixes to your playbook automatically. To do so, use the “rewrite” option like this:
spotter scan --rewrite playbook.yml
To tackle the remaining issues, you can research the “community.general.uri” module and correct it to “ansible.builtin.uri”. Then, run another Spotter scan.
Fix any issues with parameter changes. For instance, move the “params” into the “openweather_api_url” and correct “starttls: yes” to “secure: starttls”. Also, adjust the task for extracting the weather description if needed.
Your playbook is now ready for use:
---
- name: Check Weather Forecast and Send Email Notification
  hosts: localhost
  gather_facts: false
  vars:
    api_token: "{{ api_token }}"
    openweather_api_url: https://api.openweathermap.org/data/3.0/onecall?lat=46.05&lon=14.50&exclude=hourly,daily,minutely&appid={{ api_token }}"
    weather_location: Ljubljana,SI
    email_from: weather@mail.com
    email_to: bob.something@mail.com
    email_subject: Weather Forecast
    email_body: The weather in Ljubljana currently is {{ weather_description }}.

  tasks:
    - name: Fetch Weather Forecast
      ansible.builtin.uri:
        url: "{{ openweather_api_url }}"
        method: GET
        return_content: true
        body_format: json
        status_code: 200
        validate_certs: true
        follow_redirects: all
        headers:
          Accept: application/json
      register: response

    - name: Extract Weather Description
      ansible.builtin.set_fact:
        weather_description: "{{ response.json.current.weather[0].description }}"

    - name: Send Email Notification
      community.general.mail:
        host: smtp.gmail.com
        port: 587
        from: "{{ email_from }}"
        to: "{{ email_to }}"
        subject: "{{ email_subject }}"
        body: "{{ email_body }}"
        username: weather@mail.com
        password: "{{ email_password }}"
        secure: starttls
5. Schedule playbook execution
Let’s say you want to run your playbook every day at 8:00 AM (Central European Standard Time - CES). To do so, Linux users can rely on Cron jobs, while Windows users can employ the Task Scheduler.
An example of a Cron job is as follows:
8 * * * /path/to/shell/script/run_weather_notification.sh
Here’s the content of the run_weather_notification.sh file:
#!/bin/bash

cd /home/bobsomething/Downloads

ansible-playbook playbook.yml
Success! We ran the playbook and received the weather notification. 😊
Additional tips for writing good Ansible Playbooks
Ready to enhance your Ansible Playbook skills? Click the links below for valuable tips and best practices that can help you create more efficient and error-free playbooks.
- The ultimate guide for writing high-quality Ansible Playbooks
- How to create a reliable Ansible Playbook
- Future of Ansible Playbook writing: How ChatGPT is changing the game
- Avoiding common mistakes in Ansible Playbooks
To sum up
To succeed in automation, effective Ansible Playbook development, combined with best practices, is key. Set clear objectives, design comprehensive workflows, and use tools like Steampunk Spotter for reliable, error-free playbooks. This streamlines automation and boosts its quality and efficiency.
If you’re ready to take your automation to the next level and improve your development workflow, explore Spotter and join our vibrant community on Discord or Reddit.


Top comments (0)