
One thing I realized after writing TypeScript (TS) for some while is "we write TS so we can keep writing JS". I used to sprinkle type annotations for the sake of typings but that's not how it works. What I should do is, write TS in one place, and put a structure so I can infer the type from where I need it without having to manage more types.
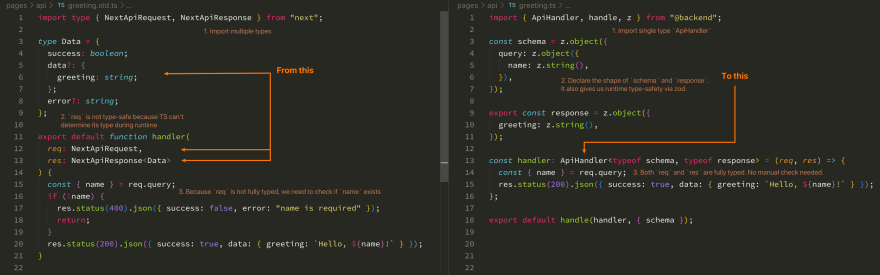
To see the difference, here's how I would write an API handler before and after applying the new structure:
This post is my attempt to extract what I wish I knew when I started. The TS knowledge is applicable anywhere you use TS, but I'll use Next.js to present the idea.
Before going further, step 1 to 2 are pretty basic if you're familiar with TS – so feel free to skim. The typing progress starts from step 3.
1. Setting up the stage
Let's set up the stage by creating a Next.js repo that uses TS out of the box:
npx create-next-app@latest --ts
Once done, you'll have these files:

At the time of this writing, I'm using Next.js 12
To ensure Next.js is ready, run yarn dev and curl the api/hello endpoint to see its response. When you stop your yarn dev terminal session (use ctrl+c), the curl should no longer work.

Now, let's install more packages (we'll explains their uses as we go):
yarn add zod http-status-code @sentry/nextjs
2. Use Absolute Import
Open the pages/api/hello.ts file in vscode and add this import statement, you'll see the red squiggle:

TS tried to find @backend package in node_modules but it couldn't find, hence the error. We don't need to install the package because it'll be a folder that we refer to using absolute import. Let's set it up:
- Open your
tsconfig.jsonand add these lines belowcompilerOptions:
"baseUrl": ".",
"paths": {
  "@api/*": [
    "pages/api/*"
  ],
  "@backend": [
    "backend"
  ],
  "@backend/*": [
    "backend/*"
  ]
},

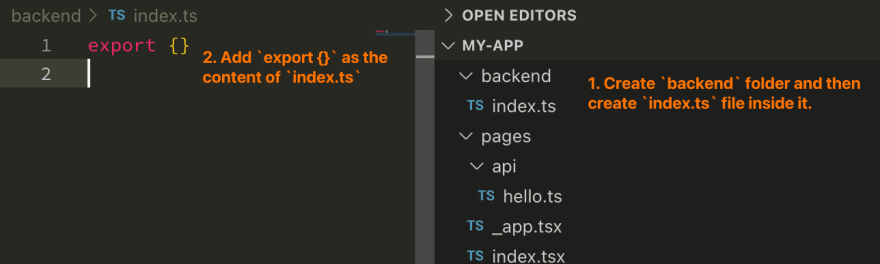
Next, let's create a new folder backend and create index.ts file in it:
Open the pages/api/hello.ts file again and the red squiggle is now gone!

Based on the newly added baseUrl and paths in our tsconfig.json, TS knows which folder to find when it sees "@backend". We call this set up "absolute import". Using absolute import is easier compared to relative import where we have to use ../ or ../../ to access files in parent folders.
1) Since we've added
"baseUrl":"."and thebackendfolder is actually in the root directory of the project, we can doimport {} "backend"and it'll still work. We'll stick with the"@backend"because (in my opinion) the@prefix is helpful to hint that it's an absolute import.2) We also added absolute path for
"@api/*"which we'll get to it later.
3. Add files to backend folder
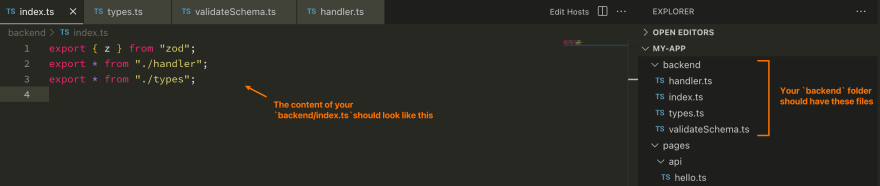
Open this Github gist and copy the content to its corresponding file in your backend folder:

Your backend folder should look like this:
Once all in place, let's run a type check to ensure there's no error:
yarn tsc --noEmit

We use
--noEmitto tell TS to run typechecking without actually compiling the files to JS.
4. Let's see the types!
Open the pages/api/hello.ts file and notice that Next.js has added a type Data for the JSON response. If you pass a wrong shape for the parameter, TS will complain:

Try save the file while having the red squiggly line and run a type check (yarn tsc --noEmit):
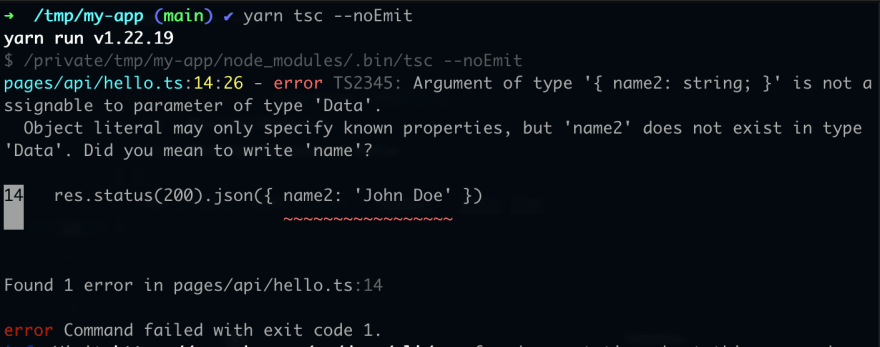
You see that the type check didn't pass because there's an error. This is one way of using TS to prevent accidental bug to creep in to production. For example, we can run the type check automatically (eg. using Github Action) for each commit and prevent the commit to get merged to main if the check is not passing.
Now we know that Next.js has added the type for the response data. But what if we want to type the request too? Open this gist and copy the content to pages/api/greeting.ts:

Here's how we read above codes:
-
Line 1: we import the typeApiHandlerand the functions (handle,z) from backend folder (seebackend/index.tsfile from step 3). Thezactually comes fromzodpackage but we re-export it thru backend so we don't have to add multiple imports. This is just a convenient approach because for our purpose,zwill almost always get imported whenhandleis. -
Line 3-7: defineschemavariable that we'll use to validate the request and add the typing to our request object (req). It tells us which properties (in query or body) are available for this endpoint. -
Line 9-11: defineresponseto type the shape of our response object (res). In this case, it has single property calledgreeting(a string). Unlikeschema,responseis exported because we want to reuse it in our React component later. -
Line 13-16: definehandlerfunction which is the meat of our API code. We useApiHandler, a generic we defined inbackend/types.ts:25, to add types to our request and response objects based on the type ofschemaandresponse.
-
Line 18: pass thehandlerto ourhandlefunction which will automatically validate the request against the schema. It guarantees that all properties defined inschemawill be available inhandler. For example, it'll drop the request and return an error response if user doesn't providenamein query param. This way, ourhandlerdoesn't have to deal with manual validation (eg. checking ifnameis not empty).
There we go! We now have a structure to type our API. I like the way it starts with declarative style (declare the shape of schema and response) and continues with imperative style (the handler).
When we have multiple files of similar structure, it'll be easy to skim because there's a pattern: shape of schema, shape of response, the handler. The handler is pretty slim too because it doesn't need to care about data validation.
For the next part, we'll see how we reuse the response to add typing in our React component. We'll also add a structure to test both the backend and frontend using jest. Here's a sneak peek:
Stay tuned!


Oldest comments (0)