
The Builder - The road from commit to production in 13s
Users can connect their GitHub project to WunderGraph Cloud.
Once they make a commit, "The Builder" will build a new docker image and deploy it across the globe in 13 seconds.
The Builder is standing on the shoulders of giants.
We use Podman for rootless docker builds, fly.io for Firecracker VMs (Fly Machines), and temporal.io for reliable
orchestration of the build process.
This post is about why and how we built "The Builder": the challenges we faced and how to build a modern, reliable, and
quick continuous integration and deployment system.
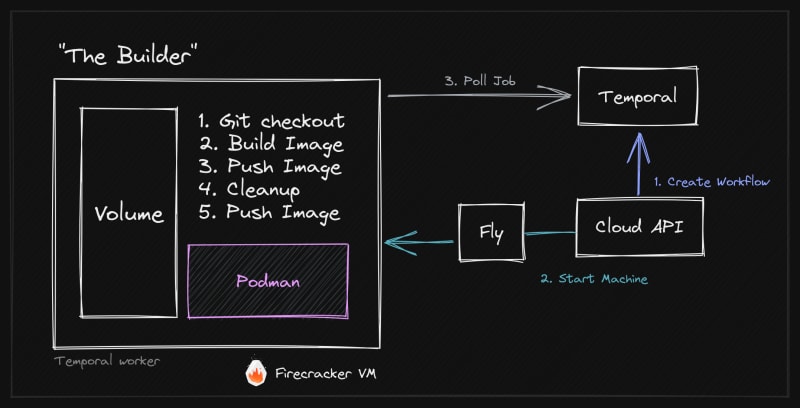
To give you a little sneak peek, here's an overview of our final Builder Architecture, outlining the different components like Firecracker, fly.io Machines, Podman, and temporal.io as well as how they interact.
As I've learned from Simon Sinek, it's important to start with the "Why" before diving into the details.
For that reason, I'd like to explain why "The Builder" is not just a game changer for API Management and API
Integrations (our focus), but more generically, how this pattern will revolutionize the way we build multi-tenant SaaS products.
Why we built "The Builder" — A game changer for API Management, API Integrations, and multi-tenant SaaS products in general
If you're not interested in the "Why", you can jump right into the "How" section.
Before building WunderGraph, I worked for a "Full Lifecycle API Management" company for a couple of years. Working there, I was confronted with the challenges of building multi-tenant applications.
The "old" way of going about it was to build and run one large monolithic API Gateway cluster that would serve all
projects, and that's exactly what most of our competitors do today in the API Management space.
When a company has enough resources, they might build a separate staging and production cluster. But that's expensive to run and maintain, so very few companies do that.
When you onboard a new project or API to the system, you usually use API calls to configure the API Gateway.
This means that the API Gateway has some sort of backend with a database to persist the configuration for each project, routes, security policies, etc.
These backends are usually named "Control Plane" or "Dashboard".
The upside of this approach is that you're able to "deploy" a change to your API Gateway configuration in a matter of
seconds.
It's a challenge to keep a cluster of API Gateways in sync, but it's possible.
That said, we've realized that this approach has many downsides:
- No out of the box versioning of your API Gateway configuration
- No out of the box way to audit changes
- The Gateway cluster is multi-tenant, which leads to:
- "Noisy" APIs that steal resources from other projects
- No isolation between projects
- No isolation between environments (staging, production, etc.)
- No isolation between teams
- No isolation between customers
- No isolation between API versions
What if we could build lightweight API Gateways that are dedicated to a single project, fully isolated from other
projects, secure, and individually scalable?
That's exactly what we're doing with WunderGraph Cloud.
We deploy lightweight API Gateways across the globe using fly.io Machines.
We've talked about the architecture before.
One catch of this approach is that you need to be able to build and deploy a new API Gateway within seconds to ensure
a great user experience. That's where "The Builder" comes into play.
Advantages of isolated Micro API Gateways over monolithic API Gateway clusters
In addition to isolation, security, and scalability, there are additional benefits of using this approach.
- Immutable deployments
Each deployment is immutable. This means that you can't change a running deployment.
This is great because it allows you to roll back to a previous version in the event of an error. It also allows you to run multiple versions of your API Gateway in parallel.
- Production-like Preview Environments
Thanks to this architecture, we can easily provide fully-isolated preview environments for each pull request.
This ties in nicely with a GitOps approach, where you can use the preview environment to test your changes before
merging them into the main branch.
Most importantly, Previews are production-like environments with this architecture.
Blue/Green Deployments and Canary Releases made easy
In addition to preview environments, we can also easily implement Blue/Green Deployments and Canary Releases.
Workflows like the following are possible:
- Deploy a new preview environment for each pull request
- Send a small percentage of shadow traffic to the preview environment
- Measure the performance of the preview environment
- If everything is healthy, send a small percentage of production traffic to the new version
- Increase the traffic gradually
- Eventually, shut down the old version
Summary — Why isolated micro deployments and quick builds are a game changer for multi-tenant SaaS and Open Source (OSS)
In summary, isolated micro deployments per tenant and quick builds are a game changer for multi-tenant SaaS products.
Instead of having to build monolithic multi-tenant applications, you can build lightweight microservices that are dedicated to a single tenant.
Another noticeable benefit of this architecture is the opportunity to build a great open-source community around
WunderGraph.
We don't have to build multi-tenant features into the core of the product.
We don't have to limit the product in any way or create multiple editions.
The core product is single tenant, Apache 2.0 licensed, and easy to use.
You can use WunderGraph Cloud or deploy it yourself to any Docker host.
How we built "The Builder" — Deploy Docker images in 13 seconds
Disclaimer: I (Jens) had some ideas about how "The Builder" should work, but the implementation was done by Dustin
(codename: The Machine), one of my Co-Founders.
It's an incredible piece of engineering, and I'm very proud of what we've created.
Research — How do you build Docker images quickly, reliably, and cost-effectively?
It all started with a few simple questions:
- Can we make building Docker images quick enough?
- Can we make it reliable?
- Can we make it cost-effective?
Our initial goal for "quick enough" was to be able to deploy a change in less than 30 seconds.
"Reliable" means that we need to be able to recover from failures, restart builds, retry failed builds, etc.
We also set a goal to be able to offer a free tier for our users, so our solution had to be cost-effective as well.
Most importantly, we needed a solution that we could easily "white label" and offer to our users.
It shouldn't feel like a third-party service but rather a first-class feature of WunderGraph Cloud.
E.g., we could have wrapped GitHub Actions somehow, but that just wouldn't have felt right.
In the process, we evaluated AWS Build, Google Build, and a few other solutions.
However, these options seemed to have the same flaws in common: they were not just slow but extremely expensive; and the level of performance we sought was simply not possible.
The Architecture of CI/CD as a Service is fundamentally broken, making it slow, hard to customize and expensive.
We came to the conclusion that CI/CD as a Service is fundamentally broken, making it unnecessarily slow and expensive.
Compared to our final solution, the state of the industry is unbelievable.
In addition, we also realized that our requirements are very specific and very niche.
Most CI/CD solutions target companies that build and deploy their own applications.
We needed a CI/CD solution that we could white label and offer to our users.
Users should not connect their GitHub account with "Google Cloud Build" but rather with "WunderGraph Cloud".
What makes CI/CD services slow?
Another question we've asked ourselves was what actually makes CI/CD services so slow.
When you want to build a project locally, here are the steps you need to take:
- Clone the repository
- Install the dependencies
- Build the project
- Run the tests
- Build the Docker image
- Push the Docker image
This takes some time, especially downloading dependencies, downloading the base layers of the Docker image, and pushing
the image.
So, if you run this sequentially, and your Dockerfile is "smart" (we'll talk about that later), you'll be able to
leverage a lot of caching and speed up the build process from minutes to seconds.
Similarly to a local build, CI/CD services need to do the same steps.
The only difference is that you usually run each build on a different "clean" machine, which also means that you can't
leverage any caching.
Well, that's not entirely true. Some CI/CD services have distributed build caches, but the concept is fundamentally flawed.
Let's take a look at how distributed build caches work and what the problems are.
Distributed Build Caches — The root cause of slow builds
As a young engineer, I wanted to progress in my career and learn more about System Design, Distributed Systems, and
Software Architecture.
Whenever I went on vacation, I would read a couple of books on these topics.
One such book was "Designing Data-Intensive Applications" by Martin Kleppmann.
It's a great book, and I highly recommend it to anyone who wants to acquire solid foundational knowledge in these topics.
If you want to learn about Consistency, Raft, Batch Processing, etc., then this is the book for you.
Anyway, I digress. There's one chapter in the book that greatly influenced the architecture of "The Builder".
But it also made me realize why all existing CI/CD solutions are so slow.
In chapter 10, Martin Kleppmann talks about Batch Processing, or MapReduce more specifically.
One of the key takeaways from this chapter is that you should always try to minimize the amount of data that needs to be transferred over the network.
This is especially important for batch processing, where you have to deal with large amounts of data.
So, instead of "transferring" the data to compute nodes, you should "bring" compute nodes to the data.
Instead of "transferring" data to compute nodes, you should "bring" compute nodes to the data.
But that's exactly what CI/CD solutions do. They use "pools" of compute nodes combined with distributed caches.
For instance, when you start a build on GitHub Actions, you'll first have to wait for a compute node to become
available—usually visible as "queuing" in the UI.
Once the node is available, it will have to download the build cache from the previous build.
And then, once the build is done, it will have to upload the build cache for the next build.
So while a remote build cache might speed up the build process, it's still not as quick as a local build because we're still transferring a lot of data over the network.
Rethinking virtual Machines with fly.io Machines — What actually is a virtual machine?
All of this leads to an interesting question: what actually is a virtual machine?
If you're using fly.io Machines, this question will have a weird answer.
They run Firecracker, the OSS VMM (Virtual Machine Manager) from AWS on big machines, and probably bare metal from
Equinix or Packet.
The "Abstraction" fly exposes is a "Machine", and there's a REST API to interact with it.
We could have used Firecracker directly, but then we'd probably still be in the "R & D" (Research and Development) phase.
Firecracker is amazing because of its strong isolation guarantees as well as fast startup times (~500ms).
So, what's special about fly Machines?
Using the APIs, you can create a Machine, assign a volume to it, start it, and make it sleep.
When your application exits with exit code 0, the Machine will be stopped, which means that it will be shut down, and
you're not charged for it anymore—only for the storage capacity of the volume.
If we want to start the Machine again, we can do so by calling the API. It will start up in about 400ms, re-attach the volume, and you're good to go.
Summarizing this, we could say that a virtual Machine is actually just a volume.
When you feel like it, you can assign CPU and Memory to the volume and make it a running VM. But most of the time, it's really just a volume.
This concept is a little brittle because the volume might fail at any time; it's still a volume and volumes fail.
But we don't care about that because we're just using it as a cache.
However, we care a lot about something else: eliminating network transfer for the build cache.
Each project in WunderGraph cloud gets assigned a dedicated Machine with a volume as the build cache.
This means that we're back to the "local" experience from above.
The first build might take some time—usually about a minute—but subsequent builds will be blazing fast because we're
using a "local" cache, just like on your local machine.
Similarly to MapReduce, we're bringing the Job, CPU, and Memory to the data—the build cache—and not the other way around.
This architecture is so simple, compared to build pools, distributed caches, etc.
Sometimes, the simplest solutions are the best.
However, we're far from done.
We've now got a machine with a file-system based cache, but that doesn't make it a CI/CD service yet.
How to build Docker images? Buildpacks? Nixpacks? Or maybe...
We needed a solution to actually build Docker images within the Machine.
We've evaluated a couple of solutions, including Buildpacks and its successor, Nixpacks.
For our use cases, we've concluded that both solutions are too generic and designed to build images for all kinds of
languages and frameworks.
In our case, we wanted to optimize for speed and simplicity, so we decided to build our own solution based on Podman.
Podman is a container engine, which is compatible with Docker.
Podman is written in Go, which makes it a great fit for our use case.
Moreover, Podman is designed to be used as a library, which made it easy to integrate into our application.
In terms of security, Podman is a great choice because it doesn't require root privileges or a daemon to run.
Build Workflow Orchestration — Queueing, Scheduling, and Cancellation with temporal.io
From an architectural point of view, we've got almost everything we need, except for a way to orchestrate the build workflow.
When a user pushes a commit to a repository, we need to start a build, monitor the progress, and report the status back to the user.
For a long time, I was looking at temporal.io, which seemed like a perfect fit for our use case to orchestrate the build
workflow.
I think that Uber is using Cadence, the predecessor of temporal, for their CI/CD solution as well, so I was pretty
confident that it would work for us.
However, we were still a very small team, and I was afraid of the complexity of integrating and running temporal.
With that in mind, I suggested that we could use a simple queueing system for the MVP, like RabbitMQ, to queue the build jobs.
We could then revisit the topic later.
One of the downsides of this approach is that we would have to implement resiliency and monitoring ourselves.
With temporal, you can easily retry failed activities, but with RabbitMQ, you'd have to implement that yourself.
In terms of monitoring, you can use the temporal web UI to debug failed workflows.
but with RabbitMQ, you'd have to reinvent the wheel again.
It was obvious that temporal would be a better fit for us, but I was still afraid of the complexity.
The next day, my technical Co-Founder, Dustin, pulled a classic "Dustin move".
Full of joy and excitement, he announced that he had already integrated temporal into our application.
"It's even testable!" he squealed.
And that's how we ended up using temporal and never looked back.
There were a couple of hiccups with canceling workflows, but the temporal team was very responsive and helpful.
Orchestrating CI/CD Workflows with temporal.io
Orchestrating CI/CD workflows, even with temporal, is not trivial, so let's break it down into a couple of steps:
- The user pushes a commit to a repository.
- This triggers a webhook from our GitHub application.
- The webhook is received by our WunderGraph Gateway, as we're actually using WunderGraph OSS to build WunderGraph cloud. This allows us to dogfood our own product. Our Gateway validates the signature of the webhook and forwards it to the WunderGraph cloud API, which is our internal GraphQL API. If you're familiar with WunderGraph, you might have noticed that we're not exposing GraphQL but hiding it behind our Gateway.
- We call a resolver in our internal API. The resolver creates a "Deployment" in our database, which is basically a record of a deployment. It then submits a build job to temporal.
- The build job is picked up by a worker, which is running within our Cloud API, so it's essentially the same process. The worker starts the build workflow, which is a wrapper around the "Build Machine" workflow. We then create a child workflow to perform the actual build. It's worth noting that for each "Project" we have one build workflow queue with exactly one worker—the dedicated build machine that is currently sleeping.
- Once the child workflow is submitted, we wake the build machine up from the wrapper workflow.
- The build machine starts and connects to temporal. It will then poll for new build jobs and execute them. As we've already submitted the build job in the previous step, the build machine will immediately pick it up.
- Once the builder is done it will poll for a new job and exit if it cannot immediately get a new one.
- The parent workflow will receive the result of the child workflow and update the "Deployment" as either done or failed.
A few more details about the build workflow:
The child workflow uses the Query API of temporal to query for the latest state of the build workflow.
This is exposed through the parent workflow, so we're able to query for the latest state of the workflow from our API.
We're able to stream the build state to the user in near real-time using a GraphQL Subscription.
One edge case that might occur is that the user pushes a new commit to the repository while the build is still running.
In this case, we cancel the current workflow by sending a signal to the workflow.
The workflow will then cancel the child workflow and start a new one.
This architecture has proven to be very reliable and easy to debug.
One thing to add is logging.
We could write a whole blog post about logging, especially real-time logging, so I'll keep it short in this post.
As the actual build runs inside Podman, we can trust the code "around" Podman, which is orchestrated by temporal.
When we execute commands inside Podman, we can mark each command as "public" or "private".
All public commands are logged automatically to a zap.Logger, which streams the logs into two sinks, NATS JetStream and stdout.
We're using NATS JetStream to stream the logs to the user in real-time through a GraphQL Subscription while the build is
running.
At the same time, we're piping the logs to stdout, which eventually ends up in our regular logging infrastructure backed by vector and ClickHouse.
Once a build is done, we can load and query the logs from ClickHouse.
ClickHouse is an (eventually) consistent database with very powerful querying capabilities.
While ingesting data, logs might be out of order, but once a build is done, we can leverage the full potential of the
database.
We've gone with this hybrid approach because we were unable to find a suitable solution that supports streaming logs in
real-time and querying them later.
A lot of time was spent on this topic, but that's a story for another blog post.
The complexity of Caching for CI/CD Workflows and building a great caching strategy
Now that we've got a way to orchestrate the build workflow, we need to discuss the details of a caching strategy.
Never use the latest tag for Docker images
When you build a docker image, even with Podman, you're going to need base images (layers).
In order to make these cacheable, you need to make sure that you're not using the latest tag.
Instead, work with SHAs, which identify the exact version of the artifact.
This is not just important for the base image/layers, but also when we're pushing the final image to a remote registry.
Using a SHA speeds up pushing layers when you're pushing the same image again.
Thanks to this, we're able to roll back to a previous version of the code in seconds using the exact same workflow, as everything is cached.
Docker best practices — Build layers in a cacheable sequence
Next, we need to be careful with how we're building our layers.
In Docker, it is essential to build layers in sequence, so you don't invalidate too early or without reason.
Here's an example of a bad layering strategy:
COPY . /app
This will invalidate the cache for the whole layer, even if you only changed one file.
Let's fix this!
First, copy the files that lock your dependencies, e.g., package.json, package-lock.json, install the dependencies, and then copy your app source code.
WORKDIR /app
COPY wundergraph/package.json wundergraph/package-lock.json /app/
RUN npm install
COPY . /app/
Installing npm dependencies can be a very expensive operation, so it's important to cache the result of this step.
Thanks to the layering strategy, we're able to cache the result of npm install and only invalidate the cache when
either the package.json or package-lock.json changes.
This step saves us at least 45 seconds per subsequent build.
Docker best practices — Use a cache mount for layers
Next, we need to take into consideration Docker layer cache mounts.
All Node package managers use a shared artifact store to avoid downloading the same package multiple times.
With the help of Docker layer cache mounts, we can instruct Podman to cache and restore the cache location when running
npm install.
Here's an example:
RUN --mount=type=cache,id=npm-global,target=/root/cache/npm npm ci --cache /root/cache/npm --prefer-offline --no-audit
Podman Blob Cache — Avoid unnecessary compression and uploads
When it comes to pushing the image layers to the remote registry, Podman will start several requests in parallel.
While this is quick in most cases, it can also become a bottleneck.
Network IO is slow compared to RAM or disk—the service can fail and lead to longer or failed builds.
To waste less time and make this process even more reliable, Podman manages a local
blob-cache.
In practice, it avoids unnecessary compression and uploads.
You can learn more about the blob cache
[here(https://github.com/containers/image/blob/b350ee329ee5f894474021358aab4d2211362e75/types/types.go#L185-L210).
Cleanup and housekeeping after the build
After your image is built and pushed to the remote registry, we need to do some cleanup.
Every new build produces a new Docker image.
It's only a matter of time before you're running out of disk space.
However, simply deleting all images after the build is not the right approach because it would delete the base images
and the local Docker layer cache.
We use Docker labels to distinguish between different images, allowing us to filter for only previously built images and delete them.
Finally, we analyze the builder volume.
If it ever grows over 75% of the space, we will run a hard podman system reset -f and clear all temporary directories.
On the next commit, your builder will be back to a clean state.
Native OverlayFS — The secret sauce
At this point, you might be thinking that we're done: we've put everything together, and we're ready to go.
With all this caching in place, we should be able to build and push images in seconds, right?
Well, not quite. We were missing ONE LINE OF CODE!
We thought we were done, but somehow, builds were still taking up to 30 seconds.
Something was wrong... so Dustin started digging deeper into the problem.
Podman uses an overlay file system as the storage driver.
Overlay File System is an efficient way to generate and store diffs to a filesystem.
Instead of moving and copying hundreds of megabytes across every container start, only modifications are tracked.
Every container has its own overlayfs mount.
In a nutshell, when a container doesn't make any modifications to the file system, no additional data is copied.
If a new file is added/updated/deleted, only the diff is stored.
If you prefer a visual approach I can recommend
this page by Julia Evans Illustrations.
Every file operation has to go through multiple kernel calls.
If you use an old kernel that doesn't support native overlayfs, and you need to copy hundreds of thousands of small
files, e.g, by copying node_modules, this can lead to a real bottleneck.
Here's a great resource if you're
interested in the details.
In the beginning, we didn't run builds with native overlayfs enabled because we were not able to make it work with our
setup of using Podman inside a Container.
If you initialize Podman inside the Container, it will check its storage capabilities at the storage root location of
Podman.
At image build time, this location is mounted on an overlayfs.
Overlay on top of native overlay won’t work.
In order to bypass the first overlay we need to volume mount the storage root as follows:
# https://github.com/containers/buildah/issues/3666
volume /var/lib/containers
With this small change, we were able to enable native overlayfs.
Initial builds improved from 1:15m to 0:55m, and subsequent builds from 30s to 13s.
We believe that 13s is an acceptable build time for a CI/CD pipeline.
It's not as fast as an API call, if we compare it to the time it takes to update the config of an API Gateway.
But it's fast enough to provide a fantastic developer experience when keeping in mind all the benefits that are
provided over a traditional API Gateway setup.
The Builder — A summary
The final solution allows us to provide our users with the best possible user experience.
When you create a new project on WunderGraph cloud, we provision a builder Machine and a Gateway Machine.
Both sleep while you're not using them.
When you make a commit, we wake the builder up and start the build process.
When the build is done, we put the builder back to sleep again.
The Gateway is also sleeping until you make an API call, in which case we wake it up in about 500ms and serve your API.
That's the power of Serverless without all the limitations.
While the administration of the fleet of Machines cannot be underestimated, the approach that's been presented allows us
to deploy our users' WunderGraphs in 13s with seamless integration into our overall architecture.
The effects of quick builds and isolated environments for SaaS and multi-tenant applications
To close this article, I want to share some thoughts on the effects of quick builds and isolated environments for SaaS
and multi-tenant applications.
This post was about building the foundation of WunderGraph Cloud, a multi-tenant multi-project API Gateway solution that
builds on top of a single-tenant API Gateway.
But as I said earlier, the same pattern can be applied to any SaaS application with remarkable benefits.
Companies can fully embrace open source and build a strong community around their product while still being able to
build a strong business model around it.
If you don't distinguish between the open-source and cloud versions, you don't have to sacrifice any developer
experience.
One such example is how we're implementing OpenTelemetry (OTEL) support in WunderGraph.
The open-source version will fully support generating OTEL traces.
You can configure the OTEL collector through environment variables and use it to send traces to your favorite tracing
backend without limitations.
When you deploy your WunderGraph app to WunderGraph Cloud, we will automatically configure these environment variables,
run the OTEL collector, the OTEL backend, storage, and the UI for you.
This strongly motivates us as a company to maintain a strong open-source offering because it's the foundation of our
business.
At the same time, we can offer a lot of value to our users by providing a fully managed suite of tools you'd need for a
production-ready environment.
Had we built a separate multi-tenant version of WunderGraph, we would always have to make a trade-off between offering a
feature in the open-source version or adding value to our cloud offering.
Another noteworthy effect for SaaS is the incredibly quick cold-start time of the deployed version of the WunderGraph
API Gateway. But the same principle applies to any SaaS application deployed the same way.
With cold-start times of around 500ms, we're able to provide a "Serverful" experience (keep in mind that we're talking
about a fully isolated environment per project) for our users at a fraction of the cost of a traditional API Gateway.
Traditional API Gateway clusters run 24/7, even if you're not using them.
This makes them economically unfeasible for small teams, startups, hobby projects, and Proof Of Concepts.
With this new deployment model, we're able to offer this functionality to an audience that was previously unable to
afford it.
But simultaneously, you can easily scale up horizontally and benefit from the strong isolation if you're a larger
company.
I believe that this is the future of multi-tenant SaaS applications.
Companies in other industries can simply follow the same pattern and turn their single-tenant applications into
multi-tenant SaaS offerings.
It builds upon the strength of open source while allowing companies to still build a strong, defensible moat around
their product.
Everybody can host WunderGraph themselves—please do so if you wish—but if you want a fully managed production-ready
deployment in 5 clicks, you're welcome to use our service.
Try it out yourself
If you're keen to experience the Builder in action, you can try it out yourself for free.
Just head over to WunderGraph Cloud and create a new project from a template.
Checkout the repository, make a commit, and watch the magic happen.
If you've got questions, feedback, or ideas on what else we could do with the builder, feel free to reach out to us on
Discord.
What's next?
The next challenge for us is to implement preview environments, distributed tracing from edge to origin, and edge caching for our API Gateway to complete our Serverless API Gateway offering.
What makes us smile
In our product demos, we love to demo the perfect integration of WunderGraph with Vercel, where WunderGraph is
responsible for the API Layer and Vercel for the Frontend.
It's amusing to see that we're able to make a full Gateway deployment quicker than deploying a typo fix in the Next.js
app.
Thoughts on fly.io
We're using fly.io not just for the builder, but also to deploy "Serverless" workloads for our users.
We've had a few issues with fly and their reliability as well but are overall very happy with their service.
In spite of the recent discussions about their reliability,
I'd like to share our perspective on the matter.
We're only really using the fly Machines API and some parts of their GraphQL API to manage fly Machines.
Although the API design could be improved, it's working very well for us. Most of the problems people report in the fly forums are related to deployments and the flyctl CLI.
I think that the problem with fly is how they manage expectations. They want to be a "Cloud Provider", but at their current stage, they're more of a "REST API for globally distributed Firecracker VMs".
This "Machine" abstraction is very powerful, with private networking, volumes, etc... and it's quite reliable.
I don't actually think that we need another "Cloud Provider", with PostgreSQL, Redis, etc... as a service.
I can go to Aiven, Planetscale or Neon and get a fully managed database.
What we really need is a rock-solid, reliable and easy to use REST API for managing VMs globally, with fast cold starts, private networking and file storage.
If I were fly, or maybe even a competitor, I'd make the decision to focus on companies that build their own clouds instead of trying to directly sell to end-users (Developers).
A lot of problems come from developers trying to deploy their Docker containers to fly manually. We never use flyctl and rarely use the fly web interface, all we care about is their API, which doesn't even have an OpenAPI specification.
I think that fly is on a great path, and I'm excited to see where they're going to take it. Kurt teased an idea a while ago, allowing you to "pause" a VM and then "resume" it later.
This feature alone would be a huge game changer for us and everybody else, because we could bring down cold starts of NodeJS, Java and other "heavy" runtimes way below 1s.
That alone, and a great REST API (without weird proxies) for managing these VMs would be enough to build a billion-dollar company. My 2 cents.

Top comments (0)