
Motivation
Everybody has encountered the problem of displaying a list or a tree view that contains a huge amount of entries. E.g. you want to display a list of articles in a store or - as in my case - a tree view of a 3D scene with (untruthfully) more than 30 million entries.
How do you solve such a problem?
Suggestions, please
Suggestion 1: Load and display all information at once.
This is the first attempt if you are inexperienced and do not yet have a "feel" for sizes. However, you will run into three problems very quickly:
- transferring all the data takes a clearly measurable amount of time.
- rendering the list in the browser also takes a measurable amount of time.
- the memory footprint of the application can become huge.
All of these points cause the application to take a long time to display anything and even blocks during rendering. Due to the high memory consumption, the application also becomes sluggish, even if everything is already loaded. If the user then filters the data afterwards, the whole fun starts all over again.
Suggestion 2: Using Pagination
This seems to be the most common solution. The list is reduced to a manageable number of entries. When the end of the list is reached, the next page is selected and the list is refilled.
In fact, this procedure solves the above problems. But I am bothered by the following:
- Why do I have a mixture of scrolling in the list and clicking to go to the next (partial) list. It is one list, isn't it?
- Let's assume the latency of the connection is high. Then after each click you have to wait this time to get back to a (partial) list to scroll.
Suggestion 3: Use a framework
Honestly? I am very skeptical about frameworks. Frameworks are often created out of a specific project to solve a problem that arose there. In fact, they offer excellent support for the most common tasks. But too often I have noticed that they do not offer a ready solution for 10% of the tasks to be solved in a project, which is not bad at first. But often they also prevent you from the "beautiful" or "elegant" solution due to their design and or parameters that are not outwardly guided.
Therefore, if the used framework solves your problem, use it. If not, from my point of view it is not useful to change it just to solve this one problem.
Suggestion 4: Use your brain!
And that's exactly what we're going to do now.
Develop a model for a vertical scrollbar for arbitrarily large data.
Our ingredients:
- Vanilla TypeScript
- CSS
- HTML
Boundary conditions:
- The list should scroll through any number of elements
- The application must never block
- The scrollbar should be arbitrarily designed/styled
- The height of the scrollbar tracker should reflect the total number of items.
- The height of the scrollbar tracker should not fall below a specified height.
- The model should be parameterizable
Even though it is possible to customize a scrollbar in modern browsers, we want to fully implement the scrollbar and its behavior ourselves. On the one hand it is a good exercise that gives you a deeper understanding, on the other hand there are still one or the other application that runs under an IE11 as embedded browser. And also these (or even just these) should profit from our efforts 😉.
Layout and Styling
Let's start with the layout. The element with the class scrollpane is the frame element for the list. It contains the elements that separates the scrollable area (scrollable) from the scrollbar (scrollbar). In the scrollable area the content (content) is placed, in which afterwards the individual rows to be drawn (row) are to be found.
The tracker (tracker) defines the slider that we can move up and down to scroll the content.
<div class="scrollpane">
    <div class="scrollable">
        <div class="content"></div>
    </div>
    <div class="scrollbar scrollbar--vertical">
        <div class="tracker"></div>
    </div>
</div>
Next, we'll set the styling, which is intentionally kept simple for this article.
.scrollpane {
    display: flex;
    flex-direction: row;
}
.scrollable {
    overflow: hidden;
    min-width: 200px;
    height: 300px;
}
.content {
    -webkit-user-select: none;
    user-select: none;
}
.scrollbar {
    background-color: grey;
}
.scrollbar--vertical {
    width: 30px;
}
.tracker {
    height: 10px;
    background-color: cyan;
    border-radius: 30px;
}
.row {
    height: 18px;
}
We are already finished here. So let's move on to the implementation of the controller!
The controller
Before we start, we should think about the implementation:
The controller should be generic
The controller should work for simple single-line list entries as well as for complex entries with images and/or multiple lines. However, we do make one small restriction here: Each list entry should have the same height.
So we define an interface ListItem without specifying it first. And the controller is a generic class of this interface.
interface ListItem {}

class VerticalScrollController<T extends ListItem> {}
As little data as possible should be stored on the client.
The minimum amount of data in a list that the client must have is the amount that it can visibly display. We define this area as a page.
interface Page<T extends ListItem> {
    startPosition: number;
    numTotalItems: number;
    items: T[];
}
A page contains:
- startPosition: the index of the first item
- numTotalItems: the total number of all items in the list (not the page!). This is needed to display the tracker of the scrollbar in the correct size.
- items: the items for this page starting with the element from startPosition.
The (re)loading of data should be hidden from the user.
Loading the data of a page can have latency. So to avoid scrolling jerkiness, we store in our controller not only the current page, but also the next and the previous one.
In addition, each page has overlapping entries above and below it, i.e. these entries appear both in the current page and in the next or previous one.

Loading a page and inserting/creating a list entry do not have to be implemented in the controller, but are passed along as functions.
type RequestPage<T extends ListItem> = (
    startPosition: number,
    numberItems: number
) => Promise<Page<T>>;

type InsertRow<T extends ListItem> = (item: T) => HTMLElement;

class VerticalScrollController<T extends ListItem> {
    private previousPage: Page<T> | undefined;
    private currentPage: Page<T> | undefined;
    private nextPage: Page<T> | undefined;

    private numVisibleItems: number = 0;
    private overlappingElements = 3;


    private requestPage: RequestPage<T> | undefined;
    private insertRow: InsertRow<T> | undefined;

    ...
}
When initializing the controller, a few characteristic values must first be calculated. The available height of our element and the height for an entry can be used to determine the number of visible entries in the list.
To determine the height for an entry, a dummy entry is created and rendered once.
private calculateEntryHeight(item: T): Promise<number> {
    return new Promise<number>((resolve, _reject) => {
        let elem = this.insertRow!(item);
        this.content!.appendChild(elem);
        requestAnimationFrame(() => {
            resolve(elem.clientHeight);
            this.content!.removeChild(elem);
        });
    });
}

...

let availableHeight = this.scrollable.clientHeight;
this.rowHeight = await this.calculateEntryHeight(dummy);
this.numVisibleItems = Math.ceil(availableHeight / this.rowHeight);
Next, we get the first page of list entries. It thus starts at index 0, and since there is no previous page, the number of entries of this page is determined by the sum of the visible entries plus the lower overlap. For this we call the passed requestPage() function.
The entries of the returned page are rendered into the corresponding content element.
We also get the next page.
private fillContent() {
    if (this.currentPage == null) return;

    this.content!.innerHTML = "";
    let fragment = document.createDocumentFragment();
    for (let item of this.currentPage!.items) {
        fragment.appendChild(this.insertRow!(item));
    }
    this.content!.appendChild(fragment);
}
Initialize the tracker
With the first page returned, we now also know the total number of list entries. Thus, we can now also determine the height of our tracker.
A small side note: It makes sense to return the total number with each page, because it may change. In a tree, the total number changes with each expand or collapse action.
The height of the tracker is determined by the ratio of the visible height and the total height. If this ratio is greater than or equal to one, the entire content fits in the visible area. In this case, we don't need a tracker because there is nothing to scroll.
If we have a high total number of entries, the tracker can become very small. Therefore, we set a minimum size in advance.
private calculateTrackerHeight(): number {
    let totalHeight = this.rowHeight * this.currentPage!.numTotalItems;
    let visibleHeight = this.scrollable.clientHeight;
    let normalizeFactor = visibleHeight / totalHeight;
    if (normalizeFactor >= 1) return 0;

    let trackerHeight = normalizeFactor * visibleHeight;
    if (trackerHeight < MIN_TRACKER_HEIGHT)
        trackerHeight = MIN_TRACKER_HEIGHT;
    return trackerHeight;
}
From the difference of the visible height and the tracker height we get the range in which the tracker can move. At the beginning, the tracker is at the top. From the displacement of the tracker we can extrapolate the displacement of our list.
let trackerHeight = this.calculateTrackerHeight();
this.trackableHeight = availableHeight - trackerHeight;
let totalHeight = this.rowHeight * this.currentPage!.numTotalItems;
this.extrapolateFactor = (totalHeight - availableHeight) / this.trackableHeight;

this.tracker!.style.height = `${trackerHeight}px`;
The scrollbar controller
To scroll a list you can:
- move the tracker up and down,
- turn the mouse wheel,
- click above or below the tracker on the scrollbar.
We want to implement two of these options in this example.
To move the tracker we add an event listener to the tracker for the pointerdown event. This way we directly support touch control as well. In the example I encapsulated the event functions onTrackerDown() etc. again in a member variable #onTrackerDownLambda. This has the advantage that this points to the controller class at the event's notification and not to the element that causes it. And since the lambda function was declared in a variable, I can also remove it with removeEventListener().
onTrackerDown() initializes the moving of the tracker.
- the Y-position of the down event is stored
- the current distance of the tracker from the top of the scrollbar is saved
- and two new event listeners are registered: pointermove and pointerup.
The new event listeners are registered here at the window object, because the tracker should be moved even if the pointer is not currently over the tracker. And this is done until the pointerup is notified.
If a move event is notified, we calculate the new distance to the top edge of the toolbar. To ensure that the tracker only moves within its specified range, we need to check the boundaries and correct the distance accordingly. Via the extrapolationFactor we can determine the actual height to be scrolled in pixels and change our view to the list with scrollTo().
#onTrackerDownLambda = (evt: PointerEvent) => this.onTrackerDown(evt);
...
this.tracker.addEventListener("pointerdown", this.#onTrackerDownLambda);
...
protected onTrackerDown(evt: PointerEvent) {
    this.trackerY = evt.pageY;
    this.lastMargin = parseFloat(this.tracker!.style.marginTop);
    window.addEventListener("pointerup", this.#onTrackerUpLambda);
    window.addEventListener("pointermove", this.#onTrackerMoveLambda);
}

protected onTrackerUp(evt: PointerEvent) {
    window.removeEventListener("pointerup", this.#onTrackerUpLambda);
    window.removeEventListener("pointermove", this.#onTrackerMoveLambda);
    this.lastMargin = parseFloat(this.tracker!.style.marginTop);
}

protected onTrackerMove(evt: PointerEvent) {
    let newMargin = evt.pageY - this.trackerY + this.lastMargin;
    if (newMargin < 0) newMargin = 0;
    if (newMargin >= this.trackableHeight) newMargin = this.trackableHeight;
    this.tracker!.style.marginTop = `${newMargin}px`;
    let scrollY = this.extrapolateFactor * newMargin;
    this.scrollTo(scrollY);
}
Before we have a look at the scrollTo() method, let's add mouse wheel control.
First we determine the distance in pixels to be scrolled by means of the deltaMode member. We calculate this back to the displacement of the tracker and check again the allowed limits and correct the distance if necessary. After that we call scrollTo() again.
#onScrollWheel = (evt: WheelEvent) => this.onScrollWheel(evt);
...
this.scrollable.addEventListener("wheel", this.#onScrollWheel);
...
protected onScrollWheel(evt: WheelEvent) {
    let scrollY = 0;
    switch (evt.deltaMode) {
        case WheelEvent.DOM_DELTA_LINE:
            scrollY = evt.deltaY * this.rowHeight;
            break;
        case WheelEvent.DOM_DELTA_PAGE:
            scrollY = evt.deltaY * this.scrollable.clientHeight;
            break;
        case WheelEvent.DOM_DELTA_PIXEL:
            scrollY = evt.deltaY;
            break;
    }

    let deltaMargin = scrollY / this.extrapolateFactor;
    this.lastMargin = deltaMargin + this.lastMargin;
    if (this.lastMargin < 0) this.lastMargin = 0;
    if (this.lastMargin >= this.trackableHeight)
        this.lastMargin = this.trackableHeight;
    this.tracker!.style.marginTop = `${this.lastMargin}px`;
    scrollY = this.extrapolateFactor * this.lastMargin;
    this.scrollTo(scrollY);
}
If we test our controller at this point, we will find that our tracker feels like a native scrollbar.
Now we come to the function scrollTo(). From the previously determined distance in pixels we determine the index of the page that should now be displayed. And from the start position of the current page we determine the index of the currently displayed page.
 private async scrollTo(scrollY: number) {
    let pageNumberByScroll = Math.floor(
        scrollY / (this.overlappingElements * this.rowHeight)
    );
    let pageNumberByPage = this.startPosition / this.overlappingElements;
        ...
 }
If both indices are the same, the target area of the scrolllevnt is still on the current page, and we only have to move our element, but reduced by the part relevant for the page. So we have to remove the previous page's heights, which in fact do not exist.
if (pageNumberByPage == pageNumberByScroll) {
    this.scrollable.scrollTo({
        top: scrollY % (this.overlappingElements * this.rowHeight),
    });
}
If the two page indices differ by exactly 1, the nextPage or the previousPage is moved to the currentPage, and the new next (or previous) page needs to be requested.
else if (
    pageNumberByPage + 1 == pageNumberByScroll &&
    this.nextPage != null
) {
    // set next page as current
    this.previousPage = this.currentPage;
    this.currentPage = this.nextPage;
    this.startPosition = this.currentPage!.startPosition;
    this.fillContent();
    this.nextPage = await this.requestPageIfExists(
        pageNumberByScroll + 1
    );
    // set the scrollTop offset from the overlapped element
    let top = scrollY % (this.overlappingElements * this.rowHeight);
    this.scrollable.scrollTo({
        top: top,
    });
} else if (
    pageNumberByPage - 1 == pageNumberByScroll &&
    this.previousPage != null
) {
    // set next page as current
    this.nextPage = this.currentPage;
    this.currentPage = this.previousPage;
    this.startPosition = this.currentPage!.startPosition;
    this.fillContent();
    this.previousPage = await this.requestPageIfExists(
        pageNumberByScroll
    );
    // set the scrollTop offset from the overlapped element
    let top = scrollY % (this.overlappingElements * this.rowHeight);
    this.scrollable.scrollTo({
        top: top,
    });
}
In large lists, it can happen that entire pages are "scrolled over" during fast scrolling. Or due to the latency the currentPage is not yet available. In this case, all pages must be reinitialized.
else {
    this.updatePages(pageNumberByScroll, scrollY);
}
...
private async updatePages(page: number, scrollY: number) {
    let availableHeight = this.scrollable.clientHeight;

    this.currentPage = await this.requestPageIfExists(page);
    this.startPosition = this.currentPage!.startPosition;
    this.fillContent();

    let trackerHeight = this.calculateTrackerHeight();
    this.trackableHeight = availableHeight - trackerHeight;
    let totalHeight = this.rowHeight * this.currentPage!.numTotalItems;
    this.extrapolateFactor =
        (totalHeight - availableHeight) / this.trackableHeight;

    this.tracker!.style.height = `${trackerHeight}px`;
    let top = scrollY % (this.overlappingElements * this.rowHeight);
    this.scrollable.scrollTo({
        top: top,
    });

    this.nextPage = await this.requestPageIfExists(page + 1);
    this.previousPage = await this.requestPageIfExists(page - 1);
}
And with that, our scrollbar is basically done.
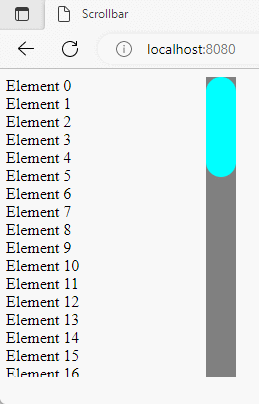
List with 50 elements

List with 500 elements

List with 500 elements and active debugger. Here you can see how the entries are updated.

The variable overlappingElements can be used to control the point of pagination. The more elements overlap, the less requests are made to a new page and the smoother is the scrolling.
Improvements
Sometimes there is a little flickering when replacing the currentPage. This effect can be controlled by a better exchange mechanism. For example, instead of deleting the innerHTML and rebuilding the entire list entries, you could create all rows directly at the beginning and only renew the texts within an entry when changing the page.
All elements below scrollpane can also be created by the controller and do not have to be entered manually in the HTML.
Furthermore, it makes more sense to decouple the request of a new page and the return of the result. This would allow a page to be updated without a previous request. This is e.g. meaningful, if in a multi user envirnonment a user works on the list entries. Then the list could be updated for all other users without them having to request the page again (push vs. poll).
This code can also be used to create a tree view. In this case a single entry would still have to contain the information in which level in the tree it is located in order to indent it correctly. This is also the reason why the method insertRow is passed as parameter and not implemented by the controller itself.
Final note
You can view the full source code on Github. As it stands, it is not (yet) a finished library or NPM module that can be used right away. Everything is kept very basic. But the code clarifies the approach. And it already shows that it is worth to think about every problem again and not to use the most common solution blindly.
It also shows that the solution of a problem is not solved by the tools you have at hand, but by thinking about it. The solution shown can basically be applied to any other language, be it C++, C#, Java, Go or Rust.
How do you like that approach? Do you have any suggestions for improvement that I missed?Let me know in the comments, so that I can adapt the article accordingly.
About which topics would you like to see an article? If it's possible for me, I'll be happy to follow your lead.
That's it for now. And don't forget:
Use your brain 😉

Top comments (0)