
When something important happens, you may want to notify all your users. One of the best ways to do so is by sending them an SMS alert. In particular, you should want to be able to launch these alerts when you desire. For example, by calling an API. Also, you should be able to customize the message to be sent. This is what this article is about!
Let's learn how to implement an alert sending API with Twilio in Spring Boot and Java.
What Is Twilio?
Twilio is a customer engagement platform used by hundreds of thousands of businesses and more than ten million developers worldwide to build unique, personalized experiences for their customers.
We're known for democratizing channels like voice, text, chat, video, and email through APIs, making it easy for every organization to build meaningful interactions with customers on the channels they prefer. — Twilio's official website
Prerequisites
Let's now delve into everything you need before starting to code your Spring Boot application.
1. Create and set up a Twilio account
If you already have a Twilio account, you can skip this step. Otherwise, follow this link to create a Twilio account: https://www.twilio.com/try-twilio.

Fill out the form to create a new Twilio account, and start a free trial. To do this, you need to verify your email by clicking on the link you will receive in your inbox.

By clicking on that link, you will reach the following page to verify your phone number.
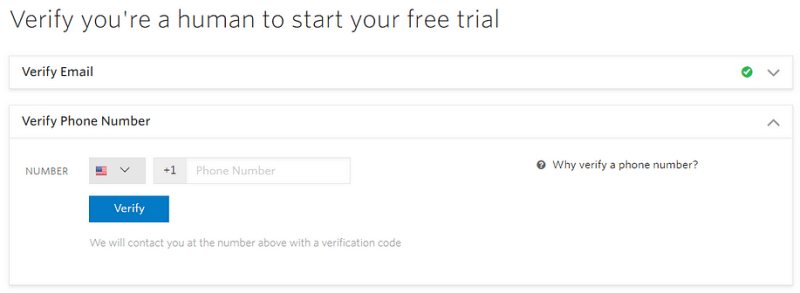
Now, follow the procedure and verify your phone number by inserting the verification code received via SMS to your personal phone number.
Then, compile the following form as below and click "Get Started with Twilio" to initialize your Twilio SMS alert platform.

This is what your Twilio console should look like:
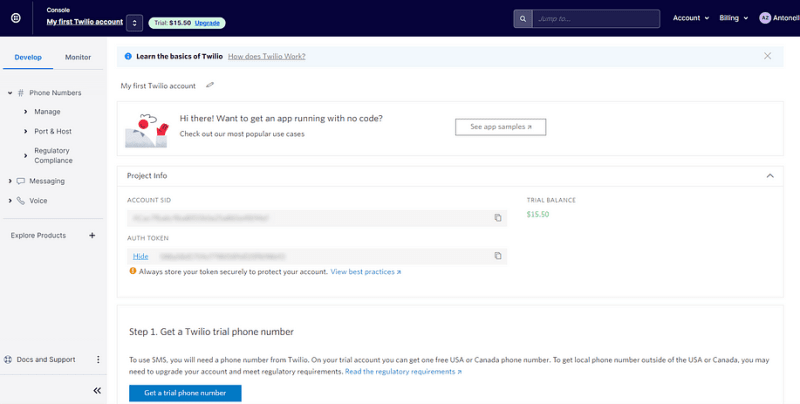
Copy and store the values you can see in the "ACCOUNT SID" and "AUTH TOKEN" fields in a safe place. You will need them later.
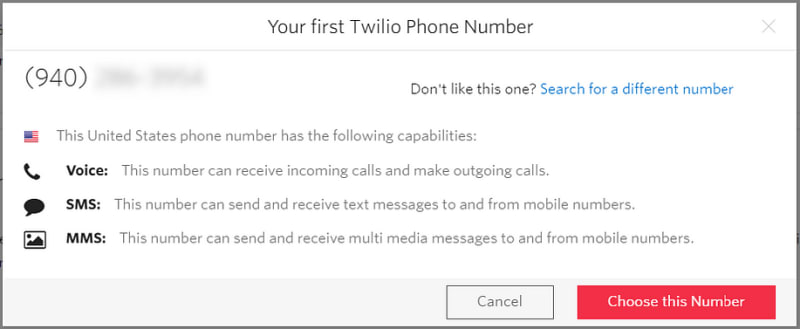
Then, click on "Get a trial phone number" and then on "Choose this Number" to get a valid Twilio phone number. This is required to send SMS with Twilio. Note that during your trial, you can only get one free Canada or USA phone number.
This is what your Twilio console should now look like:
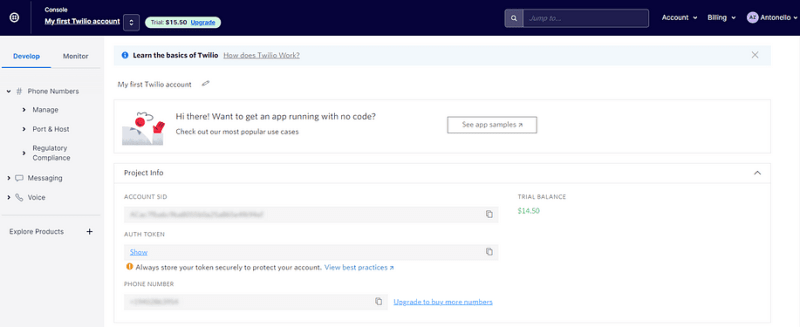
Notice how inside the "Project Info" card you have access to:
your Twilio
ACCOUNT SIDyour Twilio
AUTH TOKENyour Twilio
PHONE NUMBER
As you will see, these three values represent everything required to connect to your Twilio account and take advantage of all of its features.
2. Add the Twilio SDK to your project dependencies
To implement the demo application supporting this article, you need these:
Spring Boot ≥ 2.6.2
Spring Boot Starter Web ≥ 2.6.2
Twilio SDK ≥ 8.25.0
Java ≥ 11
First, initialize a blank Spring Boot Maven or Gradle Project by downloading it here: https://start.spring.io/. The demo application you will see how to build in the next chapter uses Maven, but you are free to opt for Gradle.
Then, add the Twilio SDK dependency, as explained below.
If you are a Maven user, add the following dependency to your project's POM file:
<dependency>
    <groupId>com.twilio.sdk</groupId>
    <artifactId>twilio</artifactId>
    <version>8.25.0</version>
</dependency>
Otherwise, if you are a Gradle user, add this dependency to your project's build file:
compile group: 'com.twilio.sdk', name: 'twilio', version: '8.25.0'
Now, you have everything required to start using Twilio in Spring Boot.
Build an API to Send Multiple SMS in Spring Boot
Follow this step-by-step tutorial to learn how to build an API to notify several users via SMS in Spring Boot and Java. Otherwise, clone the following GitHub repository supporting the article by launching this command:
git clone https://github.com/Tonel/twilio-multiple-sms-demo
and inspect the code to see how it works.
1. Initialize Twilio
As explained here in the Twilio official documentation, the first thing you need to do is to initialize Twilio by calling its init() function. You can achieve this in Spring Boot with as follows:
package com.demo.twiliomultiplesms.config;

import com.twilio.Twilio;
import org.springframework.beans.factory.annotation.Value;
import org.springframework.boot.context.properties.ConfigurationProperties;
import org.springframework.context.annotation.Configuration;

import javax.annotation.PostConstruct;

@Configuration
public class TwilioConfig {
    @Value("${twilio.account-sid}")
    private String twilioAccountSid;

    @Value("${twilio.auth-token}")
    private String twilioAuthToken;

    @PostConstruct
    public void init() {
        Twilio.init(
                getTwilioAccountSid(),
                getTwilioAuthToken()
        );
    }

    public String getTwilioAccountSid() {
        return twilioAccountSid;
    }

    public void setTwilioAccountSid(String twilioAccountSid) {
        this.twilioAccountSid = twilioAccountSid;
    }

    public String getTwilioAuthToken() {
        return twilioAuthToken;
    }

    public void setTwilioAuthToken(String twilioAuthToken) {
        this.twilioAuthToken = twilioAuthToken;
    }
}
This @Configuration annotated class will take care of reading the twilio.account-sid and twilio.auth-token properties. So, you must add them to your application.properties file as follows:
twilio.account-sid=<YOUR_TWILIO_ACCOUNT_SID>
twilio.auth-token=<YOUR_TWILIO_AUTH_TOKEN>
Then, it initializes Twilio in the init() method, which is annotated with @PostConstruct to make it access the @Value annotated fields.
2. Build a Spring Boot Alert Service
Now, define an AlertService class as follows:
package com.demo.twiliomultiplesms.service;

import com.demo.twiliomultiplesms.data.User;
import com.twilio.rest.api.v2010.account.Message;
import com.twilio.type.PhoneNumber;
import org.springframework.stereotype.Service;

import java.util.List;

@Service
public class AlertService {
    public void sendAlertSms(
            String message,
            List<User> users
    ) {
        // sending all the SMS in parallel
        users.stream()
                .parallel()
                .forEach(user -> Message.creator(
                        new PhoneNumber("+1555999000"), // your Twilio number (sender phone number)
                        new PhoneNumber(user.getPhoneNumber()), // receiver phone number
                        message
                ).create());
    }
}
The sendAlertSms() method requires the string message to be sent via SMS and a list of users to be notified. Then, it sends all the SMS in parallel by using the Twilio Message class. In particular, Message.creator() takes the following three parameters:
The sender phone number (i.e., your Twilio number retrieved above)
The recipient's phone number
The message
and send the SMS when the create() method is called.
3. Put It All Together
Now, all you need to do is an AlertController as below:
package com.demo.twiliomultiplesms.controller;

import com.demo.twiliomultiplesms.data.User;
import com.demo.twiliomultiplesms.dto.SmsAlertBody;
import com.demo.twiliomultiplesms.service.AlertService;
import org.springframework.beans.factory.annotation.Autowired;
import org.springframework.web.bind.annotation.PostMapping;
import org.springframework.web.bind.annotation.RequestBody;
import org.springframework.web.bind.annotation.RequestMapping;
import org.springframework.web.bind.annotation.RestController;

import java.util.List;

@RestController
@RequestMapping("/api/v1/alerts")
public class AlertController {
    private final AlertService alertService;

    @Autowired
    public AlertController(AlertService smsService) {
        this.alertService = smsService;
    }

    @PostMapping("sms")
    public void sendSms(@RequestBody SmsAlertBody smsAlertBody) {
        // retrieving all users to be notified

        // ...

        List<User> users = List.of(
                new User("John", "Williams", "+155599001"),
                new User("Maria", "Brown", "+1555999002"),
                new User("Gustavo", "Lopez", "+1555999003")
        );

        alertService.sendAlertSms(
                smsAlertBody.getMessage(),
                users
        );
    }
}
See the User class for completeness:
package com.demo.twiliomultiplesms.data;

public class User {
    private String name;
    private String surname;
    private String phoneNumber;

    public User() {}

    public User(String name, String surname, String phoneNumber) {
        this.name = name;
        this.surname = surname;
        this.phoneNumber = phoneNumber;
    }

    public String getName() {
        return name;
    }

    public void setName(String name) {
        this.name = name;
    }

    public String getSurname() {
        return surname;
    }

    public void setSurname(String surname) {
        this.surname = surname;
    }

    public String getPhoneNumber() {
        return phoneNumber;
    }

    public void setPhoneNumber(String phoneNumber) {
        this.phoneNumber = phoneNumber;
    }
}
But what really matters is the sendSms() method. There, you can implement your user retrieval logic. In this case, it was omitted for simplicity. Notice how it uses the aforementioned sendAlertSms() to notify them all.
4. Test Your API
Run your Spring Boot application with the following command:
./mvnw spring-boot:run
Then, if you are a Windows user, test the API defined above by launching the following command in your terminal:
Invoke-WebRequest -Uri http://localhost:8080/api/v1/alerts/sms -Method POST -Body '{"message": "Hello World!"}' -ContentType 'application/json'
Or, if you are a Linux or macOS user, with the following command:
curl -i -X POST -H "Content-Type: application/json" -d '{"message": "Hello World!"}' http://localhost:8080/api/v1/alerts/sms
Et voilà! All your users will now receive an SMS containing "Hello World!".
Conclusion
Here we looked at how to use the Twilio SDK to build an alerting system in Spring Boot and Java. Specifically, Twilio allows you to send multiple SMS with no effort, and showing how to achieve this goal step-by-step was what this article was about.
Thanks for reading! I hope that you found this article helpful.
The post "How To Send Multiple SMS With Twilio in Spring Boot" appeared first on Writech.


Top comments (0)