
Wrike recently open sourced a tool for Selenium testing called Callisto, so we wanted to share our experience with its development and usage.
Say no to Selenium Grid
Callisto is an open-source Kubernetes-native implementation of Selenium Grid.
We had previously been using Selenium Grid, but the experience wasn’t always great.
Selenium Grid has critical downsides:
It demands a lot of computational resources, but there’s always a chance of stability and reliability issues.
Selenium Hub (the part of Grid) can be an infrastructure bottleneck; it stores sessions/nodes mapping and forwards requests from a test to an appropriate node. It’s not possible to horizontally scale Hub by adding new instances, so if Hub is down, all sessions in Grid are inaccessible.
After a while we had a broad range of Selenium configurations (nodes, browsers, etc.), and it was difficult to maintain.
There were constant pain points of observability and error handling. Timeouts and unpredictable delays of test execution happened often, and unfortunately we had no tools to debug these issues properly.
It didn’t look good so we started to think about how we could fix these issues. We wanted the platform to run tests and not require constant support from QA and operation engineers.
As a result of our initial research we learned what we wanted our infrastructure to be: it should be managed by the Infrastructure as Code approach, eliminate toil and manual work, and bring the benefits of immutability and autoscaling.
Key application requirements and Kubernetes (unsurprisingly)
Based on previous conclusions we defined some key application requirements:
We don’t want to manage data and think about storage. That’s why our solution for Selenium testing should be stateless.
It should be lightweight so we can optimise our resource usage.
Containers and orchestration are cool for short release cycles and fast iterative development, so we started to think about the Kubernetes-native approach.
Since we wanted to increase visibility, we decided to use a fresh and clean environment for each and every test.
In regards to the second point above, it’s easy to understand why we chose Kubernetes, as there are obvious perks:
Kubernetes is an open-source solution, and has a great community and ecosystem.
It allows you to build an on-demand and scalable infrastructure.
The powerful API is helpful for any integration purposes.
Finally, we can declare all objects as code and pass it through our CI/CD pipelines without any trouble.
Our failed attempt to not reinvent the wheel
After we described what we wanted to achieve, we researched existing solutions.
It’s no surprise that we started with considering to fork Selenium Grid.
But we soon realized the Selenium codebase is big and complex. If we wanted to develop and maintain it, we needed to hire people with specific and specialized skill sets. And still it’d be difficult to integrate our changes to upstream.
At that time there was the public beta of Moon from Aerokube. Moon is the solution that brings you one universal autotest endpoint for all your applications and teams. Look’s good, but you have to pay to use it.
Also we understood that if we simplify this approach we’ll get a scalable, stateless solution that could be built quickly and on your own.
There’s no need for one central endpoint for all tests if you’re able to create several test endpoints with various configurations for every application on the fly. It’s simple enough to set up all the parameters for a test run and an infrastructure from the continuous integration pipeline.
So let’s conclude our intentions. We don’t want to develop a multi-purpose and complex toolchain. Instead, we decided to create a Kubernetes-native and simple solution that should do one thing and do it well. And as long as we keep it simple, we can observe and debug it with less effort.
Keep it simple
Before we dive into a detailed review of Callisto, we should outline what problem it solves.
Generally, there are UI tests that require browsers to execute some actions. To create a pod with a browser, we have to use the Kubernetes API. In principle, the tests could do it themselves, but this way has drawbacks that include observability and security issues. Another option is to move the Kubernetes interaction logic to a specific service.
That’s why we’ve created Callisto.
The test asks Callisto to create a browser. Using Kubernetes API, Callisto creates a pod with Webdriver and a browser, gives it to a test, and then deletes a pod at the end of a test.
How Callisto works
To deploy Callisto you can use the production-ready Helm chart; to automate the deployment, just use your usual CI/CD toolchain. We prefer to deploy the Callisto instance for every CI pipeline and shut it down at the end of test runs.
Let’s take a closer look at the usual browser creation workflow. This workflow is simplified and doesn’t include Kubernetes-related parts (ingress, service, etc).
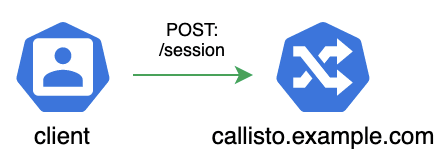
Some external clients (e.g., Java-based autotests) send POST requests to Callisto endpoint for browser creation purposes. Callisto uses standard Webdriver protocol. Client creates a session by sending a POST to /session endpoint.
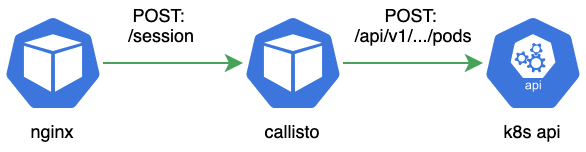
The request is first handled by Nginx, which then forwards /session requests to the Callisto application. Callisto processes these requests and interacts with the Kubernetes API to create a Webdriver pod.

When the pod is ready, Callisto passes /session request to the Webdriver instance inside the pod, and Webdriver creates a browser.

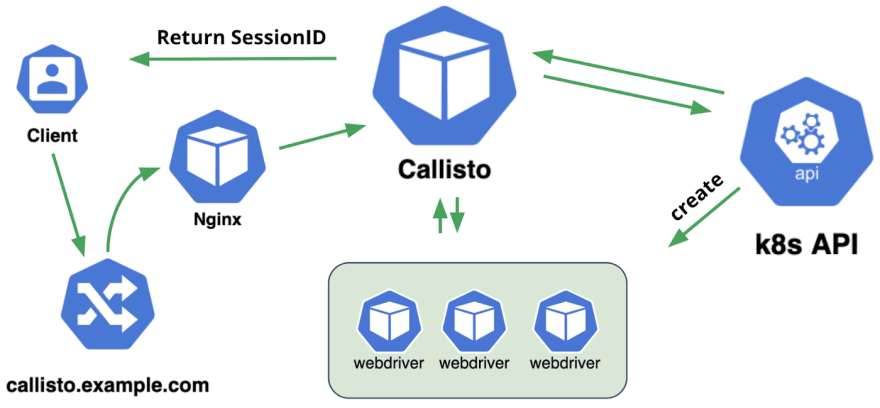
After the browser is created, Callisto returns SessionId to a client.
SessionId contains information about a pod name and internal IP. Nginx takes it into account and forwards requests from clients (tests) to appropriate pods with Webdriver and browser. There’s no need to store session data in the database, and that’s why Callisto is a stateless and fault tolerant solution.
Here you can see the complete workflow that we use to create a Webdriver session. After this stage Webdriver and the browser inside the cluster are ready to work.
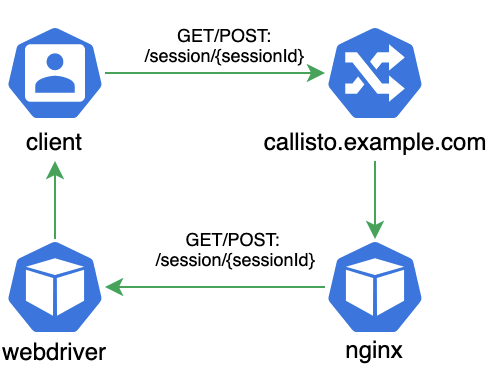
The client can interact with Webdriver using SessionID from the previous step and sends commands to the browser. Nginx gets this type of request and forwards it to Webdriver, then a browser performs some test actions and returns the result to the client.
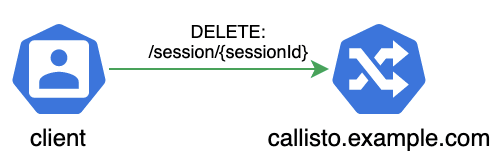
When the job is finally done, a client needs to clean up the mess. Our client sends another request to Callisto endpoint, in this case it should be DELETE http request.
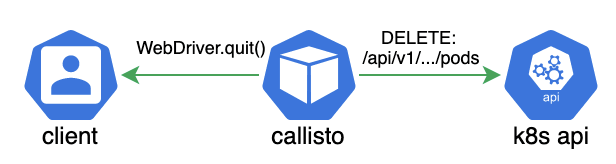
Usually after a DELETE request, Webdriver uses the WebDriver.quit() method to close all browser windows and terminate the session. But with Callisto you don’t have to waste time on a browser termination, because Callisto creates a brand new pod for every test. So we can skip termination and delete a pod right away, allowing us to complete a test as fast as possible and decrease the cost of infrastructure on a large scale.
That’s why Callisto just deletes the Webdriver pod using Kubernetes API and returns a WebDriver.quit() sample response to a client.
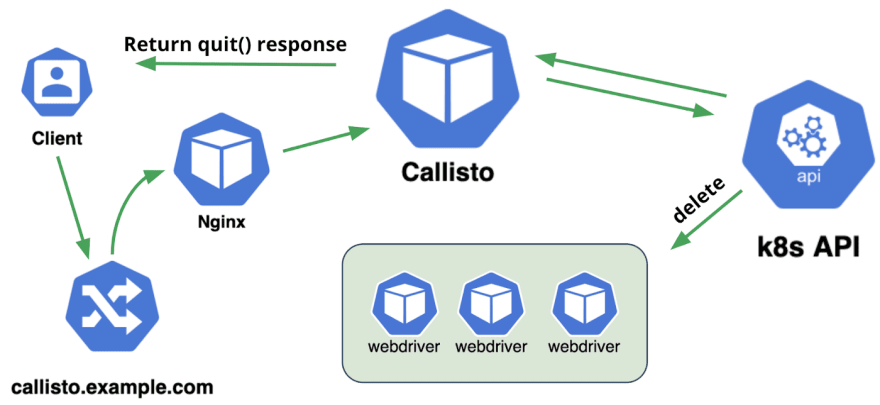
Here’s a complete workflow of Webdriver sessions termination.
Why you should give Callisto a try
It’s easy to deploy and use Callisto on top of your Kubernetes cluster.
Callisto is stateless and therefore reliable.
The stateless and lightweight nature of Callisto makes it fault-tolerant and gives you the ability to run your tests on cheap hardware without trade-offs between reliability and costs. You can run Callisto on top of preemptible or spot instances. For example, we prefer to deploy Google Kubernetes Engine worker nodes based on preemptible instances, and our spendings decrease significantly compared to Selenium Grid usage.
Callisto uses open-source Webdriver images (all thanks to folks from Aerokube), allowing you to focus on your tests instead of browser packaging and updates.
Callisto provides a useful set of metrics (either for monitoring or debugging) in Prometheus format. You can build fancy dashboards in Grafana based on these metrics.
Thanks for reading! I hope everything was clear and informative enough for you to start using Callisto. You can get it all on Github: source code, docs, and Helm chart. Feel free to contribute and share your experience. Good luck!


Top comments (0)