
Each restaurant or business will have different opening hours. To have that information and display them for each on a website, there might be some techniques including using custom fields. We’re going to add an Opening Hours section into the single restaurant page in this tutorial as this example:

Before Getting Started
For having extra information such as time slots for each day, we’ll use custom fields. So, we need the Meta Box plugin to have a framework to create them. It’s free and available on wordpress.org. Furthermore, we also need some advanced features from Meta Box that are available in the following extensions:
- MB Views: a premium extension of Meta Box. It helps you create templates and display the custom fields’ value on the frontend without touching the theme’s files;
- Meta Box Builder: this premium extension of Meta Box provides an intuitive UI in the back end to create and configure custom fields without using code;
- MB Group: this extension helps to arrange fields into groups;
- MB Conditional Logic: this premium extension allows you to create rules to control the display of the fields.
After installing and activating all these plugins, let’s move to the how-to parts right now.
Video Tutorial
Step 1: Create Custom Fields
Normally, we will create a new custom post type for the restaurants first. I skipped that step since I already had it on my website. If you haven’t had it yet, create it first then go to this step.
Go to Meta Box > Custom Fields > Add New to create a new field group. Then, add custom fields with the structure like this:
| Name | ID | Type | Options | Condition |
| Choose an option | choose_an_option | select | 1. all_days_are_the_same 2. difference_between_weekdays_and_weekend 3. custom | |
| All days have the same opening hours | all_days_have_the_same_opening_hours | group | display only when:
the choose_an_option field = the all_days_are_the_same option |
|
| Type of opening hours | type_of_opening_hours | select | 1. open_all_day 2. close_all_day 3. by_appointment_only 4. enter_hours | |
| Choose time slots | choose_time_slots | group | display only when: the type_of_opening_hours field = the enter_hours option |
|
| Start time | start_time | time picker | ||
| End time | end_time | time picker | ||
| Weekdays | weekdays | group | display only when: the choose_an_opton field = the difference_between_weekdays_and_weekend option |
|
| Type of opening hours | type_of_opening_hours_weekdays | select | 1. open_all_day 2. close_all_day 3. by_appointment_only 4. enter_hours | |
| Choose time slots | choose_time_slots_weekdays | group | display only when: the type_of_opening_hours_weekdays field = the enter_hours option |
|
| Start time | start_time_weekdays | time picker | ||
| End time | end_time_weekdays | time picker | ||
| Weekend | weekend | group | display only when: the choose_an_opton field = the difference_between_weekdays_and_weekend option |
|
| Type of opening hours | type_of_opening_hours_weekend | select | 1. open_all_day 2. close_all_day 3. by_appointment_only 4. enter_hours | |
| Choose time slots | choose_time_slots_weekend | group | display only when: the type_of_opening_hours_weekend field = the enter_hours option |
|
| Start time | start_time_weekend | time picker | ||
| End time | end_time_weekend | time picker | ||
| Monday | monday | group | display only when: the choose_an_option field = the custom option |
|
| Type of opening hours | type_of_opening_hours_monday | select | 1. open_all_day 2. close_all_day 3. by_appointment_only 4. enter_hours | |
| Choose time slots | choose_time_slots_weekend | group | display only when: the type_of_opening_hours_monday field = the enter_hours option |
|
| Start time | start_time_weekend | time picker | ||
| End time | end_time_weekend | time picker | ||
| … | … | … | … | … |
| Sunday | … | … | … | … |
As you saw in the table above, the first field is a select field and there are 3 options that I filled in the Choice box as below.

These 3 options will be used to set the display rule of other group fields.
To set conditions to groups, for example, with the All days have the same opening hours group. Go to the Advanced tab, and then set the rule in the Conditional Logic section like this:

This rule means this group will be displayed when the Choose an Option field is selected as All days have the same opening hours option which has the value is all_days_are_the_same.
Similarly, if the Choose an Option field is chosen as the Difference between weekdays and weekend options, all the subfields of the Weekdays and Weekend group will be displayed. Or if the Choose an Option field is selected as the Custom option, the group fields for every day in a week will be shown up. That’s the concept of how to create fields.
In each group field, I also have subfields with the same structure.
The Type of Opening Hours field is the select field. I have 4 options in the Choice box:
- Open All day;
- Close All day;
- By Appointment Only;
- Enter Hours.
If the restaurant has different opening hours, you can choose Enter Hours to display Start Time and End Time field in the Choose Time Slots group. So, I will set the rule for this group like this:

In case the restaurant opens in multiple time slots, we’ll need this group to be cloneable. So, I tick this box as below:

After creating all the fields, go to the Settings tab of the field group, choose Location as Post Type, and select Restaurant to apply these fields to this post type.
Publish this field group and go to the post editor in Restaurant, you will see the custom fields here.
They work exactly like the rule we set.
Step 2: Display the Fields’ Value on the Frontend
In this step, we’ll get the input data from those custom fields to display into the Restaurant single page. To do it, we’ll use MB Views in order not to touch the theme’s file.
If you’ve had a template created by MB Views for the Restaurant single page already, just go to it and edit. If not, create one. Then, add code to the view.
The code is quite long, so I put it in my Github here. You can refer to it for more details. The code is divided into several parts to get corresponding group data. Because of the same concept in all parts, I’ll explain a typical part to be more clear about the logic.
<div class="opening-hours">
<h2>
    Opening Hours
</h2>
<div class="detail-schedule">
    {% set options = post.choose_an_options.value %}
    {% if (options == "all_days_are_the_same") %}
        {% set same_days = post.all_days_have_the_same_opening_hours.type_of_opening_hours.value %}
        {% if ( same_days == "enter_hours") %}
        <div class="date-time">
            <div class="date">
                Mon - Sun
            </div>
            <div class="hour">
            {% for clone in post.all_days_have_the_same_opening_hours.choose_time_slots %}
            <div class="time-slot">
                <p class="starting-hour">
                    {{ clone.start_time | date( 'h:i A' ) }}
                </p>
                <p class="ending-hour">
                    {{ clone.end_time | date( 'h:i A' ) }}
                </p>
            </div>
            {% endfor %}
            </div>
        </div>
    {% else %}
    <div class="date-time">
        <div class="date">
            Mon - Sun
        </div>
        <div class="hour">
            {{ post.all_days_have_the_same_opening_hours.type_of_opening_hours.label }}
        </div>
    </div>
    {% endif %}
Here I created a variable named options to admit the value from the Choose an Option field. Then I set a rule based on its value to display values from the subfield in the corresponding group. It’s quite the same with the rules we created when configuring the fields.
First, if its value is all_day_are_the_same, the values of fields in the All days have the same opening hours group will be displayed.
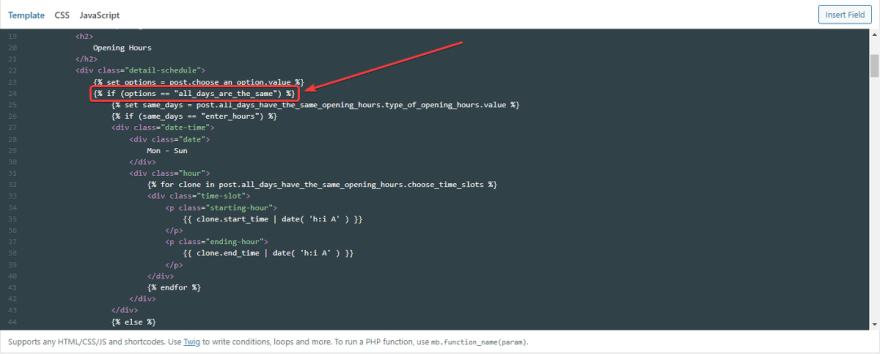
I set a variable named same_days to admit the value from the Type of Opening Hours field. If it is enter_hours, the Choose Time Slots group will be obtained and displayed the data. As we set before, this group is cloneable, so there is a loop here.

After adding code, depending on if the view is new or not, choose the right Type and Location for the view in the Settings section.
Go to the single Restaurant page and see how the opening hours section displays.
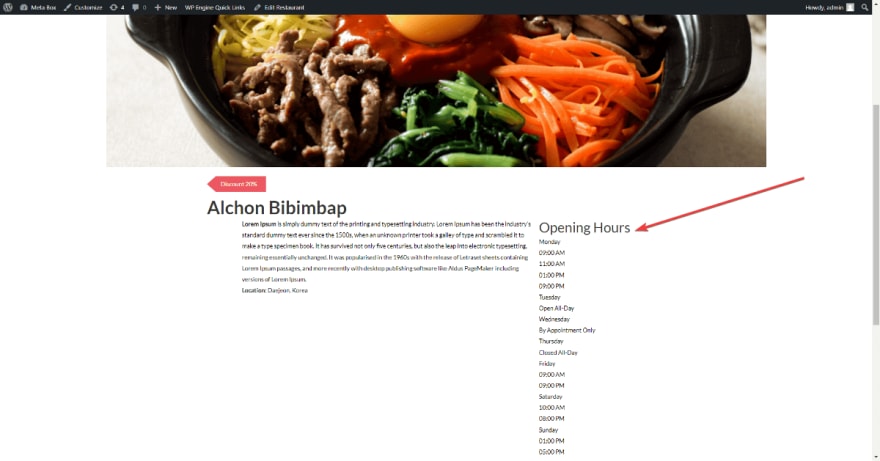
All the time slots are shown exactly as I input in the backend. But this section doesn't look as good as I want. So, I will add some CSS to style this section in the next step.
Step 3: Style the Opening Hours Section
Still, in the view of the single Restaurant page, go to the CSS tab.

And then, add the code below.
.container.detail-restaurant .opening-hours {
    max-width: 300px;
    margin: 0 auto;
    width: 100%;
}

 .container.detail-restaurant .opening-hours h2 {
    margin: 0 0 10px;
    text-align: center;
    border: 4px solid rgba(231,57,72,.85);
    border-right: 0;
    border-left: 0;
}

 .container.detail-restaurant .detail-schedule .date-time {
    display: flex;
    width: 100%;
    justify-content: space-between;
    flex-wrap: wrap;
    align-items: baseline;
}

.container.detail-restaurant .detail-schedule .date-time .hour .starting-hour:after{
    content: '-';
    margin: 0 5px;
}

.container.detail-restaurant .detail-schedule .date-time .hour .time-slot {
    display: flex;
}

.container.detail-restaurant .detail-schedule .date-time .date {
    font-weight: 700;
    font-size: 15px;
}

.container.detail-restaurant .detail-schedule {
    display: flex;
    flex-wrap: wrap;
    justify-content: center;
    border-bottom: 4px solid rgba(231,57,72,.85);
    padding-bottom: 10px;
}
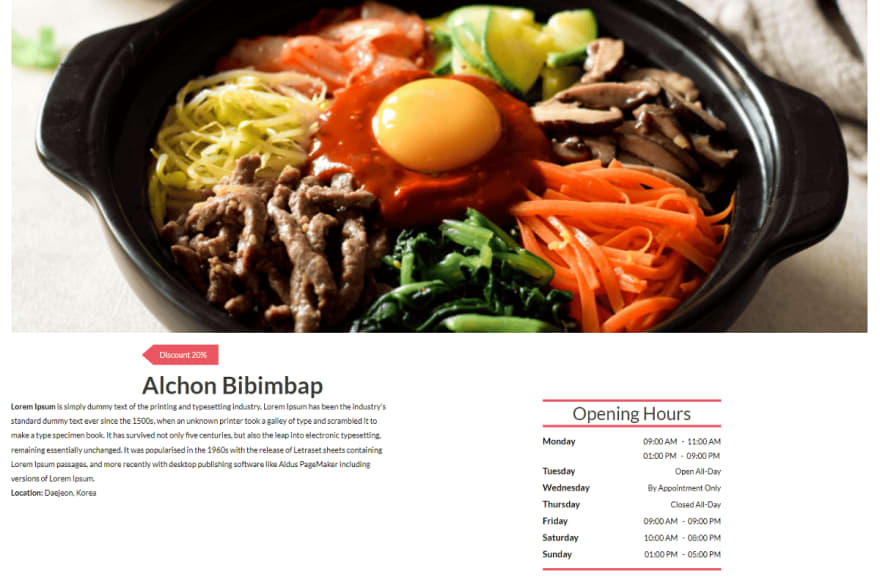
Now, go back to the single restaurant page, you’ll see the Opening Hours section looks much more beautiful.
Last Words
If you’re running an online food order platform or own a business that has several branches with different time zones, this tutorial may make sense to you. Try it out and share the results in the comment section. For other page builders, we’ll have some upcoming tutorials. By the way, if you have any idea about any other tutorials, feel free to leave a comment. Thank you for reading. Good luck!

Top comments (0)