If you have an event, a sale promotion, or a coming soon page that has a countdown timer, you should create an “Add to Calendar” button to help users add your event to their calendar via the .ics file. This .ics file can be opened by many popular calendar applications such as Outlook, Google calendar, or Windows Calendar. Thanks to that, readers can remember or create reminders to join your event.
Now, let’s find out how to create the Add to Calendar button on an event page using Meta Box plugin and its MB Custom Post Type & Custom Taxonomies extension.
First of all, you need to install and activate these FREE tools:
- Core Meta Box plugin: a framework that helps you create meta boxes and custom fields quickly and effortlessly. It’s free and available on wordpress.org.
- MB Custom Post Type & Custom Taxonomies: a free extension of Meta Box that helps you create custom post types for events easily.
Step 1: Create a Post Type and Custom Fields for Your Event
On the Admin Dashboard, go to Meta Box > Post Types > New Post Type to create a new post type.
Name this post type as Event, fill in the necessary information for this post type, and click Publish.
Next, we need to create custom fields for the Event post type to enter the information about start time, end time, event location. To do so, I use the Meta Box Builder extension (premium) to have a UI for creating custom fields right on the back end. If you don’t want to pay for it, you can also use the free Online Generator tool of Meta Box or code manually.
If you want to use the Online Generator, get the detailed instruction here.
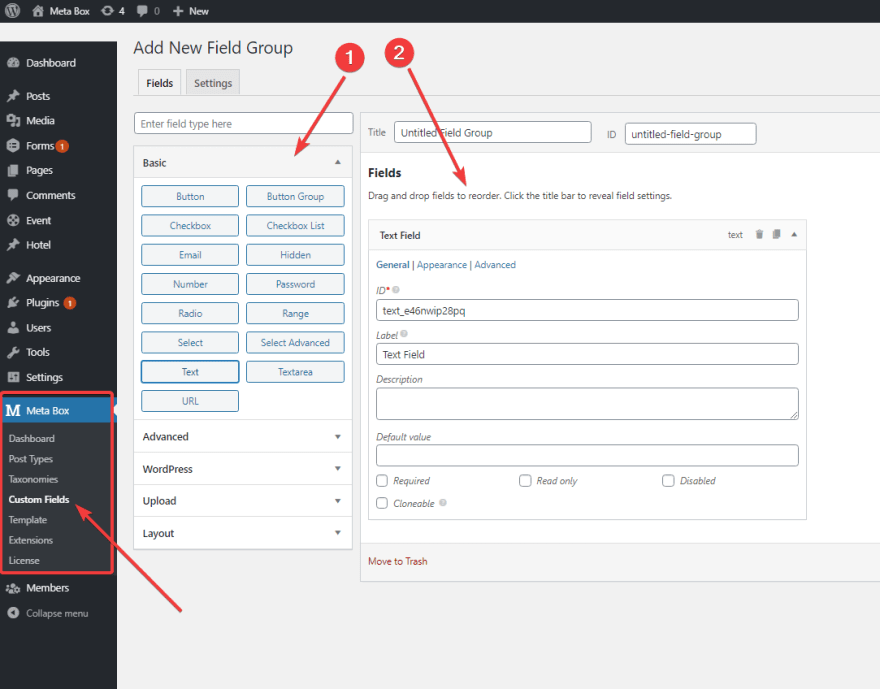
To create custom fields for the Event post type, go to Meta Box > Custom Fields > Add New. After that, select the field type and enter the field’s Label and ID. As for the Start and End fields, select the Datetime field type. And as for the Location field, select the Text field type.
These are three fields that I’ve created. You need to remember their IDs because we are going to use them in the following step.
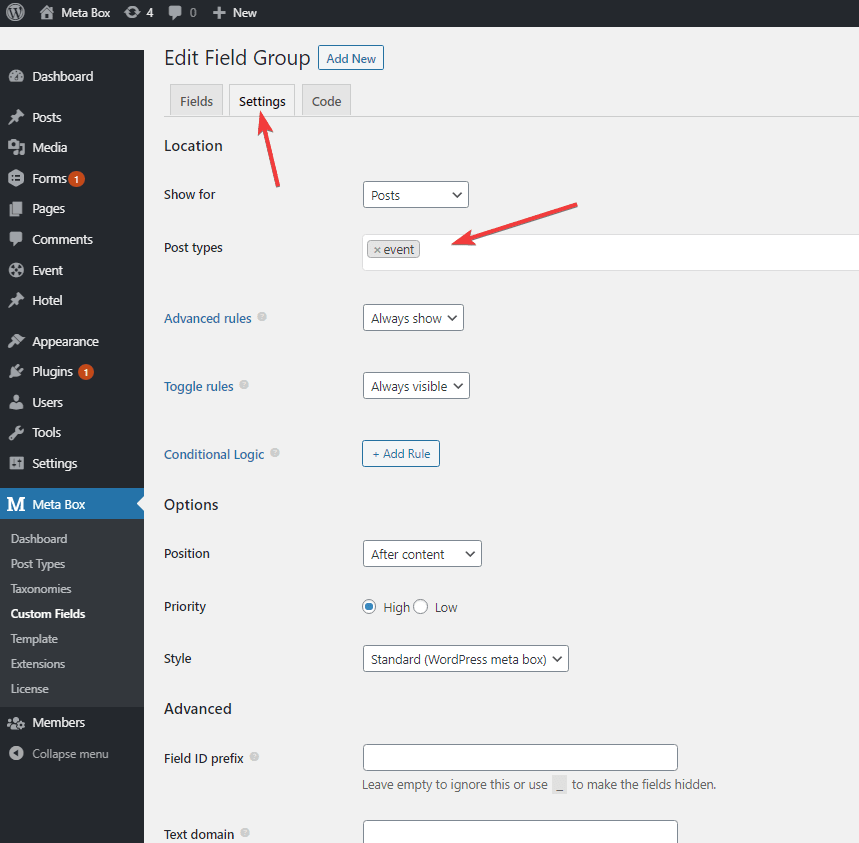
Then, go to the Settings tab and choose the Post type as Event. Once finishing, remember to click Publish.
Now, when you create a new post in the Event post type and drag to the bottom, you will see the created fields. You have to fill in the value for them.
Step 2: Create the Add to Calendar Button
First, I create a file named single-event.php in the theme folder (I’m using the Justread theme) to edit the template of the single Event page. After that, include the Add to Calendar button to this page by adding this code to the single-event.php file:
<?php

$start_date = rwmb_get_value( start_date, array( 'format' => 'Y-m-d g:iA' ) );

$start_date = wp_date( 'Ymd\THis', $start_date );

$end_date   = rwmb_get_value( end_date, array( 'format' => 'Y-m-d g:iA' ) );

$end_date   = wp_date( 'Ymd\THis', $end_date );

?>


<form method="post" action="?ics=true">

        <input type="hidden" name="start_date" value="<?php echo $start_date; ?>">

        <input type="hidden" name="end_date" value="<?php echo $end_date; ?>">

        <input type="hidden" name="location" value="<?php echo rwmb_meta( 'event_location' ); ?>">

        <input type="hidden" name="summary" value="<?php the_title(); ?>">

        <input type="submit" value="Add to Calendar">

</form>
Note:
-
start_date,end_date, andevent_locationare the IDs of the three fields that I’ve created in step 1. -
name=”start_date”,name=”end_date”,name=”location”,name=”summary”are the names of the data variables that will be used in the below code. - The above code is a form with the post method to pass the
start_date,end_date,location,summary data.
Next, we use the template_redirect hook to download the ics file (when users click the Add to Calendar button) with the start_date, end_date, location, summary data received above. This hook runs before we determine which template is loaded. In other words, this hook reloads the page to show a new window for users to download the ics file.
All you need to do now is add the following code to the functions.php file:
function justread_ics_download() {

        if ( is_singular( ‘event’ ) && isset( $_GET['ics'] ) ) {

                include get_stylesheet_directory() . '/inc/ICS.php';

                header('Content-Type: text/calendar; charset=utf-8');

                header('Content-Disposition: attachment; filename=invite.ics');


                $ics = new ICS(array(

                        'location' => $_POST['location'],

                        'dtstart' => $_POST[start_date],

                        'dtend' => $_POST[end_date],

                        'summary' => $_POST['summary'],

                ));


                echo $ics->to_string();

                exit();

        }

}

add_action( 'template_redirect', 'justread_ics_download' );
Explanation:
The ICS class is to export the ics file when users click the Add to Calendar button and download this file. This class is declared in the ICS.php file. You can refer to this ICS.php file content here.
Done! When going to the single page of the event, you will see the result:
When clicking the Add to Calendar button, you will immediately download an ics file, and then open it with an application on your computer.
Congratulation! You’ve finished adding the event to your calendar.
Last Words
Creating the Add to calendar button to the event post type will help users not miss any interesting events on your site. It’s also a factor to increase user’s experiences and engagement on your site. So if you want to have a converting landing page or a successful online event, this feature is absolutely worthy. Moreover, this process can be done easily with Meta Box plugin and its extension without any dime. Hope your events will always be successful!


Top comments (0)