
Are you getting stuck on placing a banner on all pages of the website as well as customizing the size, title, image, ... on the banner? Don't worry, this can be done easily by creating a settings page on the back end, and then add some custom fields. Each custom field is a parameter to customize the banner. After that, just use a shortcode to display the banner on the page you want.
To do so, we use two following plugins:
- Core plugin Meta Box: a framework that helps you create custom fields easily and quickly. It's free and available on wordpress.org.
- MB Settings Page: it's a premium extension of Meta Box plugin that helps you create settings pages with a lot of options right on the back end effortlessly. Note that it's required to install Meta Box core plugin to use the MB Settings Page extension.
Let's get started!
Step 1: Create a Settings Page to Install the Banner
You have to create a settings page for each banner. Then, when you want to edit any banner, you just need to go to the corresponding settings page.
To create a settings page, add the following code to the functions.php file:
// Register a theme options page

add_filter( 'mb_settings_pages', function ( $settings_pages ) {

    $settings_pages[] = array(

        'id'                   => 'banner',

        'option_name' => 'banner',

        'menu_title'     => 'Banner',

        'icon_url'         => 'dashicons-edit',

        'style'              => 'no-boxes',

        'columns'        => 1,

        'tabs'              => array(

            'design'      => 'Design Banner'

        ),

    );

    return $settings_pages;

} );
This is the settings page that I've created:

This page is still empty. Therefore, you have to add custom fields to create some options for the banner's content and parameter.
Step 2: Add Custom Fields for the Settings Page
We need to add the following fields to the above settings page for the banner:
| Field Name | Field Type | Content |
| Show | Checkbox | Display / Don't display the banner |
| Image | Single image | Choose an image for the banner |
| Title | Text | Choose a title for the banner |
| Description | Textarea | Add a description for the banner |
| Color | Color | Add colors for the banner |
| Color's description | Color | Add colors for the description |
| Title's Position | Radio | Choose a position for the title |
| Description's Position | Radio | Choose a position for the description |
To add these above fields, we can use one of these two methods:
- Use the Online Generator tool (free)
- Use the Meta Box Builder extension (paid)
Method 1: Create custom fields using the Online Generator tool
To get more details about how to use the Online Generator tool, refer to this documentation. Upon creating fields with Online Generator UI, you will have the following code. You need to add this code to the functions.php file:
// Register meta boxes and fields for settings page

add_filter( 'rwmb_meta_boxes', function ( $meta_boxes ) {

    $meta_boxes[] = array(

        'id'             => 'colors',

        'title'          => 'Colors',

        'settings_pages' => 'banner',

        'tab'            => 'design',

        'fields' => array(

        array(

    'name' => 'Show',

    'id'   => 'show_banner',

    'type' => 'checkbox',

    'std'  => 0,

),

        array(

        'name' => 'Image',

        'id'   => 'image',

    'type' => 'single_image',

),

            array(

                'name' => 'Title',

                'id'   => 'title',

                'type' => 'text',

            ),

            array(

                'name' => 'Description',

                'id'   => 'description',

                'type' => 'textarea',

            ),

            array(

                'name' => 'Color's title',

                'id'   => 'color_title',

                'type' => 'color',

            ),

            array(

                'name' => 'Color's description',

                'id'   => 'color_description',

                'type' => 'color',

            ),

            array(

                'name' => 'Title's Position',

                'id'   => 'position_title',

                'type' => 'radio',

                'options' => array(

        'left' => 'left',

        'center' => 'center',

        'right' => 'right',

    ),

    'inline' => true,

            ),

            array(

                'name' => 'Description's Position',

                'id'   => 'position_description',

                'type' => 'radio',

                'options' => array(

        'left' => 'left',

        'center' => 'center',

        'right' => 'right',

    ),

    'inline' => true,

            ),

        ),

    );

    return $meta_boxes;

} );
<!-- wp:paragraph --><!-- /wp:paragraph -->
Method 2: Create Custom Fields Using Meta Box Builder
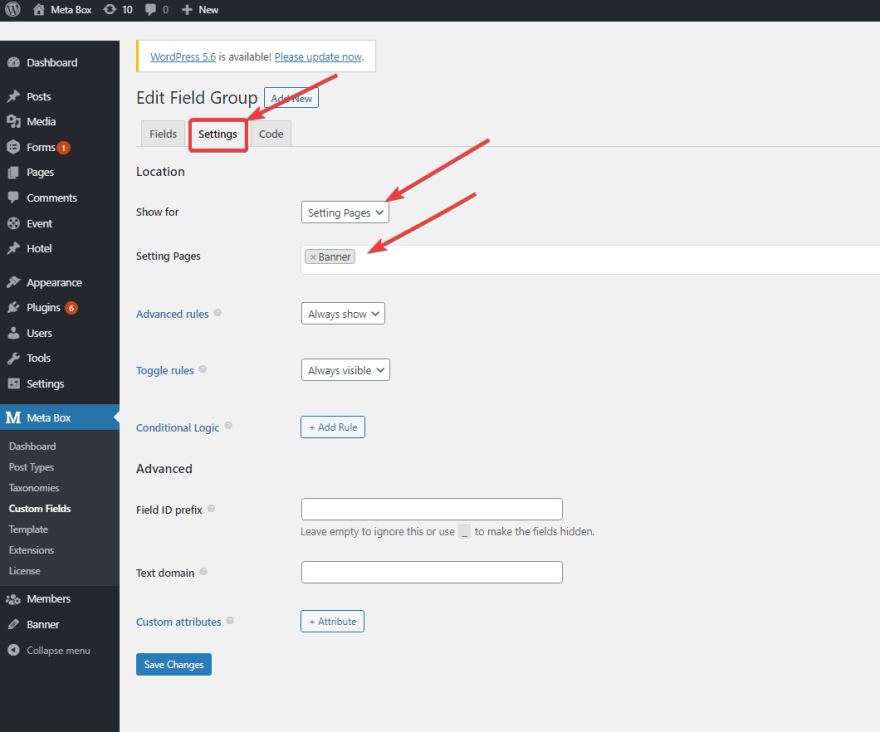
After creating fields, move to the Settings tab, choose Settings Pages on the Show for section, and choose Banner for the Settings Page section to display the created fields to the Banner settings page.
Read more: Create custom fields with Meta Box Builders.
Now the custom fields are ready, so you can start customizing the banner and uploading the image for it.

Next, we need to create a shortcode to display images in the desired positions.
Step 3: Create a Shortcode for the Banner
Next, add the following code to the functions.php file to create the shortcode for displaying the banner on the front end:
function short_code_banner() {

// Banner

$settings = get_option( 'banner' );

$image_ids = $settings['image'];

$image_attributes = wp_get_attachment_image_src( $image_ids, 'full');

$title = rwmb_meta( 'title', ['object_type' => 'setting'], 'banner' );

$description = rwmb_meta( 'description', ['object_type' => 'setting'], 'banner' );

$position_title = rwmb_meta( 'position_title', ['object_type' => 'setting'], 'banner' );

$position_description = rwmb_meta( 'position_description', ['object_type' => 'setting'], 'banner' );

$color_title = rwmb_meta( 'color_title', ['object_type' => 'setting'], 'banner' );

$color_description = rwmb_meta( 'color_description', ['object_type' => 'setting'], 'banner' );

$width_content = rwmb_meta( 'width_content', ['object_type' => 'setting'], 'banner' );

if ( !is_admin() ) {

echo '<div class="banner" style="background-image: url(' .  $image_attributes[0]  . ' )">';

echo '<div class= "content-banner" style="width: ' . $width_content . ' "> ';

echo '<h2 style="color: ' . $color_title . ' " class="title-banner ' . $position_title . ' ">' . $title . '</h2>';

echo '<div style="color: ' . $color_description . ' " class="description-banner ' . $position_description . ' ">' . $description . '</div>';

echo '</div>';

echo '</div>';

}

}

add_shortcode( 'banner-shortcode', 'short_code_banner' );
This time, just paste the shortcode [banner-shortcode] anywhere you want to display the banner such as footer, header, posts, ...
Step 4: Display the Banner on the Front End
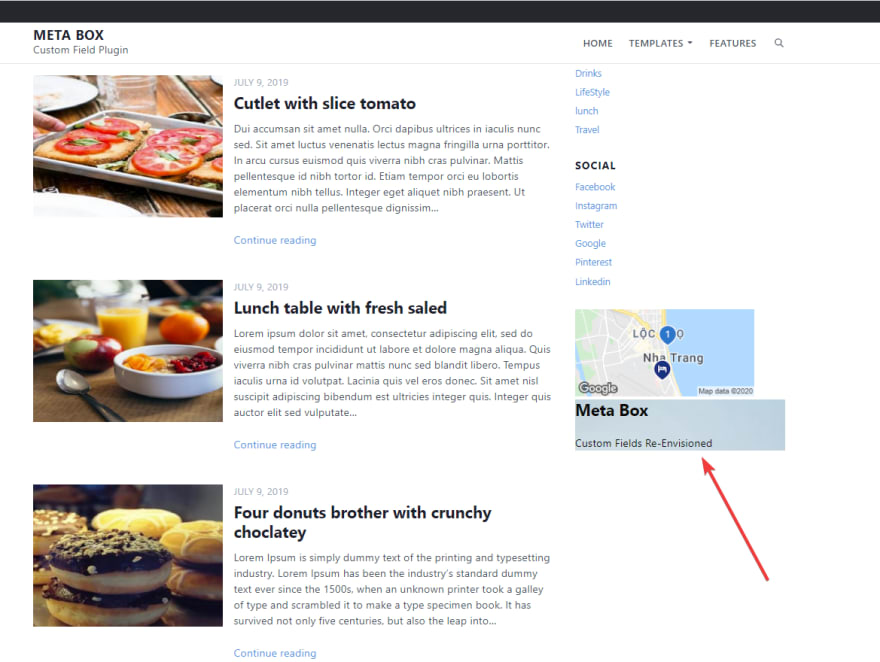
For example, I want to add a product image to the sidebar so I head to Dashboard > Appearance > Widget and paste the shortcode:

However, the banner doesn't look very well. Therefore, I'm going to style it a bit.
If you want your banner to be as beautiful as the below image, go to Customizer > Additional CSS to style the image.
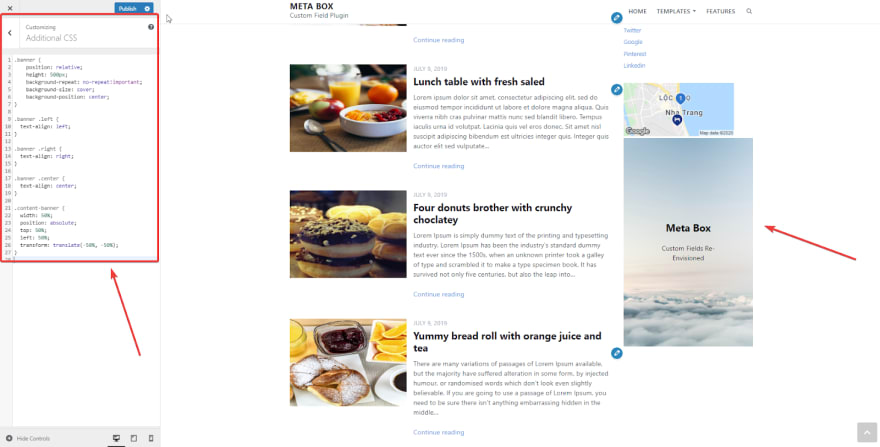
This is the CSS code that I've used to customize the image:
.banner {

position: relative;

    height: 500px;

    background-repeat: no-repeat!important;

    background-size: cover;

background-position: center;

}

.banner .left {

text-align: left;

}

.banner .right {

text-align: right;

}

.banner .center {

text-align: center;

}

.content-banner {

width: 50%;

position: absolute;

top: 50%;

  left: 50%;

  transform: translate(-50%, -50%);

}
Done! The banner has displayed on all pages that you placed the shortcode.
Last Words
Not every theme supports areas for advertising, introduction, ... on the website. Therefore, creating a custom field to display the banner is extremely useful. Especially, this method allows WordPress users to customize the size, font, color, background image, ... and place banners on all the pages on the website with just one click. If you have any questions about adding a custom field to display the banner, leave a comment!


Top comments (0)