How to use and display the ACF Google Map field — WPLake
Learn about the ACF Google Map field, the field’s options, and two ways to display it, one without any coding. Read about what happens behind the scenes and how information is stored.
The ACF Google Map field allows you to display… You guessed it, a Google Map.
About the Google Map field
The ACF Google Map field stores an address, that is then turned into a map on the frontend.
The Google Map field is one of many ACF field types, there are more than 35 field types already and still somehow that number is still growing.
ACF Google Map field is like an embed field, where you don’t have direct control over the content, but still have some control on how it displays and in what size visitors see the map and the all important location marker.
There are many reasons why you’d want a Google Map on your post or page. You can show the location of a business, e.g. a Business directory. Perhaps you have an online store and one of your delivery options is “Free pickup”, buyers may need an actual map to find their way.
Embed the map the old way
You could embed the map directly. As you may know, in the past and still today it was quite easy to just go to Google Maps or Visit maps.google.com, perhaps even with Google Earth it was possible, but let’s not lose focus here. Google Maps is simply one of those technological things we can’t live without, enough said.
To embed a Google Map directly, visit a location on Google Maps, select ‘share’ and then switch to ‘Embed the map’, select a size and then ‘Copy HTML’ and paste it in place.
Example of HTML embed code for Somerset West, City Center in South Africa;
<!--a map that's directly embedded-->
<iframe src="https://www.google.com/maps/embed?pb=!1m18!1m12!1m3!1d105767.5598163991!2d18.746078233330014!3d-34.063457740807046!2m3!1f0!2f0!3f0!3m2!1i1024!2i768!4f13.1!3m3!1m2!1s0x1dcdb565fbc4f737%3A0x42f889f307a16bb9!2sSomerset%20West%2C%20Cape%20Town!5e0!3m2!1sen!2sza!4v1682081617435!5m2!1sen!2sza" width="600" height="450" style="border:0;" allowfullscreen="" loading="lazy" referrerpolicy="no-referrer-when-downgrade"></iframe>
Embedding maps directly has of course many drawbacks, the main points are; it doesn’t provide any settings or UI to editors, and if you need to add a map to for example a CPT, different locations can’t be used on different pages in this way. At least not without a lot of manual work and effort.
Field settings
With the Google Map field you have some settings when creating the field. You can define latitude and longitude coordinates to center the initial map around that point, you can set the zoom level and customize the height of the Google Map.
These settings are useful and help on the post/page edit screen, it even saves time, and helps with consistency across the site post and pages, so the maps look similar and have the same height.
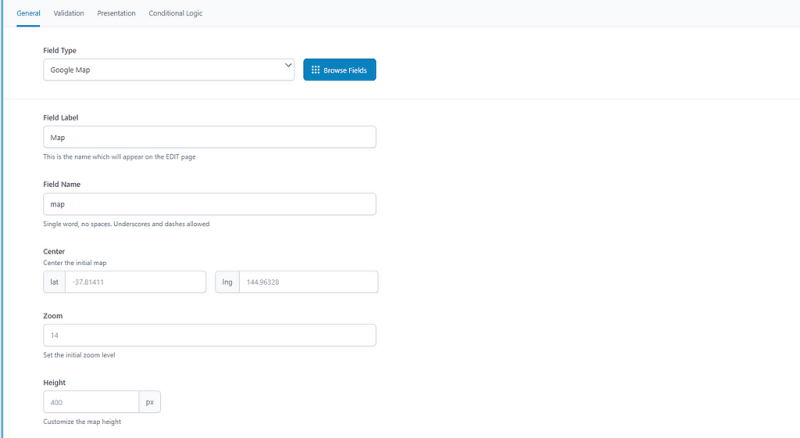
The Google Map field settings, define the zoom level and height.
Behind the scenes in ACF
Behind the scenes, the ACF Google Map field type allows editors to see and interact with a live map to define a marker. It uses the Google Maps JS API to provide address autocomplete searching and reverse geocoding lookup.
Information about your choice is returned as an array, and it’s saved into the meta field as a serialized value. It contains several keys, like ‘address’, ‘lat’, ‘lng’ and ‘country’, see below for an example of the meta value.
a:10:{s:7:"address";s:10:"London, UK";
s:3:"lat";d:51.5072178;s:3:"lng";d:-0.1275862;
s:4:"zoom";i:8;s:8:"place_id";s:27:"ChIJdd4hrwug2EcRmSrV3Vo6llI";
s:4:"name";s:6:"London";s:4:"city";s:6:"London";
s:5:"state";s:7:"England";
s:7:"country";s:14:"United Kingdom";
s:13:"country_short";s:2:"GB";}
Use this data as you see fit, from the most common usage, like displaying the address on the contact page, to using it in some API request as an argument.
But don’t forget the fact that ACF doesn’t provide any frontend for the map. This means that ACF includes the Maps’ API only for editors in the backend. Therefore you’d need to load Google Maps API, and initialize the map yourself for it to appear on the frontend of your site.
Doing it in this was does provide flexibility in the usage of the data, as you can display the map using an alternative vendor (like OpenStreetMap), but also usually results in more time spent on integration.
Register Google Map JS API key
To use the Google Maps JS API you’d need to register an API key. The Google Map field requires the following APIs; Maps JavaScript API, Geocoding API and Places API.
Follow Google’s API instructions to Get your API key.
Register your Google Map API on your site, using one of these methods;
Paste it in your theme’s functions.php template file, replacing ‘xxx’ with your key.
// Method 1: Filter.
function my_acf_google_map_api( $api ){
    $api['key'] = 'xxx';
    return $api;
}
add_filter('acf/fields/google_map/api', 'my_acf_google_map_api');

// Method 2: Setting.
function my_acf_init() {
    acf_update_setting('google_api_key', 'xxx');
}
add_action('acf/init', 'my_acf_init');

It’s often tough to navigate complex code and know where to paste it.
Display ACF Google Map with PHP code
Be sure to Register the Google Map JS API key as mentioned above. To display a live map, we need to transfer the field data (about the selected marker) to the front JS. Then we need to query the Google Maps API, and ensure the map is uninitialized. Below we provide a universal code, that suits both cases, for when you either have a map marker or not.
1. Create the markup
Add the code below into your theme template file or to your functions.php as a code snippet.
<?php

// TODO your field name here
$mapInfo = get_field("map");

$zoom = $mapInfo['zoom'] ?? '16';
$lat = $mapInfo['lat'] ?? '';
$lng = $mapInfo['lng'] ?? '';

// zoom level - gets from every specific map (when admins zoom out and saves a page, the zoom is also saved)
printf(
    '<div class="my-map" style="width:100%%;height:400px;" data-zoom="%s">',
    $zoom
);

printf(
    '<div class="my-map__marker" data-lat="%s" data-lng="%s"></div>',
    esc_attr($lat),
    esc_attr($lng)
);

echo "</div>";
2. Query Google Maps JS
Use the code below to load the Maps JS API for all pages.
<?php

add_action('wp_footer', function () {
    $apiData = apply_filters('acf/fields/google_map/api', []);

    $key = $apiData['key'] ?? '';

    $key = !$key ?
        acf_get_setting('google_api_key') :
        $key;

    if (!$key) {
        return;
    }

    wp_enqueue_script(
        'google-maps',
        sprintf('https://maps.googleapis.com/maps/api/js?key=%s&callback=googleMapsCallback', $key),
        null,
        true
    );
});
This code snippet uses the same Google API key that you’ve defined for ACF for site admins.
Pro tip: For better performance, we recommend adding some checks, to make sure this only loads on pages where the map exists. E.g. Limit it to a single page by URL with is_page, or to the CPT type with is_singular.
3. Initialize the map
Continue by adding the following JS code to the target page.
class Map {
    constructor(element) {
        this.element = element
        this.map = null
        this.mapMarkers = []
    }

    readMarkers() {
        // TODO replace the selector if you've changed it in the markup
        this.element.querySelectorAll('.my-map__marker').forEach((markerElement) => {
            let lat = markerElement.dataset.hasOwnProperty('lat') ?
                markerElement.dataset['lat'] :
                0
            let lng = markerElement.dataset.hasOwnProperty('lng') ?
                markerElement.dataset['lng'] :
                0

            this.mapMarkers.push({
                lat: parseFloat(lat),
                lng: parseFloat(lng),
            })

            markerElement.remove()
        })
    }

    createMap() {
        let mapArgs = {
            zoom: parseInt(this.element.dataset.hasOwnProperty('zoom') ?
                this.element.dataset['zoom'] :
                16),
            mapTypeId: window.google.maps.MapTypeId.ROADMAP,
        }
        this.map = new window.google.maps.Map(this.element, mapArgs)
    }

    createMarkers() {
        this.mapMarkers.forEach((marker) => {
            new window.google.maps.Marker({
                position: marker,
                map: this.map,
            })
        })
    }

    centerMap() {
        // Create map boundaries from all map markers.
        let bounds = new window.google.maps.LatLngBounds()

        this.mapMarkers.forEach((marker) => {
            bounds.extend({
                lat: marker.lat,
                lng: marker.lng,
            })
        })

        if (1 === this.mapMarkers.length) {
            this.map.setCenter(bounds.getCenter())
        } else {
            this.map.fitBounds(bounds)
        }
    }

    init() {
        if (!window.hasOwnProperty('google') ||
            !window.google.hasOwnProperty('maps') ||
            !window.google.maps.hasOwnProperty('Map') ||
            !window.google.maps.hasOwnProperty('Marker') ||
            !window.google.maps.hasOwnProperty('LatLngBounds') ||
            !window.google.maps.hasOwnProperty('MapTypeId') ||
            !window.google.maps.MapTypeId.hasOwnProperty('ROADMAP')) {
            console.log('Google maps isn\'t available')
            return
        }

        // before the map initialization, because during creation HTML is changed
        this.readMarkers()
        this.createMap()
        this.createMarkers()
        this.centerMap()
    }
}

class Maps {
    constructor() {
        this.isMapsLoaded = false
        this.mapsToInit = []

        // TODO change to yours if you've defined own callback (for https://maps.googleapis.com/maps/api...)
        window.googleMapsCallback = this.mapsLoadedCallback.bind(this)

        'loading' !== document.readyState ?
            this.setup() :
            window.addEventListener('DOMContentLoaded', this.setup.bind(this))
    }

    setup() {
        const observer = new MutationObserver((records, observer) => {
            for (let record of records) {
                record.addedNodes.forEach((addedNode) => {
                    this.addListeners(addedNode)
                })
            }
        })
        observer.observe(document.body, {
            childList: true,
            subtree: true,
        })

        this.addListeners(document.body)
    }

    mapsLoadedCallback() {
        this.isMapsLoaded = true

        this.mapsToInit.forEach((map) => {
            map.init()
        })

        this.mapsToInit = []
    }

    addListeners(element) {
        if (Node.ELEMENT_NODE !== element.nodeType) {
            return
        }

        // TODO replace the selector if you've changed it in the markup

        element.querySelectorAll('.my-map').forEach((mapElement) => {
            let map = new Map(mapElement)

            if (!this.isMapsLoaded) {
                this.mapsToInit.push(map)

                return
            }

            map.init()
        })
    }

}

new Maps()
The snippet above will initialize all the maps on your page, that have the markup from the first step. If you made changes to the markup classes, don’t forget to reflect them here too (see TODO).
This snippet uses the MutationObserver feature, so it will work even in case your maps’ info was added dynamically, e.g. after an ajax request.
You can read more about the Google Map field in the official ACF article.

The road to endless possibilities.
Display ACF Google Map with a shortcode
Using the code method is quite complex and becomes a little worse when you want to do more with a Google Map, it’s worth mentioning that there are some drawbacks, of which the biggest is that you would need to write and add several different code snippets (see above PHP way).
However, there is an alternative way to solve this without so much code. It will still allow you to display the Google Map and you can have markers too. It’s done with the incredible ACF Views plugin. It was built for handling complex field types, read more about the shortcode approach here.
ACF Views will create the HTML markup, so you won’t have to. All you do is install it, active it and start creating. You select fields from a dropdown, one by one, each field has some settings, then once you publish your ACF View you get shortcodes, each with its own purpose. Copy the shortcode in place on a post or page, that’s it.
Read more on how to display Google Map fields without coding and the field options available.
How-to Step-by-step
Follow along by installing and activating the ACF Views plugin on your WordPress website. You’ll also need Advanced Custom Fields installed and active, both plugins are available free of charge from Wordpress.org plugin directory.
Now that you’re ready, let’s continue.
Step 1. Define Google Map API key
Be sure to Register the Google Map JS API key as mentioned earlier.
See the ACF Views Google Map field for up-to-date documentation.
Step 2. Create an ACF View
When you activate the ACF Views plugin a new item appears in the admin menu, called “ACF Views”. The item has several sub-items, but in our case, we’ll be working only with the one called “ACF Views”.
Click that menu item to open the ACF Views page and then click the ‘Add New’ button to create a View. On the new page give your View a name, it can be anything that describes the View. I’ve called my View “business locations”.
Step 3. Assigning fields
It’s time to assign the Google Map field to your View. Click on the ‘Add Field’ button and select your ‘Group’ from the dropdown. In my case, I’ve called the group “Map Location”.

Assign the ACF Google Map field in your ACF View.
Then continue to select the target field from the list. I’ve selected “Map” which is what my Google Map field is called. See Field Options tab for more settings and to hide map or change address format (only in ACF Views Pro).
Now you can ‘Publish’ your ACF View or click ‘Update’ (if you’ve saved before), then copy the first shortcode and paste it in place, anywhere in the post or page content area. For Gutenberg editor, use the “shortcode” block. Save your page and view the post/page to see the results.
That’s it, you’re done.
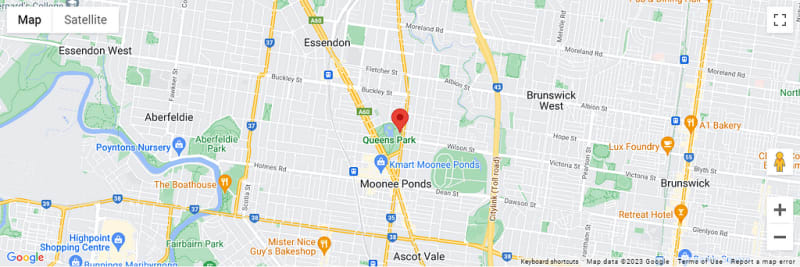
A Google Map with location marker.
Final thoughts
In this tutorial we’ve shown you how to use and display an ACF Google Map field in two ways with an added bonus for native Google Map Embed, the first with coding and the more practical and easier way with using a shortcode.
An ACF View can contain any number of fields of different types, which means you could extend your View at any time, ACF Views supports all available field types with extended support for complex fields.

Different types of maps on a stand
To get more info about the plugin we’ve used in our shortcode example, visit the official plugin page.
Maps don’t always need to be associated with a business, you can create literally any type of map.
Have fun out there!
Originally published at https://wplake.org on May 1, 2023.

Top comments (0)