
WordPress Cron provides an easy way to schedule actions without taking care of the implementation. We review specific moments to help you manage Cron properly.
What is Cron?
The Cron in short, is a way to run some tasks (or jobs if you will) on a schedule. For example, to keep the currency rates up-to-date on your website you need to update them once a day. Instead of doing it manually, you create a cron task and set it up with the frequency of once a day. Cron is widely used in many WordPress plugins and themes to keep information up-to-date.
System Cron VS WordPress Cron
With WordPress you have 2 different ways to do it.
System Cron
The first way is adding it in the Linux system cron (this is on your hosting server). These tasks are in the /etc/crontab file and with this approach being the most universal and most reliable way to run Cron tasks. Your server operating system (e.g. Linux, Ubuntu or RedHat) guarantees that tasks in our PHP files will be called as they were scheduled, regardless of any external events.
Though it’s more universal and reliable, it has no integration with WordPress. This means if you call PHP files within your theme directly, then they won’t have access to any WordPress functions and the Database. Due to the fact that WordPress can’t load properly in this way. Furthermore, it’s not suitable for plugins, because if you’re using the plugin, you can’t simply set up the system Cron for all your clients.
WordPress Cron
Then here WordPress Cron comes in and is the second way to run cron tasks. You can easily registry your cron task within WordPress, and WordPress will take care of loading and executing your tasks within your specified schedule. Sounds sweet, and it’s suitable for plugins.
What can be better, right? But nothing is perfect and this approach also has drawbacks.
WordPress is a PHP based application and has no access to your system Cron (OS running on your host). In fact, it means WP needs some external event to check the schedule list and execute relevant tasks. Another thing is that WordPress can ONLY run Cron tasks when someone visits or opens a page on the website. If nobody visits your website, the Cron tasks will NOT run.
This may sound scary, but the good news is that WordPress guarantees that tasks will be called , there just isn’t a guarantee when exactly they’ll be called. For example, you’ve set up a Cron currency rates task to run once a day. Now in real life it means the task will be executed with the first visitor, after one day at the set time. Not earlier, but perhaps later, maybe even much later if you’ve had no visitors for several days.
There are some tasks that are okay to run with this approach, however while nobody visits your site, Cron doesn’t run and therefore doesn’t actually “work”. But there are other tasks that require reliability. So if your cron tasks are about pulling info from external sources, or simply very important tasks that need to run, like any API stuff, you can’t rely on this approach.
Verdict
Both ways have their advantages and drawbacks.
For that reason the best solution which is used by professionals, and recommended by WordPress, is a combination of the two approaches, giving you the best of both and having them counteract each others drawbacks.
As a website owner (or a developer) you need to set up the system Cron job which will call WordPress Cron. Overall, it’s relatively simple to do, and in this way WordPress Cron will be more reliable while keeping the native WordPress approach.
See point no. 2 below to learn how to go about it.
About WordPress Cron
Above, we’ve learned that WordPress a PHP-based application, and its internal Cron relies on external events, i.e. user requests. Besides this fact, there is a list of important aspects, which we’ll go through in more detail.
1. WordPress Cron is asynchronous
Firstly, you should know that WordPress Cron is asynchronous. Asynchronous means it runs Cron jobs in a separate request from the event itself.
So, a user request won’t have delays due to WordPress Cron , a user that triggered some Cron job won’t wait until the job is finished to see the result of his request. So you can breathe easy knowing there aren’t any delays for your visitors. WordPress handles it all quietly in the background.
If you’re interested in the finer details, then technically it happens in the following way;
WordPress checks the Cron schedule on every user request to a website, and if there is a need to run Cron jobs, it creates a new request to the website cron file ( /cron.php ), using the cURL library. The user receives the response to their request immediately, while Cron executes the other cron tasks in a separate request, which is independent.
2. WP Cron isn’t reliable (out-of-the-box). Way to fix
As we already know, WordPress Cron out-of-the-box depends on external events. Compared with the system Cron, it has a big drawback. But we can easily fix it by merging the system Cron and WordPress Cron.
So the solution is creating a Cron job within the system Cron and calling WordPress Cron from there. In this way, we receive a reliable Cron with all WordPress features and support for plugin cron jobs. It may sound a little tricky, but it isn’t really.
For the official manual see here.
The task can be split into 2 steps. The first step is about creating a new system Cron job. Basically, there are two different types of hosting (shared and dedicated), and how to create cron jobs depends on your hosting type.
How to add a system Cron job for shared hosting
When using shared hosting, there are many different vendors, and you need to check the features offered by your vendor about the Cron tasks. Usually, a hosting admin panel has a special tab or item about Cron, where you can manage Cron jobs. The most common admin panel is cPanel, you can read more on how to add a Cron job for cPanel in the official article. Below is the official video.
How to add a system Cron job for the VPS hosting
In case you’re an owner of VPS (Virtual Private Server i.e. Dedicated), you need to log in to your server with SSH and run the following command to open a file in editing mode.
Step 1. Setup a system Cron job for WordPress Cron
Now it’s time to create a system Cron job that will call WordPress Cron. Add a new line in your cron file and copy the content below.
*/10 * * * * wget -q -O - https://YOUR_DOMAIN_HERE/wp-cron.php?doing_wp_cron >/dev/null 2>&1
Note: The line above isn’t suitable for use with WordPress Multisite mode. If you’re using WP Multisite mode and you need a reliable Cron, then read more about workarounds here.
Don’t forget to replace YOUR_DOMAIN_HERE with your domain.
The first part of the command states that we want our command to be executed once every ten minutes, regardless of an hour number, day of the week, and others options. The middle part uses the wget tool to request the WordPress Cron file, and the last part states that we don’t want to save the output of the Cron file.
You can read more about the arguments here.
Step 2. Disable default WordPress checks
As we’ve now integrated WordPress Cron with the system Cron, WordPress no longer needs to check the schedule list within every user request. We tell WordPress by setting up a special constant in the wp-config.php file.
/* Add any custom values between this line and the "stop editing" line. */

define( 'DISABLE_WP_CRON', true );

/* That's all, stop editing! Happy publishing. */
As you can see the file has a special section for custom values, so you need to add this constant after the first comment, and before the second.
Don’t worry about the label of the constant, “ DISABLE_WP_CRON ” doesn’t actually mean completely disable WordPress Cron. It disables the checking of the schedule list with every user request. WP Cron should still work properly, as we call the wp-cron.php file directly via the system Cron.
That’s it! Congrats! Now your WordPress installation has a reliable Cron with all the WordPress features. Cron will run jobs according to the schedule, regardless of the amount of visitors’ to the website.
3. How to add and remove Cron jobs
WordPress Cron job is just a bit of PHP code that is executed by some schedule. Furthermore, it can use all the WordPress features and has access to the Database. Here you can find an article for developers from WordPress on this topic.
Choosing an interval
Firstly, we need to choose an interval by which Cron will repeat our job. Default WordPress intervals are hourly , twicedaily , daily , weekly. Though it’s good enough for most cases, you may need a custom interval. We can define it by adding the following code.
add_filter('cron_schedules', function ($schedules) {
    return array_merge($schedules, [
        // here is the name of our custom interval. used when adding a new job
        'five_hours' => [
            // the number here represents seconds, so the formula is: 5 hours * 60 minutes * 60 seconds
            'interval' => 5 * 60 * 60,
            'display' => esc_html__('Every Five Hours'),
        ],
    ]);
});
Adding a new reoccurring job
To add a new Cron job we need to add a new shortcode and attach a schedule to the shortcode. The interval (the second argument to the wp_schedule_event() function) must be of one of the default intervals, or some custom name that you can add using the code snippet above.
add_action('YOUR_NAME_HERE', function () {
    /* your job here
    you can use all the WordPress features and functions
    e.g. wp_insert_post() */
});

// we must check that the event wasn't scheduled as each call creates a new one
// otherwise, if we've skipped the check it'll create a new event for each user request
if (!wp_next_scheduled('YOUR_NAME_HERE')) {
     /* the first argument is the timestamp which controls when the job
       will be run for the first time
       the next argument reflects the chosen interval */
    wp_schedule_event(time(), 'hourly', 'YOUR_NAME_HERE');
    return;
}
In the code above we’ve created an empty job that Cron runs once an hour.
Adding a new single job
The example above adds a job that Cron runs in a reoccurring method. But you also have the option to schedule a single job. For this goal, you need to use the wp_schedule_single_event() function instead of the wp_schedule_event(). It can accept two (2) types of arguments: timestamp with the next execution time and the hook that contains the job. So let’s create a job that Cron will run only once, after 5 hours:
add_action('YOUR_NAME_HERE', function () {
    /* your job here
     you can use all the WordPress features and functions
     e.g. wp_insert_post() */
});

// it's necessary to check that the event wasn't scheduled as each call creates a new one
// if you've skipped the check it'll create a new event for each user request
if (!wp_next_scheduled('YOUR_NAME_HERE')) {
    // as before, the first argument is the timestamp which controls when the job will be run
    // it's presented in seconds, so the formula is: 5 hours * 60 minutes * 60 seconds
    wp_schedule_single_event(time() + 5 * 60 * 60, 'YOUR_NAME_HERE');
    return;
}
Removing a Cron job
You can remove a scheduled job that you have previously added. It’s especially useful for reoccurring tasks. For this purpose, we’ll call the wp_unschedule_event() function with a couple of arguments. The first must contain the next timestamp for the event (we get it dynamically) and the second is your job name.
The code below removes single and reoccurring jobs. Also, pay attention, that for the reoccurring jobs, it’ll not only remove the schedule or the next event but also all future events of the job.
add_action('YOUR_NAME_HERE', function () {
    /* your job here
     you can use all the WordPress features and functions
     e.g. wp_insert_post() */
});

// it's necessary to check that the event wasn't scheduled as each call creates a new one
// if you've skipped the check it'll create a new event for each user request
if (!wp_next_scheduled('YOUR_NAME_HERE')) {
    // as before, the first argument is the timestamp which controls when the job will be run
    // it's presented in seconds, so the formula is: 5 hours * 60 minutes * 60 seconds
    wp_schedule_single_event(time() + 5 * 60 * 60, 'YOUR_NAME_HERE');
    return;
}
4. How to monitor Cron jobs
Information about all WordPress Cron jobs is stored in the Database. This means we can get a list of all the scheduled jobs and manage them. It’s an important thing for developers and website owners.
If you have seen the WordPress Database scheme, then you know that there is no separate table for Cron. All Cron tasks are stored within a single option in the Options table. Most likely you already know this table, as any good WordPress developer knows the main tables of the WordPress Database. This knowledge is necessary to clear understand internal processes. If you want to check and improve your knowledge, read what must a good WordPress developer know.

WordPress stores Cron tasks as an option in the Options table
But looking at the serialized data directly via PhpMyAdmin isn’t the best idea. That’s why we’ll use the WP Crontrol plugin which will give us a clear UI. Using the tool we can debug our Cron jobs or check external ones that are added by plugins. For example, we created our custom Cron job and ran it immediately using the tool to make sure it works correctly.
The plugin provides the interface for managing both Cron jobs and the intervals. Using it is quite simple. Install and activate the plugin then visit the “Tools” — “Cron events” item in your admin menu.
Here you can manage Cron jobs (called Cron Events) and Cron Intervals (called Cron Schedules).
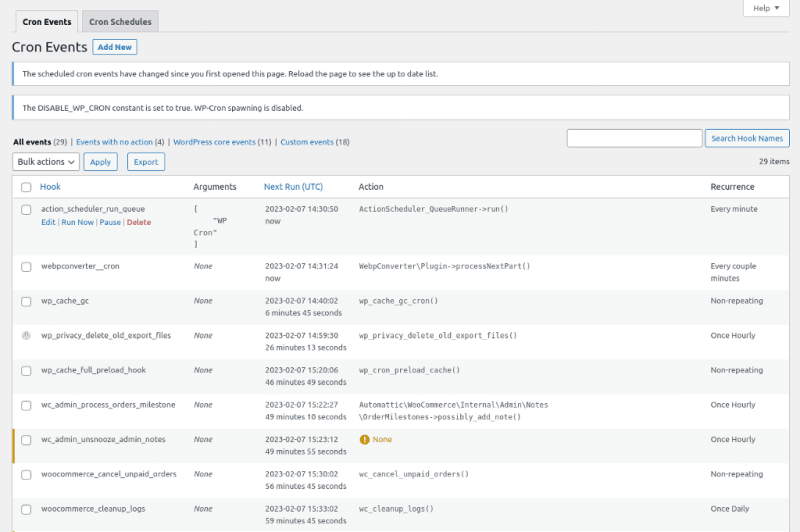
You can control each job individually. Hover your cursor on the target item to see the list of actionsp
5. Cron and Cache plugins
The important thing that you have to pay attention to is the collaboration of WordPress Cron and cache plugins. Most WordPress websites use some cache plugin to reduce the response time. Overall the approach is good and important for SEO. Also, cache means a lot for WordPress speed optimization. But in our case, it also means we skip PHP execution and return HTML.
By default, WordPress Cron relies on user requests. Whether or not WordPress Cron will be called during requests to cached pages depends on the plugin that’s in use. From our experience cache plugins don’t call WordPress Cron or call Cron more rarely than when it’s out-the-box.
WordPress Cron will still be called during editor visits to the dashboard, but that may not be enough. This approach is okay in case your Cron jobs aren’t important and can be delayed for longer periods. Otherwise, consider the second part of the article.
The solution described in the second part of the article, regarding the merging of the system Cron and WordPress Cron, shows the clear benefits, so if you have used it in that way then you’re set and don’t need to worry about it any longer.
The wp-cron.php file is called directly and WordPress Cron will work properly.
Conclusion
We’ve reviewed the 5 important things about WordPress Cron. We recommend following the second part (merging system Cron and WordPress Cron) for each of your WordPress sites. It’ll save you from tonnes of headaches in the future. Also, don’t forget about the tools that allow you to monitor your Cron jobs. They’re quite useful.
We hope our article was helpful to you, and that you now have a clear picture of WordPress Cron and how to add your own Cron jobs using the code snippets.


Top comments (0)