
Cover image by Valdemaras D. on Unsplash
In this blog post I want to share with you how you can set up GitHub Actions workflows in your Python project to make sure that the code you write is elegant, aligned with all best practices and it’s well tested.
Lately I’ve decided to start to learn Python. Nowadays it’s one of the most popular programming language so it was no-brainer decision to try it out. Especially that I’m still bad at algorithms so I was hoping that I’ll kill two birds with one stone — learn Python and practice it with solving some algorithmic exercises.
Therefore I’ve created a Algorithms Python project on GitHub where I put solutions to problems that I found interesting.
But when I was practicing it I’ve stomp on a problem.
How to make sure that the code I write has high quality? How can I make sure that my code is aligned with official style guide PEP 8 ? And how to check if it’s well tested?
Well there is a solution! GitHub Actions!
But what exactly I want to achieve?
I’ll show you how to:
set up integration with CodeFactor — tool that founds potential bugs in your code,
set up wemake-python-styleguide GitHub Actions workflow that checks if your code is aligned with PEP 8,
run unit tests and report its’ coverage with Codecov.
In the next steps I assume that you already has a Python project on GitHub. If you don’t have it create one 😉.
CodeFactor
It’s a very simple tool that check the quality of you code. It’s free of charge for all public repositories and for 1 private.
To start with it, go to the official website — www.codefactor.io, and create a new account by logging via GitHub. The icon for doing that should be located in the top right corner of the main page.

Once you’ll be registered add a repository to your dashboard by clicking the plus ( + ) sign located at the top right corner.
From the list pick the repository that you want to analyse and click Import at the bottom of the page.

And that’s it! You should be now redirected to a dashboard with a list of all issues that has been found. Awesome!

wemake-python-styleguide
Let’s move on to the second tool which will check if a code is written accordingly to the official Python style guide.
This time we won’t create an account in any web service. We’ll set up a GitHub Actions workflow which will be triggered whenever a pull request is created and will add comments to a review where it founds potential problems.
To those of you who don’t know what GitHub Actions is. It’s a new feature on GitHub that allows to automate many tasks and it’s usually treated as CI/CD tool (Continuous Integration/Continuous Deployment) which runs tests, runs quality checks and then deploy it. But it’s not the only purpose of it.
To start with it, in the root folder of your project create a .github/workflows folder where definitions of your workflows will be located.
Then create a new file with a name workflow-pr.yaml.
name: Python Pull Request Workflow
on: [pull_request]
jobs:

  qa:
    name: Quality check
    runs-on: ubuntu-18.04
    steps:
      - uses: actions/checkout@v1
      - name: Set up Python
        uses: actions/setup-python@master
        with:
          python-version: 3.8
      - name: Run unit tests
        run: |
          pip install pytest
          pytest
      - name: Wemake Python Stylguide
        uses: wemake-services/wemake-python-styleguide@0.13.4
        continue-on-error: true
        with:
          reporter: 'github-pr-review'
        env:
          GITHUB_TOKEN: ${{ secrets.GITHUB_TOKEN }}
It’s a very simple workflow with the full name Python Pull Request Workflow. It’s triggered on each pull_request, so whenever we create new or update existing one following jobs will run.
Above workflow consists only one — qa — job that has 4 steps:
actions/checkout@v1— is necessary to let GitHub Actions workflow know that it can use code located in a repository,Set up Pythonthat usesactions/setup-python@masterconfigure a Python version, in our case it’spython-version: 3.8.Run unit testsruns all unit tests located in the project. For that I’m using pytest which first needs to be installedpip install pytestso the next commandpytestcan be run. If any test fails on this step the next one will not run.Wemake Python Styleguidestep is the one that we’re the most interested in. It uses thewemake-services/wemake-python-styleguide@0.13.4action which are the atomic building blocks of the workflows. You can found them on the GitHub Marketplace, like mentioned action. This one is configured (withclause) to usegithub-pr-reviewreporter which enables the inline comments in the code review. More supported reporter options could be found on the official website. Finally this workflow requires to pass yourGIHUB_TOKENand that’s why theenvclause is added.
To test it running you need to create a new branch, commit some changes and push it to the GitHub. Then create a pull request which will trigger this workflow. To check it go to the Actions tab in your project and if everything went fine it should look like this one:

If you click on Run unit tests, in the console log, you’ll see the test report:

And if you go back to the Pull request you should see comments added. Like here: https://github.com/wkrzywiec/algorithms-python/pull/6

Codecov
And finally we want to have a test report with coverage. For that we again use pytest library which will generate it for us and then we upload it to the Codecov which will take care of visualizing it.
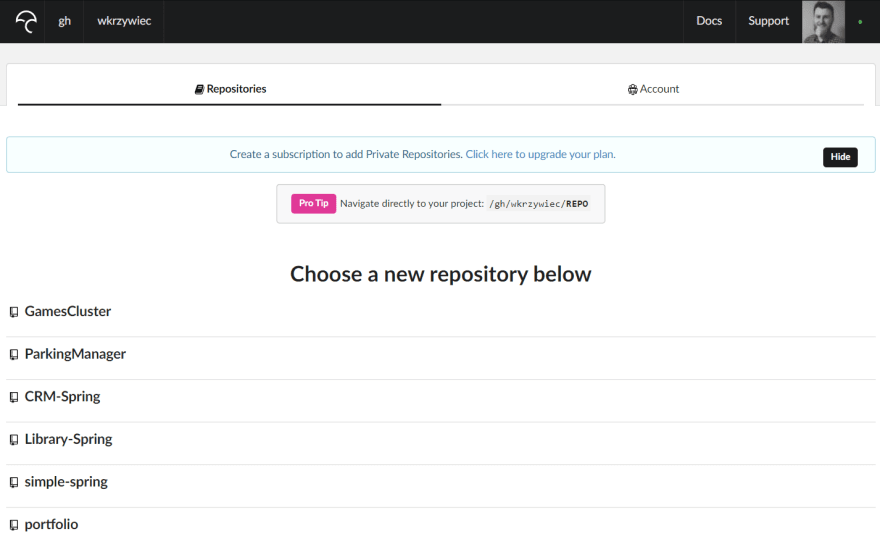
Before defining a new workflow first you need to create an account at Codecov. Therefore go to https://codecov.io at click Sign Up button located at the top right corner.
Then choose GitHub as a sign up option.

Then you should be taken to your dashboard for GitHub projects, where you need to click the Add new repository button.

A list of all your projects will appear from where you can pick the one you want to analyze.
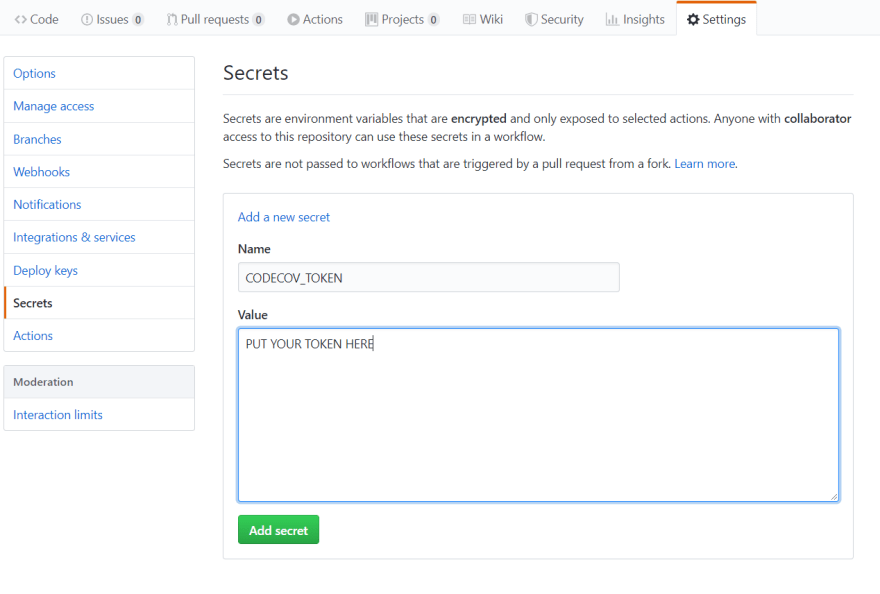
Then a page with your token will appear. Save it, because we will use it in next step.

Now go back to the project on GitHub and click on its Settings button. There click Secrets, and then Add a new secret where you can provide the token you’ve generated on Codecov website. To finalize it click Add secret.
Ok, everything is set up, so we can move on to defining the GitHub workflow.
name: Python Master Workflow
on:
  push:
    branches:
      - 'master'
jobs:
  codecov:
    name: Codecov Workflow
    runs-on: ubuntu-18.04

    steps:
      - uses: actions/checkout@v1
      - name: Set up Python
        uses: actions/setup-python@master
        with:
          python-version: 3.8
      - name: Generate coverage report
        run: |
          pip install pytest
          pip install pytest-cov
          pytest --cov=./ --cov-report=xml
      - name: Upload coverage to Codecov
        uses: codecov/codecov-action@v1
        with:
          token: ${{ secrets.CODECOV_TOKEN }}
          file: ./coverage.xml
          flags: unittests
Again we create a separate file called workflow-master.yaml, because this time we don’t want to trigger this workflow when pull request is created. This one should run only when a new commit is pushed on the master branch.
In the jobs section there is only one job called codecov which consists of 4 steps:
uses: actions/checkout@v1— this one, again, is just to tell GitHub Actions that we want to use the files located in current repository,uses: actions/setup-python@master— this one was also mentioned before, here we set up a Python version, which is3.8,then there is a new step, which is responsible for
Generate coverage report; it’s a series of scripts which cover installing pytests (pip install pytest), pytest-cov (pip install pytest-cov) and running actual tests (pytest — cov=./ — cov-report=xml),and finally the generated test coverage report can be uploaded to the Codecov (
Upload coverage to Codecov). Here we uses:codecov/codecov-action@v1GitHub Action available on the Marketplace. In it we provide 3 arguments:token: ${{ secrets.CODECOV_TOKEN }}which value is taken from the GitHub Secrets vault where we put it,file: ./coverage.xmlis location of the test coverage report (generated step before) andflags: unittestsis a flag that groups our unit tests.
To test it you need to push some commits to the master branch. It can be done directly from your local repository or by merging a pull request. If everything went fine, it should like this:

Now if you go back to the Codecov to your project dashboard you should see similar output:

All right, we did it! 🍾
Just before the wrap up I want to tell you that CodeFactor, Codecov or wemake-python-styleguide are not the only tools that can help you write better quality code. In fact there plenty of them, like SonarCloud, Pylint, Coveralls, DeepSource and more. Some of them could be found on GitHub Marketplace, which is best place to start if you don’t like those what I have proposed.
Conclusion
With this blog post I hope I’ve gave you an idea of how you can set up your GitHub repository to make sure that code you write has good quality. With such tools set you can find all the bugs and vulnerabilities, but keep in mind that not every bug, not every issue is worth to be taken care of. Sometimes it’s better to focus on the real work, not on tidying smelly code base 😉.
As usual, you can find mentioned project on GitHub.

Top comments (1)
This is awesome! I've been using Black to follow the pep8 standards. I'm going to give this a try tonight.