
Cover image by Matthew Smith on Unsplash
During my work on one of my Android application I’ve stomped on a problem where I needed to call some REST API every 10 seconds to check whether some data have changed or not. And with this blog post I would like to share with you how I’ve managed to achieve that.
Prerequisites
First of all, I don’t want to show the Android code, because due to some code around it it may blur the solution. Instead for this demo I go with a simple command line app.
Even though my application is very small I use couple tools that helps me develop the app and take care of some aspects that I don’t want to focus right now. So if you don’t feel comfortable with some parts of the code and you don’t know what it does, don’t worry. Here is a list of tools that I used with short explanation what it does.
Gradle —it’s used to manage dependencies (external libraries). More info: https://gradle.org/
Spring Boot — I used it for dependency injection, where Spring, as a platform, take care of the lifecycle of the objects (creates and destroy them). More info: https://spring.io/projects/spring-boot
RxJava 2 & Retrofit — both libraries are used to perform API call and make it asynchronous. They are very popular in Android app development.
Lombok — it helps to skip writting boring parts of model class like, getters, setter, constructor and so on. You only need to add some annotation above the class name and it’ll work. More info: Project Lombok.
Step 1. Set up app structure
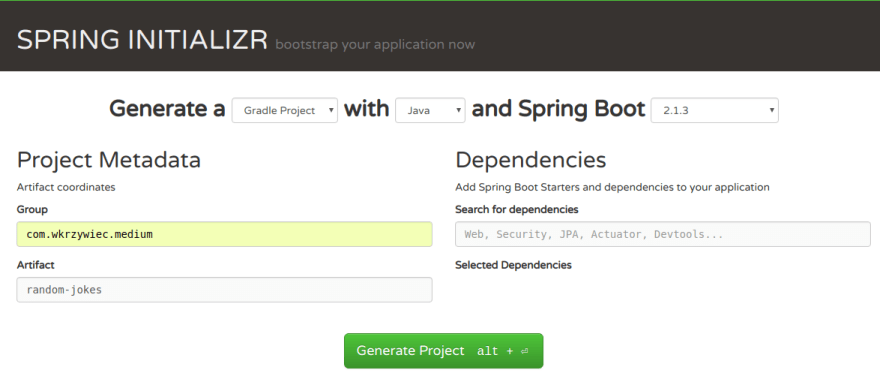
So if you’re now ok with some of libraries that I use for this example we can go to the implementation. As it’s a Spring Boot app go to https://start.spring.io/ where you can generate Spring app. To do that just pick a Gradle project (or Maven if you prefer) and customize artifacts (group, artifact). Then click Generate Project.
After downloading it, unpack it and open with you favorite IDE (Eclipse, IntelliJ) — usually importing it as a Gradle project should work.
Then go to the RandomJokesApplication class and add create Logger object and implement CommandLineRunner interface, so it should look like this.
import org.slf4j.*;
import org.springframework.boot.*;
import org.springframework.boot.autoconfigure.*;

@SpringBootApplication
public class RandomJokesApplication implements CommandLineRunner {

    private static Logger LOG = LoggerFactory
            .getLogger(RandomJokesApplication.class);

    public static void main(String[] args) {
        SpringApplication.run(RandomJokesApplication.class, args);
    }

    @Override
    public void run(String... args) throws Exception {

        LOG.info("\n\n\n\n Hello World! \n\n");

    }
}
From now on, every “working” part of the code we will insert into the run(…) method. Now if you run this app you should have some Spring app info printed in the console as well as the “Hello World!”.
Great! Let’s move on to next part, but just before that, we need to add some dependencies to the build.gradle file, so all necessary libraries will be downloaded automatically.
// some other default properties

dependencies {
    implementation 'org.springframework.boot:spring-boot-starter'
    implementation 'io.reactivex.rxjava2:rxjava:2.2.7'
    implementation 'com.squareup.retrofit2:retrofit:2.5.0'
    implementation 'com.squareup.retrofit2:converter-gson:2.5.0'
    implementation 'com.squareup.retrofit2:adapter-rxjava:2.5.0'

    compileOnly 'org.projectlombok:lombok:1.18.6'
    annotationProcessor 'org.projectlombok:lombok:1.18.6'
    testImplementation 'org.springframework.boot:spring-boot-starter-test'
}
For Lombok annotation processing you would also need to enable annotation processing in the settings of your IDE. Full instruction for each IDE can be found here: https://projectlombok.org/setup/overview
Step 2. Create RxJava 2 Observable that prints something in a console each 2 seconds
Now we can create an Observable that will print us something every 2 seconds.
import io.reactivex.Observable;
import io.reactivex.schedulers.Schedulers;

// some other stuff mentioned before

    @Override
    public void run(String... args) throws Exception {

    LOG.info("\n\n\n\n\t\t\t ---------  RandomJokesApplication is up and running --------- \n\n");


    Observable.interval(2, TimeUnit.SECONDS, Schedulers.io())
        .observeOn(Schedulers.newThread())
        .subscribe(s -> LOG.info("Tick"));

    Thread.sleep(10000);

    LOG.info("\n\n\t\t\t ---------  RandomJokesApplication ends its work --------- ");

    }
With interval() method we define a new Observable that will emits value each 2 seconds. ObserveOn() tells us on which thread subscribe() method will be running. And a final method is added to take care of the output of the emitted value (in our case it only prints the same String in the console).
You may also see that a main Thread has been paused to sleep for 10 seconds. It’s because I want to run my program only for this amount of time during which the events will be triggered.
When you run above code in the specified time frames in a console should be printed the same output — “Tick”.
Step 3. Add REST API service
So as we handle a first part, let’s move on to the next one, which is mapping the API call to the Retrofit.
A first step would be to create class models (data transfer objects) that reflects the structure of the API respond. For this demo I’m using The Internet Chuck Norris Database API that have specific URL for fetching, yes you guess so, Chuck Norris jokes! The URL is https://api.icndb.com/jokes/random and the respond looks like this:
{
  "type": "success",
  "value": {
    "id": 550,
    "joke": "Chuck Norris can speak Braille.",
    "categories": []
  }
}
So to reflect above structure we need to create following classes (notice that I map only those fields that are really needed):
import lombok.Data;

@Data
public class ChuckNorrisJoke {

    private ChuckNorrisJokeValue value;
}

@Data
public class ChuckNorrisJokeValue {

    private String joke;
}
@data annotation is a Lombok annotation, and creates for us getters, setters, toString(), equals(), hashCode() and no arguments constructor.
Then we need to create an interface that will map URL resource path to the method. The method should return the Observable and looks like this:
import retrofit2.http.GET;
import rx.Observable;

public interface ChuckNorrisJokesApi {

    @GET("/jokes/random")
    Observable<ChuckNorrisJoke> randomJoke();
}
You may notice that in @GET annotation only partial URL is provided. The remaining base needs to be provided in a service class, which we will be our utility class to fetch jokes from the Chuck Norris API.
import org.springframework.stereotype.Service;
import retrofit2.Retrofit;
import retrofit2.adapter.rxjava.RxJavaCallAdapterFactory;
import retrofit2.converter.gson.GsonConverterFactory;
import rx.Observable;

@Service
public class JokesService {

    private ChuckNorrisJokesApi chuckNorrisJokesApi;

    JokesService() {

        Retrofit retrofit = new Retrofit.Builder()
                .baseUrl("http://api.icndb.com/")
                .addConverterFactory(GsonConverterFactory.create())
                .addCallAdapterFactory(RxJavaCallAdapterFactory.create())
                .build();

        chuckNorrisJokesApi = retrofit.create(ChuckNorrisJokesApi.class);
    }

    public Observable<String> getRandomChuckNorrisJoke(){

        return chuckNorrisJokesApi.randomJoke()
                .map(respond -> respond.getValue().getJoke());

    }
}
At first glance the JokesService class may not be straight forward, but basically it only sets up the ChuckNorrisApi object and uses in a single method that is responsible for retrieving a text of the joke wrapped in a Observable.
The @Service annotation comes with Spring and tells Dependency Injection Container that it should take care of this object life cycle.
Finally we can inject our service (using @Autowired annotation) into the main class — RandomJokesApplication and then use it in run(…) method. For now just to print a single joke.
// ...beginging of the class

@Autowired
private JokesService jokesService;

// ...other middle stuff...

@Override
public void run(String... args) throws Exception {

        LOG.info("\n\n\n\n\t\t\t ---------  PeriodicQuotesApplication is up and running --------- \n\n");

    jokesService.getRandomChuckNorrisJoke()
        .subscribe(result -> LOG.info("\n\n\n\t\t\t {} \n\n", result));

    // following code...

}
If you run above code you should get a single Chuck Norris joke and which means that we have only one thing left ahead — combining it with periodically triggered Observable.
Step 4. Combing all together
To do that we could move a part of the code that is printing the joke to the subscribe() method of Observable that is printing something in each 2 seconds. But I would like to try a little different approach:
@SpringBootApplication
public class RandomJokesApplication implements CommandLineRunner {

    // some dependencies...

    @Override
    public void run(String... args) throws Exception {

        LOG.info("\n\n\n\n\t\t\t ---------  RandomJokesApplication is up and running --------- \n\n");


        Observable.interval(2, TimeUnit.SECONDS, Schedulers.io())
                .observeOn(Schedulers.newThread())
                .map(tick -> jokesService.getRandomChuckNorrisJoke())
                .doOnError(error -> LOG.info(error.toString()))
                .retry()
                .subscribe(jokeObservable -> jokeObservable.subscribe(joke -> LOG.info("\n\n\n\t\t\t {} \n\n", joke)));

        Thread.sleep(10000);

            LOG.info("\n\n\t\t\t ---------  RandomJokesApplication ends its work --------- ");

    }
}
Firs of all, I’ve added a map() step in which joke text is extracted, so the subscribe() method is much more cleaner. Also doOnError() and retry() steps were added to take care of error and make sure than even some of them occurs Observable will still fire the event.
If you run the application, you should get similar output:
And that’s it! 🤓
The entire code for this app could be found here (if you dig into commits history you can also see that a code was written similar to described story) :

Oldest comments (0)