
Code generation in Unity is often done imperatively with StringBuilder or Roslyn source generators. Text templates offer a declarative alternative to code generation, but setting them up in a Unity project is not straightforward.
Interestingly, the Unity Editor makes use of templates for creating new scripts. They can even be customized, although their functionality is limited.
What if text templates were just another asset in the Unity Editor? And could be used to generate code or any text asset. This is what I set out to accomplish with Templ. An open-source Unity Editor extension which integrates Scriban templates to enable declarative text assets generation effortlessly.
There are two prominent use cases for asset generation:
On-demand, where one or more assets are generated only once, whenever needed. Also known as scaffolding.
Reactive, where an asset is generated in response to another asset changing.
After installing Templ, Scaffolds can be created to support the on-demand generation of assets and folders.
To support reactive generation, live entries can be configured to establish a one-way data binding between any existing text asset and a new text asset to be generated and automatically kept up-to-date. Both techniques will be described in more detail further below.
How to install
There are two ways to install Templ on a Unity project, via OpenUPM or as a git package. Keep in mind that the lowest supported Unity version is 2020.3.
Install via OpenUPM
The best way to install Templ is via OpenUPM. First, install OpenUPM CLI by following these steps.
Once OpenUPM CLI is installed on your system, open the terminal of your choice and browse to your Unity project's root directory. Then, type the following command and press Enter.
openupm add com.willykc.templ

Install as a Git package
Alternatively, it can also be installed as a Git package. First, add the following scoped registry via Edit -> Project Settings... -> Package Manager to satisfy the dependencies:
| Name | URL | Scope |
|---|---|---|
openupm |
https://package.openupm.com |
org.nuget |

Afterwards, select Window -> Package Manager -> Add package from git URL..., enter https://github.com/willykc/templ.git, and click on Add.

First-time setup
Once installed, a prompt will appear in the Unity Editor. Click on Proceed to create the TemplSettings asset. By default, it can be found at Assets/Editor/TemplData but can be moved anywhere in the project hierarchy. It can always be found by clicking on Window -> Templ -> Settings.

The TemplSettings asset inspector has two sections:
Live Entries, where input assets and templates are configured to generate output assets.
Selectable Scaffolds, where scaffolds are configured to be selectable in the context menu.
How to create a simple scaffold
Scaffolds are collections of templates arranged in a tree structure. To begin, create a template asset by right-clicking anywhere in the project hierarchy and selecting Create -> Templ -> Scriban Template.
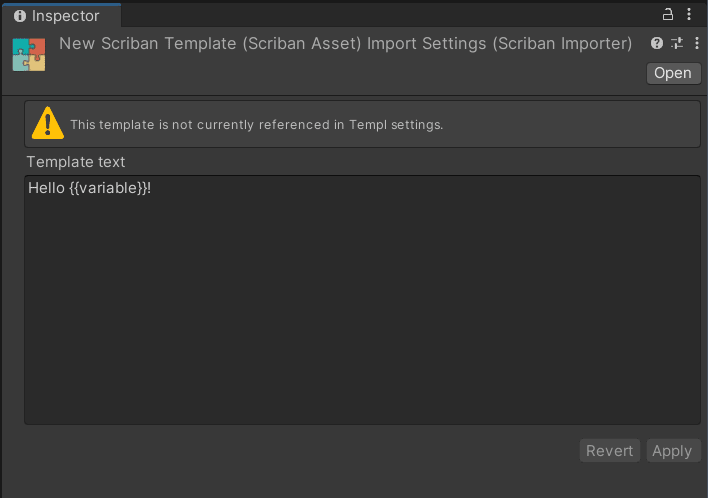
The template asset inspector allows editing of the template text. It will also show any syntax errors found in the template and warn if the template is not referenced in TemplSettings. Enter the source code below in the template text area and click Apply.
using UnityEngine;

namespace ScriptableObjects
{
    [CreateAssetMenu(fileName = "newScriptableObject")]
    public class NewScriptableObjectScript : ScriptableObject
    {

    }
}
Rename the template to ScriptableObjectScriptTemplate.
Next, right-click anywhere in the project hierarchy and select Create -> Templ -> Scaffold Definition. Once created, name it ScriptableObjectScaffold.
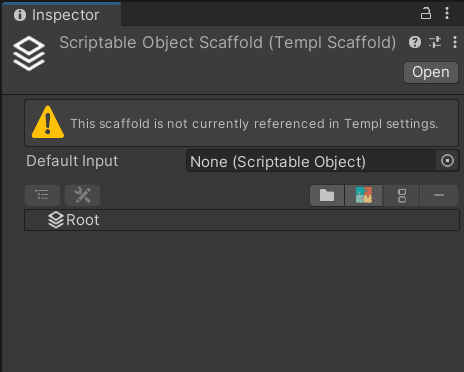
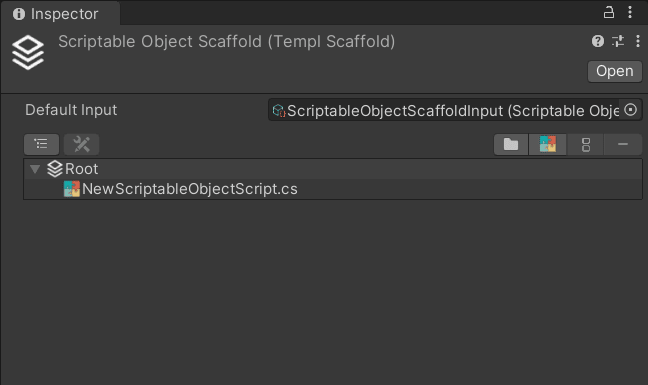
The scaffold asset inspector consists of a Default Input field, a toolbar to edit the scaffold tree, and the scaffold tree view. Similarly to the template asset inspector, it will show any errors in the scaffold and warn if it is not referenced in TemplSettings.
Select the Root node in the scaffold tree view and click on the button with the colourful icon in the toolbar to add a template node. Then, name it NewScriptableObjectScript.cs and drag-&-drop ScriptableObjectScriptTemplate into the field next to the name.

The scaffold will generate a single file with the contents of the template. This scaffold is not very useful for now, but it is a good starting point to build upon.
To generate the scaffold, it must first be set as selectable. Select TemplSettings and, in the inspector, create a new item in the Selectable Scaffolds list and drag-&-drop ScriptableObjectScaffold into it.

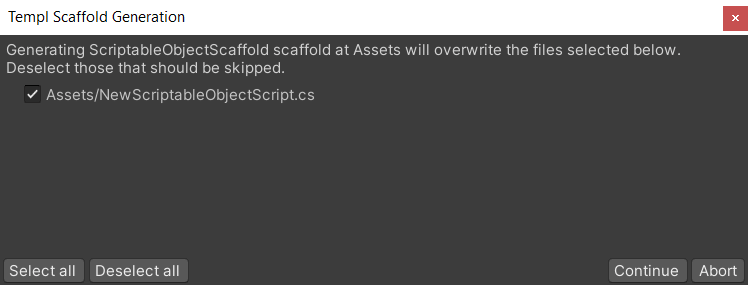
At this point, the scaffold is selectable from the context menu. Right-click on any folder in the project hierarchy and select Generate Templ Scaffold. A menu will appear with a single option named ScriptableObjectScaffold. Clicking on it will generate the scaffold.
Attempting to generate the same scaffold under the same folder will result in a prompt asking which files to overwrite or skip.
Since the template is static, the generated script will always match its contents. This sample scaffold will be extended further below to make it more dynamic. Live entries will be introduced next.
How to add a simple live entry
Live entries monitor their input asset for changes and react to them by generating an output asset. To detect changes, input assets must be saved to disk first. Changes to the assets in the Unity Editor are seldom saved to disk automatically. One way to ensure assets are saved to disk is to use the keyboard shortcut Ctrl/Cmd + S.
Start by renaming the scriptable object script generated earlier from NewScriptableObjectScript to Windows. Then, replace its contents with the source code below.
using UnityEngine;

namespace Willykc.Templ.Samples
{
    [CreateAssetMenu(fileName = "Windows")]
    public class Windows : ScriptableObject
    {
        public string[] windowList;
    }
}
Right-click anywhere in the project hierarchy and select Create -> Windows. Once the asset is created, proceed to populate the Window List with the following values:
Main
Profile
Store

Imagine this could eventually become the heart of a complex window system for an application. For now, it only lists the names of the windows in the application, but later it could specify how the windows are meant to behave or how to navigate between them.
Sometimes, it is desirable to have a representation of the data in a scriptable object as constants in C#. An example would be to generate an enum whose values represent the windows in the list above. Every time the window list is updated, the enum will be updated automatically to reflect the changes.
To achieve this, a template must be defined to convert the data in the scriptable object to an enum script. Right-click anywhere in the project hierarchy and select Create -> Templ -> Scriban Template. Name the template EnumTemplate and fill its contents with the following text.
namespace Willykc.Templ.Samples
{
    public enum {{OutputAssetPath | GetFileNameWithoutExtension}} {
{{~ for window in scriptableObject.window_list ~}}
        {{window}},
{{~ end ~}}
    }
}
As mentioned earlier, templates are written in the Scriban language. The capabilities of this template engine are explained in more detail further ahead. For now, note that every statement between {{ }} is a template statement.
Pay special attention to the for loop. For each element in the collection, a line is written to the output with the window name, followed by a comma. The end statement closes the scope of the for loop.
In this case, scriptableObject.window_list represents the list of windows in the scriptable object created earlier. The reason it is named window_list instead of windowList, as in the class definition, is due to a Scriban convention which exposes object fields in snake_case.
To bring everything together, select TemplSettings and, in the inspector window, add a new Scriptable Object entry to the Live Entries list. Next, drag-&-drop the following assets into their respective places:
Windows scriptable object instance into the Scriptable Object field.
EnumTemplate into the Template field.
The folder in the project hierarchy where the enum script should be generated into the Directory field.
Lastly, enter WindowNames.cs in the Filename field and use the keyboard shortcut Ctrl/Cmd + S to save TemplSettings to disk.
A logline will appear in the Unity Editor console window showing a template has been rendered. From this moment onwards, a one-way data binding exists between the Windows scriptable object and the WindowNames script. Open the WindowNames script to verify it contains the window list represented as values in an enum definition.
To test that the live entry works as expected, add a new element to the window list in the Windows scriptable object and save it to disk using Ctrl/Cmd + S. A new logline will appear in the console window, and the WindowNames script will be updated to reflect the change in the Windows scriptable object.

The data binding is also upheld when the template changes. Replace the contents of EnumTemplate with the following text.
namespace Willykc.Templ.Samples
{
    public enum {{OutputAssetPath | GetFileNameWithoutExtension}} {
        None = 0,
{{~ for window in scriptableObject.window_list ~}}
        {{window}} = {{for.index + 1}},
{{~ end ~}}
    }
}
The resulting enum will always have a None value followed by the window name values, all denoted by their respective numerical values. Once the template is saved to disk and the logline is shown in the console window, inspect the WindowNames script to see the changes.
The fact that the output folder is referenced as an asset means it can be renamed or moved in the project hierarchy without breaking its reference in the live entry. Consequently, the data binding will "follow" the folder as long as it is renamed or moved within the Unity Editor.
More advanced use cases for live entries will be explored further below. Templates are explained in more detail next.
Templates
Even though the Scriban language is well documented, there are a few specifics worth noting.
Several reserved keywords are available as variables in templates. For example, OutputAssetPath is the output asset path of the generated asset. It is exposed to both live entry and scaffold templates. The rest of the reserved keywords are exclusive to scaffold templates:
Input: Exposes the input object of the scaffold.Selection: Exposes the selected asset at the time of generation.Seed: Exposes a new GUID shared across all the templates.RootPath: Exposes the path where the scaffold is generated.
There are also various template functions to aid with typical requirements, such as GetFileNameWithoutExtension. The complete set of template functions available can be explored here.
It is worth pointing out that these reserved keyword variables and functions are not exposed in snake_case as opposed to object fields.
Why Scriban?
There are many different template engines out there. Scriban was selected primarily because it is open-source, fully featured and provides a flexible API. It is also available as an OpenUPM package through UnityNuGet, which makes it convenient to reference as a package dependency.
Scriban provides a Visual Studio Code extension for syntax colouring that simplifies the creation and editing of templates. To make the most of it, rename the extension of C# templates from .sbn to .sbncs so that the syntax colouring matches the nature of the template.
To improve template reusability, the Scriban API allows defining how to reference templates within templates using the include function. This means that templates can be included in other templates by specifying their asset paths or GUIDs in Unity, as shown below.
{{ include 'Assets/Templates/MyTemplate.sbn' }}
{{ include 'a82406792f69d0b4bad506b4d160ac1c' }}
Use asset paths when it is safe to assume the templates will not be moved to another location in the project hierarchy. Otherwise, use GUIDs to guarantee the reference will not be broken even when moving the templates to a new location. An asset's GUID can be obtained by inspecting the .meta file next to it.
Another virtue of Scriban is extensibility in the form of custom template functions. Even though Scriban provides a versatile set of built-in functions, it is convenient to be able to define custom ones to fit specific requirements.
Defining custom template functions
To write a custom template function, declare a public static class and decorate it with the TemplFunctions attribute. Any public static methods implemented under such a class will be automatically exposed as template functions with the same name.
The following source code exemplifies this by implementing a method that returns the input string with trailing underscores.
namespace Willykc.Templ.Samples
{
    using Editor;

    [TemplFunctions]
    public static class TemplFunctionsSample
    {
        public static string Padding(string str) => $"_{str}_";
    }
}
The method is exposed as a template function called Padding. An example of usage is shown below.
{{ 'some text' | Padding }}
Rendering this template would output the following text.
_some text_
If a custom template function is declared with the name of an existing custom template function, an error will appear in the Unity Editor console window detailing the conflict. Asset generation will not function before these conflicts are resolved.
Scaffolds in detail
This section continues the "How to create a simple scaffold" section. It is recommended to read that section before proceeding.
Scaffolds can be configured to show a prompt for input data when generating them. This allows the output to change depending on the input values. ScriptableObjectScaffold, defined earlier, can be extended in such a way as to output scriptable object scripts of different names.
Start by defining a scriptable object class named ScriptableObjectScaffoldInput to represent the input object of the scaffold, as shown below.
using UnityEngine;

namespace Willykc.Templ.Samples
{
    [CreateAssetMenu(fileName = "ScriptableObjectScaffoldInput")]
    public class ScriptableObjectScaffoldInput : ScriptableObject
    {
        public string scriptName;
    }
}
Right-click anywhere in the project hierarchy and select Create -> Scriptable Object Scaffold Input. Next, drag-&-drop the newly created ScriptableObjectScaffoldInput instance into the Default Input field of ScriptableObjectScaffold.
Double-click on the NewScriptableObjectScript.cs node in the scaffold tree view and rename it to {{Input.script_name}}.cs.
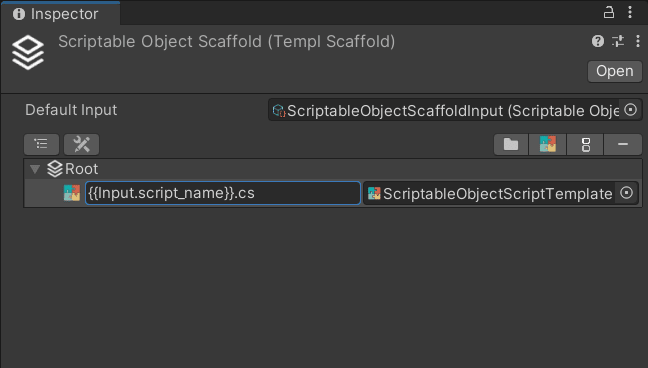
Select ScriptableObjectScriptTemplate in the project hierarchy and replace its contents, in the inspector window, with the following text.
using UnityEngine;

namespace {{OutputAssetPath | GetDirectoryName | regex.replace `[\/\\]` "."}}
{
    [CreateAssetMenu(fileName = "new{{Input.script_name}}")]
    public class {{Input.script_name}} : ScriptableObject
    {

    }
}
The class name will now match the input script name. The namespace of the generated script is dynamic as well. It will correspond to its location in the project hierarchy. This technique to obtain a namespace is rudimentary; a custom template function could be implemented to scan the filesystem for assembly definitions that provide the namespace for the script.
Next, right-click anywhere in the project hierarchy and select Generate Templ Scaffold. Then, click on ScriptableObjectScaffold to generate the scaffold. The following prompt will be shown this time to request input data.

Enter a sensible scriptable object name, click on Generate ScriptableObjectScaffold at the bottom and inspect the output.
The input form above shows the inspector for the Default Input scriptable object configured in the scaffold. If a custom inspector is implemented, it will be shown instead of the default inspector. This allows the implementation of custom validation rules for input data.
The scaffold tree view and toolbar
ScriptableObjectScaffold can be further extended to generate a default serialized instance of the scriptable object class. To begin, select ScriptableObjectScaffold to view it in the inspector window. Then, select the Root node and click on the toolbar button with the folder icon. Name the new folder node DefaultInstance.

The right-most button in the toolbar is for removing nodes from the scaffold. The button next to it is for cloning nodes. Select the file node on top of the folder node and click on the clone button. Then, drag-&-drop the duplicate node into the folder node.

The two buttons to the left are to expand or collapse the tree view and to edit nodes. Scaffold trees can have multiple levels of depths and many different nodes. Nodes can be moved in bulk by selecting them together while holding down the Shift key and then dragging them in the tree hierarchy. Multiple nodes can also be cloned or removed simultaneously. Edits to the scaffold tree can be undone or redone as any other action in the Unity Editor.
Scriptable object YAML node
The next step is to rename the file node inside the folder node to {{Input.script_name}}.asset. Once renamed, create a new template by right-clicking anywhere in the project hierarchy and selecting Create -> Templ -> Scriban Template. Name it ScriptableObjectInstanceTemplate and replace its contents with the following text.
%YAML 1.1
%TAG !u! tag:unity3d.com,2011:
--- !u!114 &11400000
MonoBehaviour:
  m_ObjectHideFlags: 0
  m_CorrespondingSourceObject: {fileID: 0}
  m_PrefabInstance: {fileID: 0}
  m_PrefabAsset: {fileID: 0}
  m_GameObject: {fileID: 0}
  m_Enabled: 1
  m_EditorHideFlags: 0
  m_Script: {fileID: 11500000, guid: {{RootPath + Input.script_name | string.md5}}, type: 3}
  m_Name: {{Input.script_name}}
  m_EditorClassIdentifier:
Select ScriptableObjectScaffold and double click on the {{Input.script_name}}.asset node. Then, drag-&-drop ScriptableObjectInstanceTemplate into the field next to the node name.
It may seem enough to accomplish the desired goal, but the scaffold is still incomplete. The generated script asset GUID (provided by the Unity Editor) will not match the GUID value in the scriptable object YAML.
Meta node
To ensure the script asset GUID matches the GUID in the scriptable object YAML, create a new template with the following text and name it ScriptMetaTemplate.
fileFormatVersion: 2
guid: {{RootPath + Input.script_name | string.md5}}
MonoImporter:
  externalObjects: {}
  serializedVersion: 2
  defaultReferences: []
  executionOrder: 0
  icon: {instanceID: 0}
  userData:
  assetBundleName:
  assetBundleVariant:
Clone {{Input.script_name}}.cs in the scaffold tree and rename the duplicate to {{Input.script_name}}.cs.meta. Next, drag-&-drop ScriptMetaTemplate into the corresponding field in the node.

Generate the scaffold anywhere in the project hierarchy (as shown before) and inspect the output.
Dynamic scaffolds
Despite the flexibility of the scaffold tree view, it is static. Once the scaffold is defined, the contents of the files it generates may change, but its structure will remain constant.
Dynamic scaffolds allow the tree structure to change the same way the contents of the files do; by using a template to determine the tree structure expressed in YAML. This makes it possible to generate a collection of files based on an array of values or conditionally generate specific files depending on the results of a boolean expression.
For example, a dynamic version of ScriptableObjectScaffold could generate the default instance of the generated scriptable object conditionally, depending on the value of a boolean flag in the default input object.
Start by creating a new template to generate the tree structure of the dynamic scaffold. Right-click anywhere in the project hierarchy and select Create -> Templ -> Scriban Template. Name it TreeTemplate.
Select ScriptableObjectScaffold and click on the context menu in the inspector window. Then, click on the Copy YAML Tree menu item.

Select TreeTemplate and paste the copied YAML into its contents. It will look similar to the following YAML text. The paths to the templates may differ depending on their location in the project hierarchy.
- '{{Input.script_name}}.cs': Assets/Editor/TemplData/ScriptableObjectScriptTemplate.sbn
- '{{Input.script_name}}.cs.meta': Assets/Editor/TemplData/ScriptMetaTemplate.sbn
- DefaultInstance:
    - '{{Input.script_name}}.asset': Assets/Editor/TemplData/ScriptableObjectInstanceTemplate.sbn
Selecting Copy YAML Tree with GUIDs in the scaffold inspector context menu would produce a YAML representation of the scaffold tree with GUID references instead of asset paths.
Next, add if and end statements to TreeTemplate as shown below.
- '{{Input.script_name}}.cs': Assets/Editor/TemplData/ScriptableObjectScriptTemplate.sbn
{{~ if Input.generate_default_instance ~}}
- '{{Input.script_name}}.cs.meta': Assets/Editor/TemplData/ScriptMetaTemplate.sbn
- DefaultInstance:
    - '{{Input.script_name}}.asset': Assets/Editor/TemplData/ScriptableObjectInstanceTemplate.sbn
{{~ end ~}}
The default instance will now be generated depending on the value of Input.generate_default_instance.
Extend the ScriptableObjectScaffoldInput class to include the boolean field, as shown below.
using UnityEngine;

namespace Willykc.Templ.Samples
{
    [CreateAssetMenu(fileName = "ScriptableObjectScaffoldInput")]
    public class ScriptableObjectScaffoldInput : ScriptableObject
    {
        public string scriptName;
        public bool generateDefaultInstance;
    }
}
Afterwards, create a dynamic scaffold by right-clicking anywhere in the project hierarchy and selecting Create -> Templ -> Dynamic Scaffold Definition. Name it ScriptableObjectDynamicScaffold. Then, drag-&-drop ScriptableObjectScaffoldInput into the Default Input field and TreeTemplate into the Tree Template field.
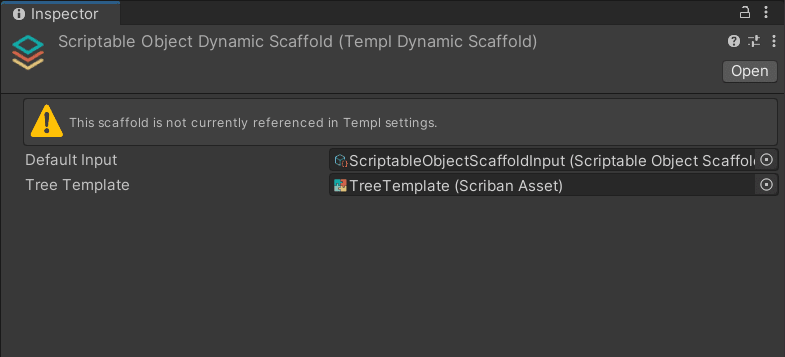
Finally, select TemplSettings and, in the inspector, replace ScriptableObjectScaffold with ScriptableObjectDynamicScaffold in the Selectable Scaffolds list.
Generate the new scaffold multiple times and experiment with the boolean flag to see the results.
This concludes the detailed overview of scaffolds. The following section will describe advanced use cases for live entries.
Other types of live entries
There are two default live entry types, Scriptable Object and Assembly Definition. The former was exemplified earlier, while the latter allows monitoring for changes in source code and generates an output asset based on the contents of a compiled assembly. It is exposed to templates as assembly while a set of template functions allow manipulating it using reflection.
The Assembly Definition entry type is ideal for taking code reflection from runtime to design time. A list of constants can be generated from the subclasses of a specific class or the fields of a custom attribute. Several examples of usage are included in the Templ package samples, as described later.
How to create a custom live entry
Suppose a JSON text asset with a specific data structure is to be used to generate another text asset. Start by creating a script to define the data structure. Name it JsonData and replace its contents with the following source code.
using System.Collections.Generic;

namespace Willykc.Templ.Samples
{
    public class JsonData
    {
        public string name;
        public string[] list;
    }
}
To write a custom entry type, extend the TemplEntry class, decorate it with the TemplEntryInfo attribute and define a public field of the target asset type decorated with the TemplInput attribute.
Produce a new script anywhere in the project hierarchy and name it JsonEntry. Then, replace its contents with the source code below.
using UnityEngine;

namespace Willykc.Templ.Samples
{
    using Editor.Entry;

    [TemplEntryInfo(changeTypes: ChangeType.Import, DisplayName = "JSON")]
    public class JsonEntry : TemplEntry
    {
        [TemplInput]
        public TextAsset json;

        protected override object InputValue => JsonUtility.FromJson<JsonData>(json.text);

        protected override bool IsValidInputField
        {
            get
            {
                try
                {
                    return base.IsValidInputField && InputValue != null;
                }
                catch
                {
                    return false;
                }
            }
        }
    }
}
The TemplEntryInfo attribute allows the specification of change type (in this case ChangeType.Import) and defines the display name of the entry type in the TemplSettings inspector (JSON in this case).
The json field is the input asset of the entry. It must always be public and decorated with the TemplInput attribute. In this case, it is of type TextAsset. It must always be a subtype of the UnityEngine.Object class.
The InputValue property override allows defining the object instance exposed to the templates. In this case, the JSON text is parsed and exposed as an instance of the JsonData class. This allows the templates to interact with a data structure rather than just a JSON string value.
The IsValidInputField property override determines if the entry is valid or not. In this case, if the JSON text fails to parse, then the entry is considered invalid.
A few more details about implementing custom live entries can be found here.
Open a file explorer and create a sample JSON file anywhere under the project's Assets hierarchy. Name it SampleJson.json and enter the following text in it.
{
    "name": "sample",
    "list": ["one", "two"]
}
Lastly, create a new template by right-clicking anywhere in the project hierarchy and selecting Create -> Templ -> Scriban Template. Name it YamlTemplate and fill its contents with the following text.
name: {{json.name}}
list:{{if json.list | array.size == 0}} []{{end}}
{{~ for item in json.list ~}}
  - {{item}}
{{~ end ~}}
In the TemplSettings inspector, expand the dropdown to add new entries. A JSON entry type will be available, as shown below.

Add a new JSON entry and drag-&-drop SampleJson into the JSON field, YamlTemplate into the Template field, any folder in the project hierarchy into the Directory field, and enter SampleYaml.yml in the Filename field.

Press Ctrl/Cmd + S on your keyboard to save TemplSettings to disk. Inspect the output and experiment by editing the SampleJson.json file.
Samples
The Templ package includes many samples to showcase the capabilities discussed before and more. Select Window -> Package Manager and select Templ in the packages list. Then, expand the Samples foldout to reveal the list of samples.
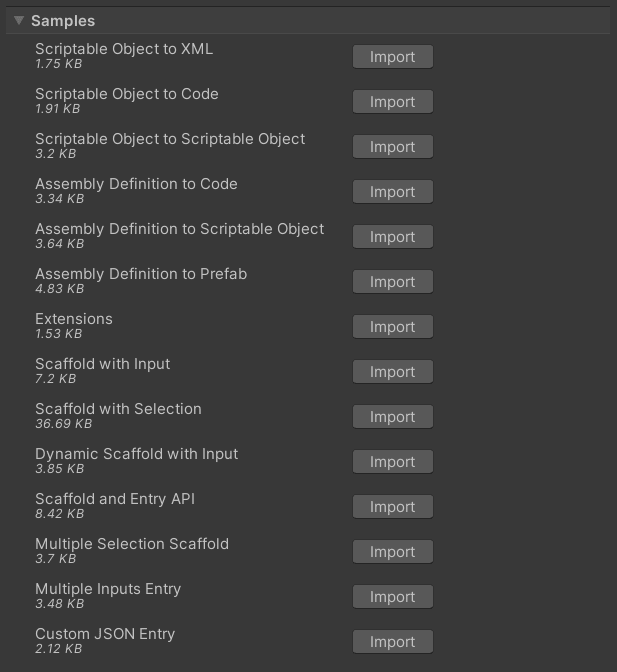
Click on Import to copy a sample into the project hierarchy. Each contains all the assets necessary to utilize the capabilities in a specific manner. They are a good starting point when working on an asset generation project.
API
An API is provided to enable further automation of asset generation. It can generate scaffolds within custom editor windows and add, update or remove live entries. It is fully documented, and some of the samples showcase its usage.
To access the API, reference the TemplManagers static class. The properties of this class expose the available operations.
TemplManagers.ScaffoldManager: Exposes scaffold operations.TemplManagers.EntryManager: Exposes live entry operations.
The following is an example of how to use the API to generate a scaffold.
await TemplManagers.ScaffoldManager.GenerateScaffoldAsync(
    scaffold,
    targetPath,
    overwriteOption: OverwriteOptions.OverwriteAll);
It is an asynchronous operation since it can prompt the user to input data. The scaffold parameter is an instance of a scaffold asset. The targetPath parameter is the asset path to the folder where the scaffold is meant to be generated. The overwriteOption parameter determines what happens if already existing files are encountered during generation.
Known issues and limitations
When using the include function in live entry templates, changes to the included templates will not trigger the rendering of the entry as a change to the direct template would.
A live entry generating an asset which triggers another generation is considered an import feedback loop. To prevent this, live entries will not be rendered when configured to overwrite the input asset or the template of any other entry. The same restriction applies to entries configured to overwrite TemplSettings.
Assembly Definition entries are still susceptible to feedback loops since assembly definitions are associated with multiple script assets. Do not generate a script within the assembly definition associated with the entry. Also, any build issues caused by removing an assembly definition reference will prevent any associated live entry from rendering until the build issues are fixed.
Neither TemplSettings nor templates can be used as the input of a Scriptable Object entry.
Live entries are only capable of generating a single output asset. Some consideration was given to using scaffolds as live entries output, but that would make import feedback loops harder to prevent.
The dependencies referenced as UPM packages can cause conflicts in the Unity build process. The most likely manifestation of this issue is with the system.threading.tasks.extensions package. Plugin conflicts must be resolved by disabling the offending plugins for the build using the Unity Editor's PluginImporter API.

Oldest comments (0)