We can work with structured NoSQL data using the Table API in Azure Cosmos DB

If you have an application that uses Azure Table Storage and you need to scale your application globally, you could benefit from using the Table API in Azure Cosmos DB.
You can migrate your application with no changes required to your code and take advantage of capabilities such as global distribution, high availability etc that comes with Azure Cosmos DB.
In this article, I’m going to outline in what scenarios you should Cosmos DB’s Table API instead of normal Azure Table Storage, I’ll show you how you can create a Table API account in Azure and I’ll also walk you through a basic C# application that interacts with our Cosmos DB Table API account.
OK, so when would I use Azure Cosmos DB instead of normal Table Storage?
Normal Table Storage is quick, but has no upper bound defined on latency. Azure Cosmos DB has single-digit millisecond latency for reads and writes along with strong SLA’s (99.999% read availability, 99.99% write for single region, 99.999% for multi-region accounts).
You can make significantly more operations per second on Cosmos DB (over 10 million per second per table) than you could in normal Table Storage (limit to 20,000 per second).
If we need to failover our table storage, we can do this in Cosmos. We can assign any Azure Region that we want to failover to and we can do this automatically or manually. We can’t do this in normal Table Storage.
Indexing is far more extensive in Cosmos DB. We can index on every property in Cosmos DB and we can do this without managing it ourselves. This is fantastic for performing fast queries. In normal Table storage, we only have primary indexing on PartitionKey and RowKey. There is no secondary indexes in Table Storage.
We can also take advantage of multiple consistency levels in Cosmos DB. There are 5 well-defined consistency levels in Cosmos DB that we can take advantage of depending on the needs of our application.
Let’s create a Azure Cosmos DB account that uses the Table API. I’m going to assume that you have a basic familiarity with the Azure portal.
Click on ‘ Create New ’ to create a new resource and use the search text box to search for ‘ Azure Cosmos DB’. Click on the Azure Cosmos DB icon to start configuring your new account.

Give your Azure Cosmos DB account a name and assign it to a resource group. The important thing here is that we select Azure Table as our API option. Cosmos DB comes with 5 different API’s (Table, Core, Gremlin, Cassandra or MongoDB). At the time of writing, we can only assign one API when we create our Cosmos DB account.
Since this is a tutorial about the Table API, we need to choose that as our API option.
If this is your first Cosmos DB account in your subscription and you just want to play around without paying any money, I’d highly recommend that you apply the Free Tier discount as I have. This is a new feature that’s fantastic for trying out Cosmos DB without spending any money. You can read more about the Free Tier here.
Provision the account in a region that’s close to you. You don’t need Multi-Region writes or do anything else for this tutorial. Check out the screenshot below to see how I set up my account. Click on ‘ Review + Create ’ to provision your Cosmos DB account.

After a few minutes, our Cosmos DB account will be provisioned. Let’s create a new Table within our account. To do this, head to your Cosmos DB accounts’ “ Data Explorer” and click on the “ New Table” button.

In the Add Table panel, give your table a name and set the throughput level that you want to provision. Unlike the Core (SQL) API, when you create a table in the Table API, you always provision throughput for that Table and a Database will automatically be created for that table. If you provision more tables within that account, they will sit underneath the same database.
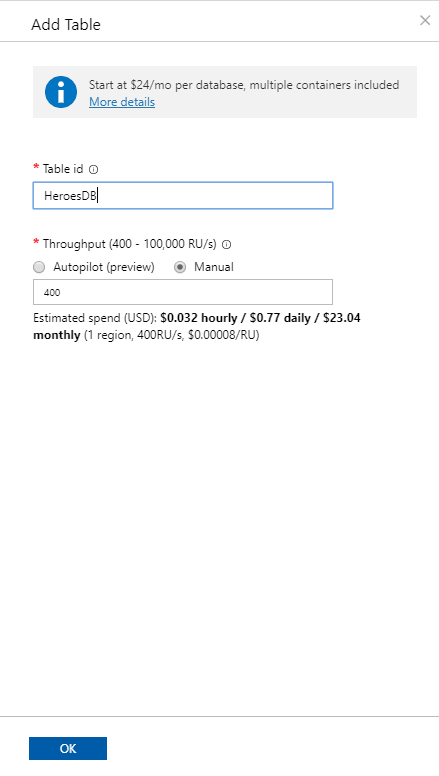
Click “ OK ” and you should see your new table ready to go. Let’s build a simple application to put some data in there!

For this tutorial, I’m going to develop a simple .NET Core application that deals with Superheros from both the DC and Marvel Universe(DC comic, Marvel films 😊).
To work with the Table API in our C# application, I’ll need to use the Microsoft.Azure.Cosmos.Table NuGet package. This package allows us to develop applications that target .NET standard. We’ll also need to download some Configuration packages to hide our secrets.
Below are the packages we want to download from NuGet. If you’re unsure how to do this, right click your project in Visual Studio and click ‘ Manage NuGet Packages ’. Just search for these packages and just click install. You can use the latest versions if you want, but for the Table Storage SDK, I used version 1.0.6.
Microsoft.Azure.Cosmos.Table
Microsoft.Extensions.Configuration
Microsoft.Extensions.Configuration.Binder
Microsoft.Extensions.Configuration.Json
We’ll store our Primary connection string to our Table API account in a “ Settings.Json ” file. We’ll then use a ConfigurationBuilder to load the connection string when we run our program.
Do to this, create a new JSON file and add the following code to it.
{
    "ConnectionString": "<YOUR\_TABLE\_STORAGE\_PRIMARY\_KEY>"
}
You can get your connection string by going into your Table account and clicking on ‘ Connection String ’ under ‘ Settings ’. Copy your primary key to the clipboard and paste it in your “ Settings.json ” file.

Now that we’ve set up our JSON file, I’ve created a class that loads the settings our application will need to connect to our table account.
With this set up, I’ll create a separate class that connects to our Table account, then connects to a specified table within our Table account. If you’ve worked with Table Storage in C# before, you’ll notice that the code is identical. This makes it real easy to migrate from normal table storage to Azure Cosmos DB 😍.
Now that we can connect to our account, let’s define an entity that we can insert into our table. For the Table API, we need to inherit our entities from the TableEntity class.
The Partition Key and Entity Key uniquely identify data within our Table account. Here, I have defined public properties that I want my Hero entities to store. I’ve assigned my Partition Key to have the heroName property and I’ve set my alterEgo property as the Entity Key.
Here is our HeroEntity class below.
So now that I’ve got my HeroEntity all set up, let’s take a look at my Program.cs file. I’ll go through each operation one-by-one and I’ll put a link to the whole GitHub repo in the conclusion for your benefit.
But for now, let’s try to insert data into our Cosmos DB Table API account, check out the following method below:
In my Program.cs file, I’ve got a list of seed data that I want to insert into my table account. In my InsertOrMergeHero() method, I’m passing through the name of the table that I want to insert my hero into and the HeroEntity that I’m attempting to persist.
I’m instantiating a TableOperation variable called insertOrMerge and then passing my entity to the InsertOrMerge() method. This method will either create a new entity if it doesn’t exist or update it if it does. We then instantiate a TableResult variable that will represent the result of the operation. We then return the result of that operation.
After inserting all the entities within our List, we should now see them all stored within our Table.

Reading a specific hero is pretty straight forward. Let’s say I want to retrieve my Superman entity, here, I call the Retrieve() method on my TableOperation and pass through my Partition Key and Row Key values.
We should see our retrieved entity appear in our Console app.

Something doesn’t look right though. Technically, Superman’s hometown on Krypton was Kryptonopolis, so let’s update our call our GetHero() method to retrieve our Superman HeroEntity , then set the Hometown property as ‘ Kryptonopolis ’ and then call the InsertOrMerge() method to update our Superman entity.
Console.WriteLine("Let's see if we can find Superman! Performing a read.");

var superman = await OperationsHelper.GetHero(cloudTable, "Superman", "Clark Kent");

Console.WriteLine("Wait, his hometown isn't right! Let's update it.");

superman.Hometown = "Kryptonopolis";

await OperationsHelper.InsertOrMergeHero(cloudTable, superman);
When we query our Superman entity in the data explorer, we should now see the Hometown property for Superman updated.

Let’s delete a hero from our Table. Since Tony Stark snapped his fingers to save the universe at the cost of his own life, let’s delete him from our table.
Here, we just call the .Delete() method on TableOperation and pass through our Entity as a parameter. In my Program.cs file, I first call my .GetHero() method to retrieve Tony from my table and set that as our HeroEntity , then I pass through the entity to my .DeleteHero() method.
Now if we query him to try and find him in our table, he’ll be gone.
(Love you 3000 😥).

After reading this article, I hope you’ve grasped the very basics of working with the Azure Cosmos DB Table API. If you’ve worked with Table Storage before, you’ll notice that it’s all very familiar and if you’re considering migrating your Table Storage data to Cosmos DB, there’s very little changes required to make it work.
If you want to see the full demo app, check out my GitHub repo for it here.
Hopefully you’ve enjoyed reading this article! If you have any questions or comments, let me know and I’ll do my best to answer them. 😊


Top comments (0)