In the past, when you were about to release a website to be accessed worldwide, you usually would have the following:
- A domain where your users would use to access your website.
- Reserved IPv4 public address.
- A configuration that consists of a DNS entry of type A mapping your IPv4 address to your domain.
- Some infrastructure stuff that would deliver your website.
Nowadays, we must have an IPv6 address as well! There are certain areas in the world where IPv4 connections only are not supported anymore due to addresses exhaustion. Let's see how we can do it using Terraform to apply it on GKE Ingress!
Reserving IPv4 and IPv6 addresses
We can use the resource google_compute_global_address:
resource "google_compute_global_address" "gke_ingress_ipv6" {
  name = "external-address-gke-ingress-ipv6"
  ip_version = "IPV6"
  address_type = "EXTERNAL"
}

resource "google_compute_global_address" "gke_ingress_ipv4" {
  name = "external-address-gke-ingress-ipv4"
  ip_version = "IPV4"
  address_type = "EXTERNAL"
}
After their creation, you can check them out by accessing VPC Network and then External IP addresses through the Web Console.
Creating certificate managers
The following GCP resource:
google_compute_managed_ssl_certificate
It allows us to create certificate managers. To illustrate our fictional sample:
resource "google_compute_managed_ssl_certificate" "jasmine_certs" {
  provider = google-beta

  name = "jasmine-certs"

  managed {
    domains = [
      "agrabah.com",
    ]
  }
}
Now we have everything to create our Ingress 🚀.
Creating the GKE Ingress
Here we'll follow the guide Configuring Ingress for external load balancing. First, let's start understanding which annotations we must use.
Static IP address
To use only one of the reserved addresses, we should use the annotation kubernetes.io/ingress.global-static-ip-name. Its description:
Use this annotation to specify that the load balancer should use a static external IP address that you previously created.
By the way, I wrote only one address because, sadly, this annotation supports only one at the current time. We will circumvent that later 😉.
Certificate managers
There are two ways to bind a certificate manager with the Ingress. If you see the guide Using Google-managed SSL certificates, you will see a ManagedCertificate resource; that's not our case. As we created our certificate managers on GCP, we must use the ingress.gcp.kubernetes.io/pre-shared-cert annotation. Its specification:
You can upload certificates and keys to your Google Cloud project. Use this annotation to reference the certificates and keys.
We created only one certificate manager, but let's suppose we had two certificate managers, this annotation would have the following value:
"ingress.gcp.kubernetes.io/pre-shared-cert" = "cert_manager_1,cert_manager_2"
Terraform manifest
Wrapping everything up, this is our resource kubernetes_ingress:
resource "kubernetes_ingress" "sample_ingress" {
  metadata {
    name = "sample-ingress"
    namespace = "production"

    annotations = {
      "kubernetes.io/ingress.global-static-ip-name" = "external-address-gke-ingress-ipv4"
      "ingress.gcp.kubernetes.io/pre-shared-cert" = "jasmine-certs"
    }
  }

  spec {
    rule {
      host = "agrabah.com"
      http {
        path {
          backend {
            service_name = "agrabah-np-service"
            service_port = 8000
          }
        }
      }
    }
  }
}
Now you can execute terraform apply followed by your confirmation. After its creation, if you run the command kubectl -n production get ingress, you'll see something like the following:
▶ kubectl -n production get ingress
NAME               CLASS    HOSTS         ADDRESS             PORTS   AGE
sample-ingress     <none>   agrabah.com   34.X.X.X            80      42d
We're almost there. Now we're at the part where we have to make our hands dirty 😬.
Manual configuration
As this configuration hasn't been supported yet, we have two approaches: either create two Ingresses or configure only one manually. Let's do the latter. When you create an Ingress, a native load balancer is automatically made for you. You can get its name through the command:
kubectl get ingress sample-ingress -o jsonpath='{.metadata.annotations.ingress\.kubernetes\.io/url-map}'
Let's open it on the page Load balancing in Network Services. You'll see the frontend table more or less like the following:
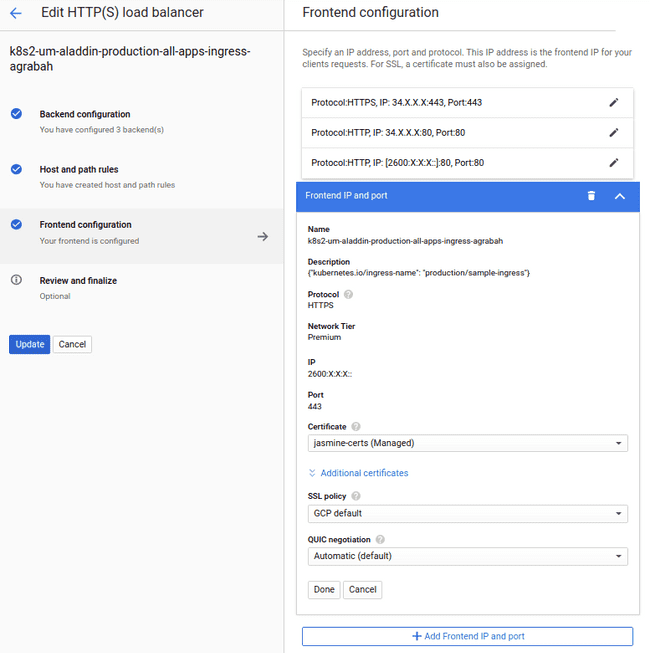
You can click on edit and then click on frontend configuration.
On the panel Frontend configuration, we can click on Add Frontend IP and port and then configure two new entries for ports 80 and 443 for the IPv6 address that is missing. You can base your configuration following what has been set for you automatically. Sample:
After saving the new setup, it should be working accordingly if you access your website either through IPv4 or IPv6.
Possible caveats 🤏
A friend of mine said that this setup wasn't working as expected two years ago because GKE would override what you had done manually. It's been more than one month that I released a project with this approach, and so far, so good. I create some new hosts and certificate managers on the Ingress, and GKE only applied the new configuration and left what had been set intact. Be careful and do your tests as well 👍.
Conclusion
At the end of the blog entry where I posted about how to fix a 502 error returned by GKE Ingress, I described an issue regarding health check configuration that has been opened for over three years. The one I mentioned here to support multiple addresses it's been opened for over four years. I think GKE Ingress is a remarkable resource. It can help you quickly release an application using K8S and cloud-native features wrapped in abstracted manifests, but it seems a bit left aside in some aspects.
You can check the entire code out on GitHub. As always, don't forget to execute terraform destroy after your test! See you next time ✌.
Posted listening to Toy Soldiers, Martika.


Top comments (0)