
This post was originally posted on my personal blog
Hello there! This is a post I decided to write when I found myself looking for a basic setup in order to start learning D3.js. Yeah, I know, you don’t have to configure a npm package just to start playing with D3. At its simplest, you can go to blockbuilder.org and edit the provided boilerplate code to see things working. Likewise, you can simply create an index.html file, add the D3 CDN, and include a script where you have written some D3 code. Those are really great alternatives if you are just trying to create some drafts and see how D3 works. However, when we want to create a well structured project where we have to use D3 and handle external data source, for instance, it is good to start with something we can easily scale.
In fact, what truly pushed me to going for this setup was that I find it really tedious to have to open the browser and manually reload the page every time I want to see how things changed. Now, if you think about working with D3 where you are basically dealing with visual stuff as an output, can you understand how good it is to have live reloading available?
Concepts behind this setup
Enough motivational talk, let’s get into some details and concepts for this project setup. You can take a look at its Github repository and check the files as you read.
D3.js
As you may know, D3.js is a JavaScript library that uses HTML, SVG, and CSS to create visualization sets for data driven documents. You can see some amazing data visualizations created with D3 in their gallery.
Webpack and webpack-dev-server
In order to provide you with a myriad of options to scale your project, this setup comes with a basic Webpack configuration file, which you can customize as you need.
As for the live reloading option, this setup provides configuration for the webpack-dev-server package, which gives you a little Node.js Express server. That is what allows you to recompile your assets as you make changes to your files.
Babel
Another nice thing to have in a setup like this is the option to write ES6 code, which adds new features to your JavaScript, such as support for Constants and Arrow Functions, for instance.
Babel is a Javascript compiler that allows you to write next generation Javascript and keep serving your browser with browser-compatible Javascript code.
Project structure
The project consists basically of the folders src, where all the not yet compiled source code remains, and dist, where you can find the bundles generated for all your code. Also, as you can see in the project tree below, you also get a webpack.config.js and package.json, where you can check the dependencies the project uses.

package.json
First, let’s check the list of dependencies and commands we use in this setup. Below you can see the contents of the package.json file.

In the scripts block you can see the commands configured to start and build the project. For the start command we are using the webpack-dev-server available inside our node_modules folder, considering that the package was not installed globally in your machine. For the options passed to that command we have:
--hot : this enables Hot Module Replacement in your server.
--inline : this adds the webpack-dev-server client entry point to the webpack configuration.
--progress: this displays the compilation progress in the command line.
The build command is responsible for using the options passed in the webpack.config.js and generate a customized build for your assets. For that we have:
-p: shortcut for setting production environment configuration, such as minimizing Javascript files and running the LoaderOptionsPlugin.
--config: specify the configuration file to be used.
--hide-modules: hide ugly and unnecessary output on modules being compiled.
As for the dependencies, we are using babel-core, babel-loader, babel-preset-es2015, and babel-preset-stage-0 to setup Babel compiler. Also, we have to add dependencies to handle Sass syntaxe in our CSS and to bundle our styles in a separate file (main.bundle.css). Finally, of course, we added the D3 dependency in its version 4.10.0.
webpack.config.js
The webpack configuration file is the place where you can customize your build process to match your needs. In the default configuration provided with this project we have the following sections:
context, entry, and output

Here you are basically telling webpack where it should look for files to compile and the files it should use as the entry point for the bundle. In this case we are passing the app.js and main.scss files, where all of your scripts and styles should be imported to. After that, the output key represents the folder and the name of the generated bundle file.
module
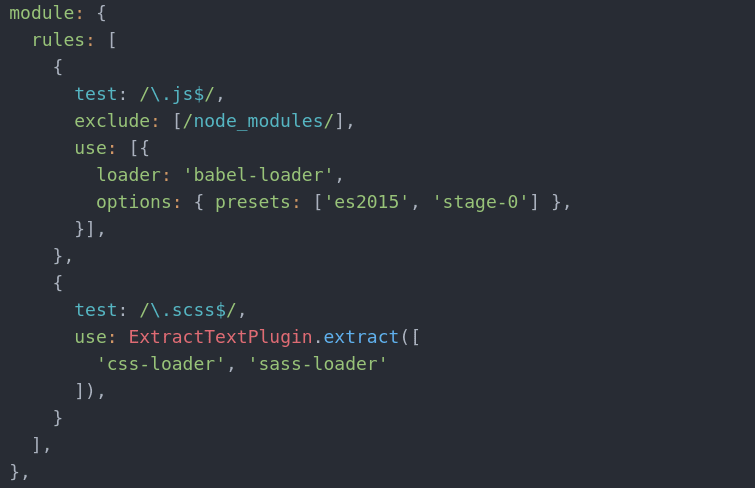
Here we are taking all of our modules (Javascript and Sass files) and applying loaders to them so webpack can generate browser-compatible code. It is important to notice that loaders are apllied from right to left, that means that for our stylesheets, for isntance, the sass-loader will be applied before the css-loader.
The ExtractTextPlugin here is being used so we can generate a separated file for our stylesheets, instead of having them appended to a style tag in the final index.html file.
devServer

Here is where the webpack-dev-server is configured for making the live reloading option available for us. First we define which folder the server should look for the static files to be served. As the webpack-dev-server documentation explains,these files will be served from memory and not from disk, so even if you have not generated a bundle of the source code to the dist folder, the files will still be served to the browser.
app.js
This is where you can add all your D3 code. If you want to get a more drawn up structure you can create separate script files and import them here. Below is the snippet provided as example, in which we are using a div with the ID of root, that is available in the index.html file.
import * as d3 from 'd3'

d3.select('#root')
  .append('h5')
  .append('text')
  .text(`D3 version: ${d3.version}`)
Project setup
If you already have node and npm installed in your machine, you can simply run the commands listed in the steps below.
1. Install dependencies
$ npm install
Or using yarn
$ yarn install
2. Run server
$ npm start
Or using yarn
$ yarn start
Now you can open you browser and go to http://localhost:4800/. You should see the D3 version this project uses, which is provided by the snippet shown below (also available in app.js).
import * as d3 from 'd3'

d3.select('#root')
  .append('h5')
  .append('text')
  .text(`D3 version: ${d3.version}`)
Project build
If you wanna generate the minified files for the project you can simply run the command below.
$ npm run build
Or using yarn
$ yarn run build
Loading external data
As loading external data is one of the most common things in a D3 project, this setup includes a basic flow to serve data files, such as JSON and CSV.
The webpack.config.js file includes a step in which all the files living in the data folder are copied to the dist folder so you can require them as you want. The default folder is called data and lives in the project root. If you want to change the name or location for that folder you just have to update the constant called paths in the webpack.config.js to match with your desired folder location.
In the app.js file you can find an example on loading external files using D3. At the moment you clone this repo, the sample.csv file is already copied for you in the dist folder. However, if you want to add more data files or change the existing one, you will have to build the project so you will have those modifications available for you in the dist folder.
// Loading external data
d3.csv('/data/sample.csv', (error, dataset) => {
  dataset.forEach((data) => {
    console.log(data)
  })
})
If everything goes alright, then you are ready to start some D3 hacking. I hope you liked this post and if you have any commments or contribution, feel free to contact me or open a Pull Request.
Finally, check out the example below so you can have a better idea of what I explained in this article.
Have fun! :)


Latest comments (0)