
This article was inspired by a Microsoft article on the same subject. I would highly recommend reviewing the original. What follows is an attempt to simplify the process and focus only on pausing the dedicated pool.
Step 1: Create a New Pipeline in Synapse Studio
- Navigate to your workspace and open Synapse Studio.
- Click the Integrate icon, then select the + sign to create a new pipeline.
- Name your pipeline PausePool.

Step 2: Create Pipeline Parameters
- Select the Parameters tab near the bottom of the pipeline screen.
- Select +New to create each of the following parameters:
| Name | Type | Default Values |
|---|---|---|
| ResourceGroup | string | Name of your resource group |
| SubscriptionID | string | Subscription Id of your resource group |
| WorkspaceName | string | Name of your workspace |
| SQLPoolName | string | Name of your dedicated SQL pool |

Step 3: Check the Dedicated Pool State
- Under Activities > General drag a Web activity to the pipeline canvas as the first stage of your pipeline.
- In the General tab, name this stage Check State.
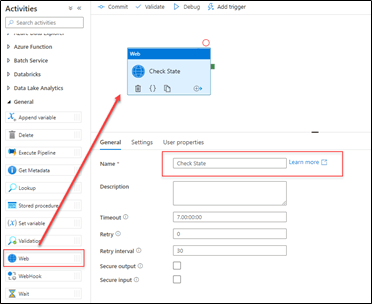
- Select the Settings tab then click in the URL entry space, then select Add dynamic content.

- Copy and paste the GET request that has been parameterized using the @concat string function below into the dynamic content box. Select Finish. The following code is a simple GET request:
@concat('https://management.azure.com/subscriptions/',pipeline().parameters.SubscriptionID,'/resourceGroups/',pipeline().parameters.ResourceGroup,'/providers/Microsoft.Synapse/workspaces/',pipeline().parameters.WorkspaceName,'/sqlPools/',pipeline().parameters.SQLPoolName,'?api-version=2021-03-01') - Select the drop-down for Method and select GET.
- Select Advanced to expand the content. Select Managed Identity as the Authentication type. For Resource enter
https://management.azure.com/
Step 4: Add an If Condition to Pause
- Under Activities > Iteration & conditionals drag an If condition activity to the pipeline canvas as the second stage of your pipeline.
- In the General tab, name this stage Pause If Online.

- Select the Activates tab then click in the Expression entry space, then select Add dynamic content.

- Copy and paste the expression below into the dynamic content box. Select Finish. The following code is an expression which returns True if the status is Online:
@equals(activity('Check State').output.properties.status,'Online') - On the Activities tab, select the edit icon for the True case.
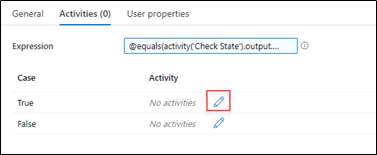
- Under Activities > General drag a Web activity to the True activities canvas.
- In the General tab, name this stage Pause

- Copy and paste the POST request that has been parameterized using the @concat string function below into the dynamic content box. Select Finish. The following code is a simple Get request:
@concat('https://management.azure.com/subscriptions/',pipeline().parameters.SubscriptionID,'/resourceGroups/',pipeline().parameters.ResourceGroup,'/providers/Microsoft.Synapse/workspaces/',pipeline().parameters.WorkspaceName,'/sqlPools/',pipeline().parameters.SQLPoolName,'/pause?api-version=2021-03-01') - Select the drop-down for Method and select POST.
- In the Body section type Pause.
- Select Advanced to expand the content. Select Managed Identity as the Authentication type. For Resource enter
https://management.azure.com/
- You can run your pipeline by selecting Debug mode. After your debug is successful, you can add a trigger to schedule the pipeline execution.

Closing
I hope you found this article helpful. Would you mind letting me know of any comments or questions you have below?


Top comments (0)