Scratch is a free web-based graphical programming language created by the Massachusetts Institute of Technology Media Lab (MIT Media Lab), geared primarily towards children, but don't let that fool you, it is challenging enough for adults as well.
I was introduced to Scratch while seeking the CS50 Certification from Harvard University. In the first week (week 0), we are asked to build a game, interactive story or animation using this block-based visual programming language.
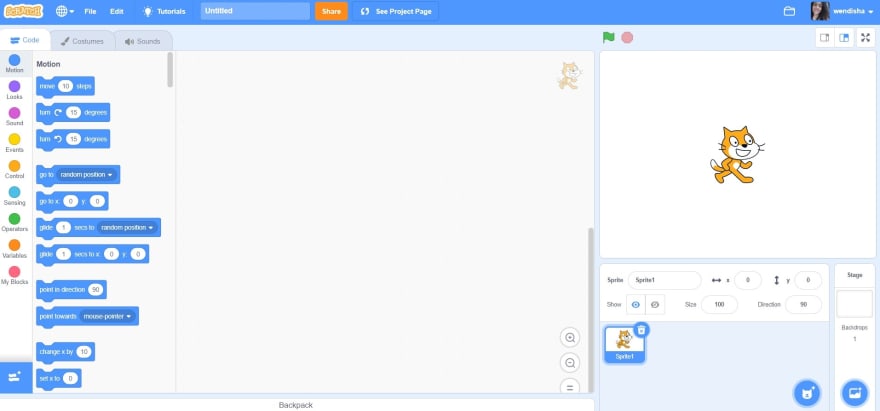
To start working on your first project, sign up to their site, click on the create button and let the fun begin! Your browser should be showing something like this:

The toolbar at the top will allow you to change languages, save your work (even to your computer), access short tutorials, rename your project, share it, and see it live. Fun fact: Scratch has been translated into 70+ languages!
Sprites: These are characters that we can animate in our story. They go from the default cat we see, to apples, toys, you name it! To add a new sprite, click on the cat-looking icon at the bottom right-hand corner. We also have to option to load our own sprite, or draw/paint it! Most sprites have more than one costume, this is what allows us simulate a walking cat, or a dancing ballerina, in other words, changing our sprites' costumes will let us animate them. When we click on a sprite, we'll also have the option to rotate them, make them visible or not at a certain point, or modify how they look.
Another cool feature we could add to our sprites, is sound! When you click on the sound tab you will see the pre-defined sounds each sprite has, but will also be able to add new ones by clicking on the speakers-looking icon on the bottom left-hand corner. You can choose sounds from the ones already on Scratch, or upload, even record your own! All these sounds can then be edited, making them faster, slower, fade in or out, reverse them, etc.
Backdrops: These are the backgrounds of your project. You could choose from the pre-loaded ones, draw or upload your own. The backdrops can be changed at any point throughout your project.
The Code tab: Here's where we put together scripts to animate our sprites and compose our game or animation. All the blocks are draggable and act as magnets that easily connect to one another.
- Motion: Here we can control how or where to our sprites move, by specifying the horizontal and vertical axis (x and y), instructing it to "look" to the mouse pointer, etc.
- Looks: Just as it's name denotes, here we can edit a sprite's appearance. Also, we can make our sprite "say" or "think" something, by showing a dialog box to the user. This coding section is the one that allows us to control the visibility of a sprite and costumes/backdrop changes.
- Sounds: Control how and when a sound appears.
- Event: The blocks in this section are the ones we use to start a script, that's why they cannot be connected to the bottom or another block, except for the broadcast ones, which allow a script to send a signal to another (or others), to possibly start or end an action.
- Control: Lists the options to control actions by adding loops, conditionals, wait time, etc.
- Sensing: Cool control feature to wait for specific signals to proceed with whatever action we've instructed our sprite.
- Operators: Perfom basic math operations, as well as provide ranges to pick a random value, add logical operations that result in booleans, etc
- Variables: Just like just about any other programming language, variables allow us to store values in them.
- My Blocks: Think of blocks as the methods that help us keep our code DRY (Do Not Repeat Yourself), where we define those actions that will probably be used more than once within a script.
Hopefully these notes will inspire you to build the next Scratch project! It's fun, visually pleasant and challenging. Enjoy!


Top comments (2)
Im a kid and honestly its helping me start learning and understanding other programming langauges im trying to learn and even better it makes me look a bit cool at school hehe (I dont care about fame over career) and yes! i feel that scratch also is for adults from the layout of it and how the code looks like (They are colored)
I agree with you. Scratch is what an adult also have fun. It would be also so nice if you visit my article of dev.to/krayg/amazing-scratch-world... .