
The next major version of the very popular PWA helper library was just released. Workbox 4 brings many interesting additions to the existing modules and only a few minor breaking changes. Also, it ships one totally new module called workbox-window, to fulfil the need of developers in a simple and powerful way to register the service worker, to hook into its lifecycle, and to provide a bi-directional communication channel with the app. This is the first module of Workbox to be used in the window context, i.e. in our application’s (not service worker’s) code.
Let’s explore this new module to check what will it take to build the well-known “refresh-to-update-version” technique — one of the UX best practice for PWA. As we use this flow often while building our applications, and Workbox exposes the corresponding tooling now, we just need to find a simple and robust code to build that flow. This article is my try to find that code: minimal and stable. But first, what is this flow I’m talking about?
Refresh-to-update-version 101
You open some website. And after a couple of seconds, it shows you some prompt/dialogue saying “A new version of this website is available. [Refresh the page to get it]”. In most cases that means:
- This is a service worker-driven origin (if it also has Web App Manifest we can call it PWA), and the UI you see was not fetched from the network but was taken from the Cache Storage of your browser
- You visited this website using this browser some time ago
- Between the previous and current visit, the deployed version was updated
The dialogue you see is a sort of trade-off between the possibility to show app UI immediately, without fetching it from the network (using precached version) and the need to deliver the actual version of the app to the user after all. Where is the compromise then? It’s in the fact that we still load the precached (“old”) version of the app from Cache Storage, but if the service worker knows that there is a new version available, it fetches the updated resources, updates cache and sends a message (using Broadcast Channel API or postMessage) to the app. Where we catch this message and show the notorious “The app was updated. Click refresh to upload” message to the user. Next page load — and we serve the “new” version from Cache Storage (of course, if our service worker performed all the listed above operations in a proper way).
Another variation of this technique — we do not send any signal from service worker but listen to the changes of its lifecycle in our app. For our case, the combination of onupdatefound and onstatechange events caused by the fetching of byte-different service worker could mean the change of hash sums of the resource(s) mentioned in “to precache” list injected in service worker. Which, in its turn, means that the new version of the app was built — so we can safely show “The app was updated” message.
Workbox v3 options to have refresh-to-update-version flow
First, let’s say thanks to the Workbox maintainers for the magic precacheAndRoute() method we could use in our own service worker. This method takes care of all the complexity of precaching, version maintaining, fetching updated resources, updating the cache etc. We just pass the object with resources and their hash sums (built by another helper from Workbox family — workbox-build module) and it works. Furthermore, another line of code in the service worker:
…and we can receive the signals about the precached resources were updated in our app code — exactly what we need to show the message to our user:
We can even add the same plugin to the resources we cache during runtime to follow their updates if needed.
Why do I tell about the option we use in Workbox 3 in the article about Workbox 4? Because it still works fine — your code from v3 related to this flow will not break.
What about the second option — when we rely on the service worker lifecycle events? In v3 we don’t have any helpers to actually register our Workbox-driven service worker in our app code and subscribe to its events. Of course, we always can write this ourselves or use the really nice register-service-worker library by Evan You, then the code in our app could look like:
But now we have way more powerful, flexible and truly Workbox-native way to achieve it: workbox-window module. As stated in the documentation, The key features/goals of this module are:
To simplify the process of service worker registration and updates by helping developers identify the most critical moments in the service worker lifecycle, and making it easier to respond to those moments.
To help prevent developers from making the most common mistakes.
To enable easier communication between code running in the service worker and code running in the window.
Let’s implement the above UX trick using this module.
The refresh-to-update-version flow powered by workbox-build
Let’s start at the very beginning. To demo the flow, we need to implement a service worker with precaching and serving the resources forming our application shell.
The minimalistic version of the Workbox-powered service worker source file could look like:
Lines 8 and 9 are important in the context of this article. You will read later why do we need them
Why is this “source file”? Because we have to process it after every build of our application. To be precise — we have to inject the list of resources to precache and their hash sums as a parameter for precacheAndRoute() method (instead of this empty array). To save us from this boring task Workbox has 3 options to choose from: Workbox CLI, Webpack plugin, and Node module. The last one is my choice: it needs neither globally installed CLI nor Webpack configuration file exposed. Installing the workbox-build module:
npm install workbox-build --save-dev
Now the service worker build script:
And the final part — is to add the npm run script combining the build of our app and service worker, one after another:
As you might notice, I use an Angular app in my example (ng build --prod is a build command for it) but everything I describe in that article about Workbox modules and PWA techniques is applicable to any JavaScript application.
After I do npm run build-pwa I see something like
Generated dist/angular-pwa/service-worker.js, which will precache 6 files, totaling 735289 bytes.
And the service worker in the distribution folder now contains all the info Workbox needs to know about our app:
It would be the same in Workbox 3. But now the difference starts: let’s register this service worker in our app using workbox-window. Installing the module first:
npm install workbox-window
Hint: there are different scenarios of importing/using/bundling this module available.
Now in our application code:
Some important things to notice:
- There is no service worker feature detection in register() method, so don’t forget to have this in your code (line 3). At the same time, the delaying of the registration until the window.onload event is included, so we don’t have to add this extra wrapper.
- Where exactly to put this code in your app? The later — the better. Have it after your app was fully rendered for service worker not to compete with the main thread for the network and CPU resources. For Angular apps, the best place will be in then() block after bootstrapModule() call in main.ts file.
Time to run our app in any static http server. I use serve:
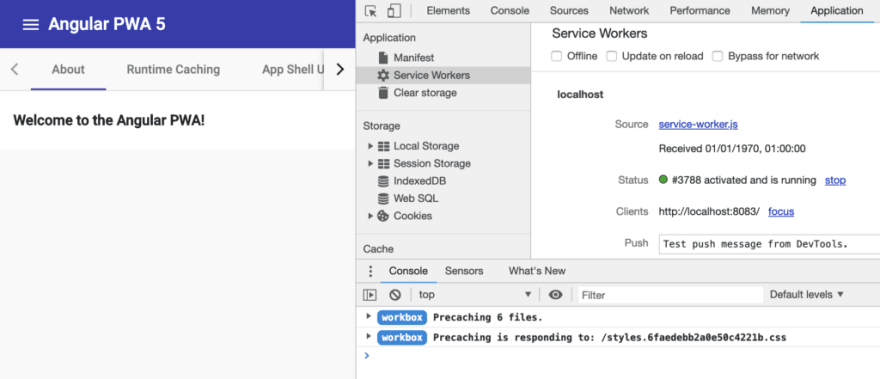
This is exactly what we expect: the service worker was registered, some files were precached. Now if you shut down the server or check Offline checkbox in DevTools — the app will still be available. Thanks to our Workbox-powered service worker serving the resources from the Cache Storage.
Hint: to have much more detailed log just set the corresponding logging level in DevTools — see the Default levels dropdown in the right bottom corner of the screenshot.
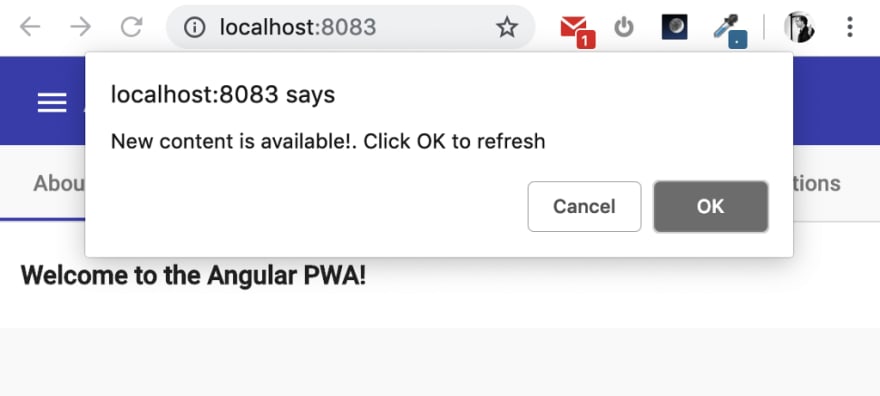
It’s time to update something in our app. Let’s change the title to Angular PWA 6. Build/deploy/serve/refresh the page: you still see Angular PWA 5. Hit browser’s refresh button once again — now you see the new title. This was expected and our goal is to give the user a hint that the app was actually updated while they see the older version. One of the listeners exposed by workbox-window called installed will help!
Now on every application update, we’ll see the prompt:
Some notices:
- We have an extra condition in the code — event.isUpdate. It’s there because we don’t want to show this message on the very first service worker installation, only on the updated. The inversion of this condition is a good option to show a message like “This app is now ready for the offline usage”
- The described approach works ONLY if we are good with modifying the service worker lifecycle by skipping the waiting phase (see lines 8 and 9 in our service worker code). Without this modification the new service worker will not be activated until the user closes all the open tabs with this app — as a result, they will see the old version until that. If for some reason skipping activation step is not an option for your project — please use more general (and more complex) option mentioned in the documentation.
- Please, don’t use JavaScript’s confirm() method in production :) It’s in the sample code only for simplicity. Use the less obtrusive and non-blocking toast/snackbar from the UI library you use for your application.
Awesome! Now we have pretty laconic code helping us to register service worker and catch the proper moment when to show the message about a new version is available.
Of course, workbox-window has lots of other useful events helping us to have full control over the service workers: both “internal” (registered by workbox-window) and “external” — all others, for example from some 3rd party services providing Push-notifications. Also, it gives a convenient option to communicate with the service worker which will be extended and standardized by the release of the workbox-messages module.
To sum up:
- Workbox 4 was released — production-ready library for the PWA’s main network tasks automation
- The new module workbox-window gives developers a convenient way to register service worker and listen to the events of its lifecycle
- We discovered the proper event to react on for showing the message to the user for the refresh-to-update-version flow
So, let’s try the brand new Workbox 4 and its workbox-window module! If you find any issues, please report. If you wish to know all the latest news about Workbox and PWA in general, please follow me on Twitter webmaxru and join PWA Slack team. My direct messages are always open for your technical questions and invitations to speak about PWA/Workbox at your conference or hold a PWA workshop for your conference/company.

Top comments (0)