
WebSocket is a protocol which enables communication between the server and the browser. It has an advantage over RESTful HTTP because communications are both bi-directional and real-time. This allows for the server to notify the client at any time instead of the client polling on a regular interval for updates.
In this series of posts, I'm going to show you three different ways to create a WebSocket server in Java using Spring Boot, the Spark Framework, and the Java API for WebSockets.
Prerequisites
You will be using Gradle to manage your dependencies and run your application.
Additionally, you'll need to make sure you have a copy of the JDK installed. I will be using JDK 8 in this tutorial.
WebSockets with the Spark Framework
Spark is a micro framework for creating Java and Kotlin web applications.
Create the Project
You will use Gradle to initialize a new Java application. You can use the following command to create a directory for your project, navigate to that directory, and initialize the application:
mkdir websocket-spark-framework
cd websocket-spark-framework
gradle init --type=java-application
Add the Spark Dependency
Add the following dependency to the dependencies block of build.gradle:
compile 'com.sparkjava:spark-core:2.7.2'
Unlike Creating a WebSocket Server with Spring Boot, WebSockets with Spark only work with the embedded Jetty server, and you will need to define the path and the handler before any HTTP routes.
Create the WebSocket Handler
WebSocket messages can be both text and binary. You're going to create a handler that can handle both of these messages.
Create a new class called WebSocketHandler and annotate it with @WebSocket:
import org.eclipse.jetty.websocket.api.annotations.WebSocket;

@WebSocket
public class WebSocketHandler {

}
Each event that the WebSocketHandler handles is defined by an annotation. You can use the @OnWebSocketMessage annotation to tag methods for receiving binary or text events.
For demonstration purposes, you're going to create an echo server which will echo the message received back to the sender.
Add the following methods:
@OnWebSocketMessage
public void handleTextMessage(Session session, String message) throws IOException {
    System.out.println("New Text Message Received");
    session.getRemote().sendString(message);
}

@OnWebSocketMessage
public void handleBinaryMessage(Session session, byte[] buffer, int offset, int length) throws IOException {
    System.out.println("New Binary Message Received");
    session.getRemote().sendBytes(ByteBuffer.wrap(buffer));
}
Note that the method signature determines which type of message the method will handle. See the OnWebSocketMessage annotation documentation for a list of supported method signatures.
Register the WebSocket Handler
In order to use the WebSocketHandler, it must be registered.
Open up the App class that Gradle has created for you. Delete the getGreeting method and the contents of the main method as you won't be needing either.
Inside of the main method add the following to register the WebSocketHandler on the /socket path:
@Override
public void registerWebSocketHandlers(WebSocketHandlerRegistry registry) {
    webSocket("/socket", WebSocketHandler.class);
}
Create a Client to Test Your Application
You will need to create a client to test your WebSocket server. You will want to test sending both text and binary messages. This can be accomplished with JavaScript.
Create the resources folder inside of the src/main folder. Inside of the resources folder, create the static folder.
Add the following to index.html inside of the src/main/resources/static folder:
<html>
<head>
    <style>
        #messages {
            text-align: left;
            width: 50%;
            padding: 1em;
            border: 1px solid black;
        }
    </style>
    <title>Sample WebSocket Client</title>
</head>
<body>
<div class="container">
    <div id="messages" class="messages"></div>
    <div class="input-fields">
        <p>Type a message and hit send:</p>
        <input id="message"/>
        <button id="send">Send</button>

        <p>Select an image and hit send:</p>
        <input type="file" id="file" accept="image/*"/>

        <button id="sendImage">Send Image</button>
    </div>
</div>
</body>
<script>
    const messageWindow = document.getElementById("messages");

    const sendButton = document.getElementById("send");
    const messageInput = document.getElementById("message");

    const fileInput = document.getElementById("file");
    const sendImageButton = document.getElementById("sendImage");

    const socket = new WebSocket("ws://localhost:8080/socket");
    socket.binaryType = "arraybuffer";

    socket.onopen = function (event) {
        addMessageToWindow("Connected");
    };

    socket.onmessage = function (event) {
        if (event.data instanceof ArrayBuffer) {
            addMessageToWindow('Got Image:');
            addImageToWindow(event.data);
        } else {
            addMessageToWindow(`Got Message: ${event.data}`);
        }
    };

    sendButton.onclick = function (event) {
        sendMessage(messageInput.value);
        messageInput.value = "";
    };

    sendImageButton.onclick = function (event) {
        let file = fileInput.files[0];
        sendMessage(file);
        fileInput.value = null;
    };

    function sendMessage(message) {
        socket.send(message);
        addMessageToWindow("Sent Message: " + message);
    }

    function addMessageToWindow(message) {
        messageWindow.innerHTML += `<div>${message}</div>`
    }

    function addImageToWindow(image) {
        let url = URL.createObjectURL(new Blob([image]));
        messageWindow.innerHTML += `<img src="${url}"/>`
    }
</script>
</html>
Now you will need to configure Spark to look for your index.html and to initialize the server when the application is run. You can also define the port on which the server will listen for connections.
Inside of the main method of the App class, add the following below webSocket:
staticFileLocation("static");
port(8080)
init();
Start the Application
Your WebSocket server is now complete. Start your application using the gradle run command inside of the application's directory.
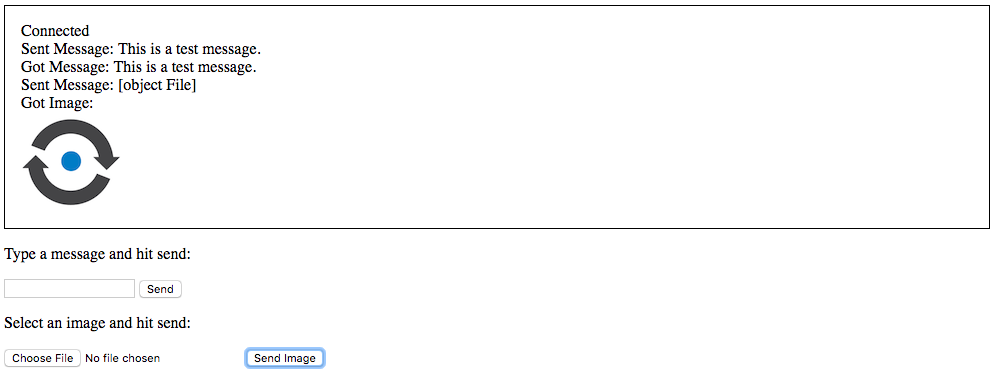
You can access your application at http://localhost:8080 where you will be greeted with the following page:

The "connected" message indicates that the JavaScript client was able to make a connection.
Try sending a text message by typing into the input field and clicking on the send button. Also try uploading an image. In both instances, you should see the same message and image echoed back.
Conclusion
In this tutorial you learned how to create a WebSocket server using Spark which can receive both binary and text messages. The finished code for this tutorial can be found on the nexmo-community/websocket-spark-framework repository.
Want to implement WebSockets into your existing Spring application? Maybe you want to learn about Creating a WebSocket Server with Spring Boot?
No frameworks? No problem! Stay tuned for the next tutorial where I show you how to create a WebSocket server using the Java API for WebSockets.
Did you know that you can use WebSocket as an endpoint in a Nexmo Call Control Object? Look at this example on Streaming Calls to a Browser with Voice WebSockets.
Want to see an interesting use of WebSockets? Look at the nexmo-community/dtmf-snake repository to see some code which lets you play a game of snake using dual-tone multi-frequency signals.

Top comments (0)