This post has been written by one of Appsmith's contributors, Joseph Petty. This was previously published here.
Hey everyone! Joseph here from GreenFlux, LLC. I'm a Shopify Partner Developer and a HUGE fan of Appsmith! 😻
In fact, I've written several blog posts on Appsmith integrations already, but today will be my first post officially written for Appsmith! I'm super excited to be working with the Appsmith team and sharing my API integration experience with the community.
I've done a lot of work with the Shopify API over the last few years, but only recently discovered Appsmith. So I wanted to put together this guide with some specific use-cases that help solve some common business problems.
but before I get to those specific use-cases...
This guide is written for the Shopify API, but the build process can easily be applied to any API.
The Authentication steps may be different, but most of this guide will work with any API to:
- Perform CRUD (Create/Read/Update/Delete) operations with the API directly
- Download/sync API-GET request to Google Sheets
- Find/Modify/Delete a row in Google Sheets based on API data
- Send data from Google Sheets to Shopify (Create, or Update existing)
Now for the specific use-cases
Most shops only take orders for products that they have in inventory, then ship them out as the orders come in. But some businesses wait to begin 'creating' the product until an order has been placed. Think T-shirt printing, custom-built bikes/skateboards, and even wholesale produce and flowers that are only harvested after an order is placed.
That creation/ harvest process can have several steps and require multiple employees, and even have an approval process with different access levels. Lots of industries are creating products to-order, and need a way to track this process without sharing the Shopify admin login to all users.
☝️ So let's say you have a Shopify store that sells high-tech vehicle upgrades! 🛸
And you have a team of workers in three departments:
[Assembly, Quality Control, Shipping]
| Use Case | Description |
|---|---|
| Case 1 | Track production with Google Sheets data linked to each order |
| Case 2 | Safely enable workers to edit orders (mark shipped) without sharing Shopify login |
Let's get to building! 🛠
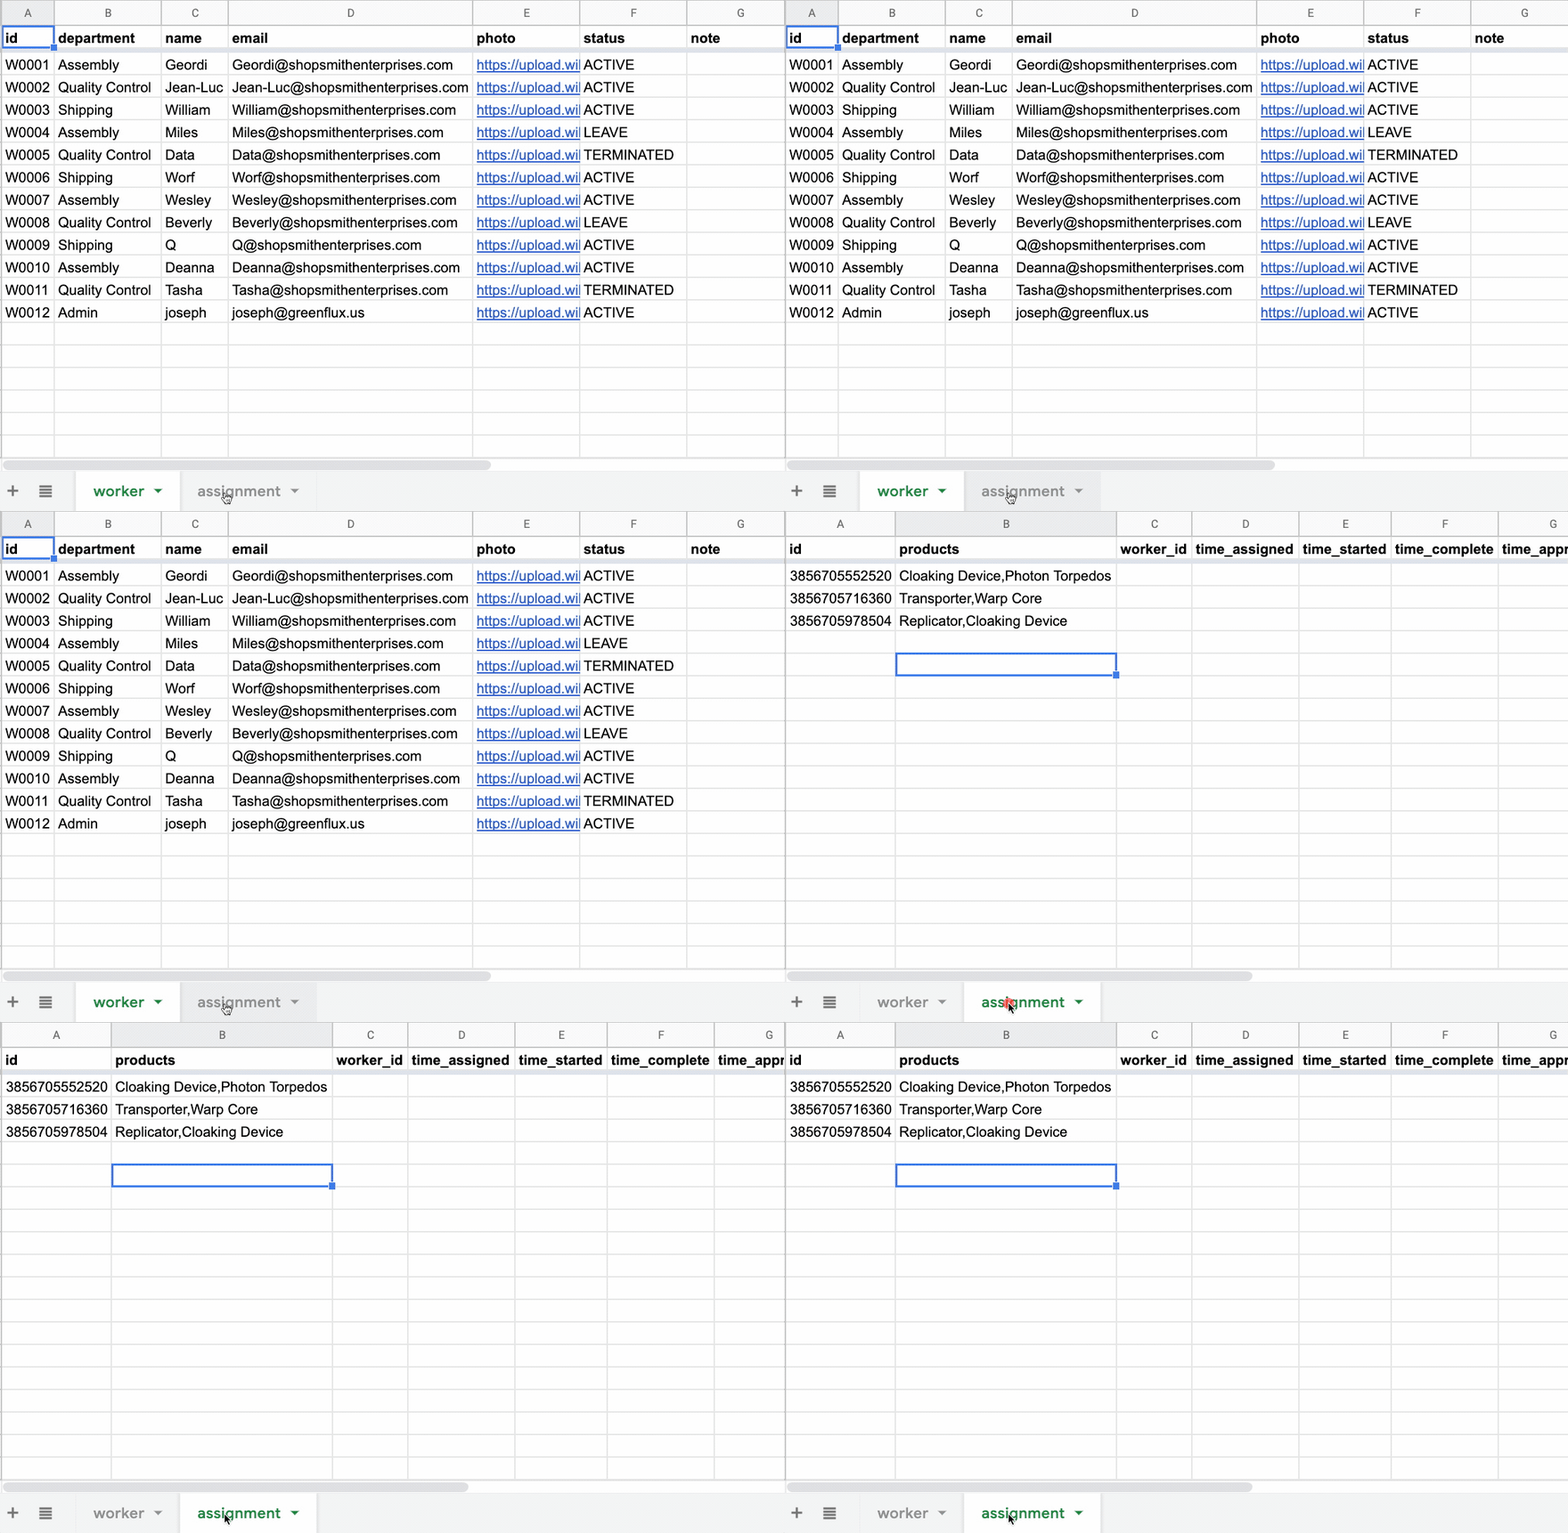
Start by creating a Google Sheet for Workers and another for Assignments.
Or you can copy this public sample sheet .
Next, you'll want to enable the Shopify API.
- Login to Shopify and click Apps on the left sidebar
- Scroll down and click manage private apps
- Create a new private app
- Click Show inactive Admin API permissions to expand
- Select: Orders =
Read and write - Save and note the new API Key and Password
Ok, on to Appsmith
Add Shopify Datasource
- Create a new App (from Drag & Drop)
- Under Datasources, create a new Authenticated API
- Set the URL to https://
YOUR_STORE_NAME.myshopify.com/admin/api/API_VERSION/
https://greenfluxtest.myshopify.com/admin/api/2021-07/
- Set Authentication Type to Basic
- Enter the API Key (as the username) and the password, and SAVE.

Add Query
Next let's create our first query to GET orders.
- Under the Shopify datasource, add a new Query named get_orders
- Append the URL with
orders.json - Click RUN.

Awesome! Our new app is now making authenticated API calls to Shopify and returning data.
Note the response format; All orders are nested inside the "orders" property.
{
  "orders":
    [
      // ARRAY OF JSON OBJECTS
      {Order1},
      {Order2},
      {Order3}...
    ]
}
Copy the API and rename get_products, then change orders to products in the endpoint URL.
Next, let's add a few widgets to display the data
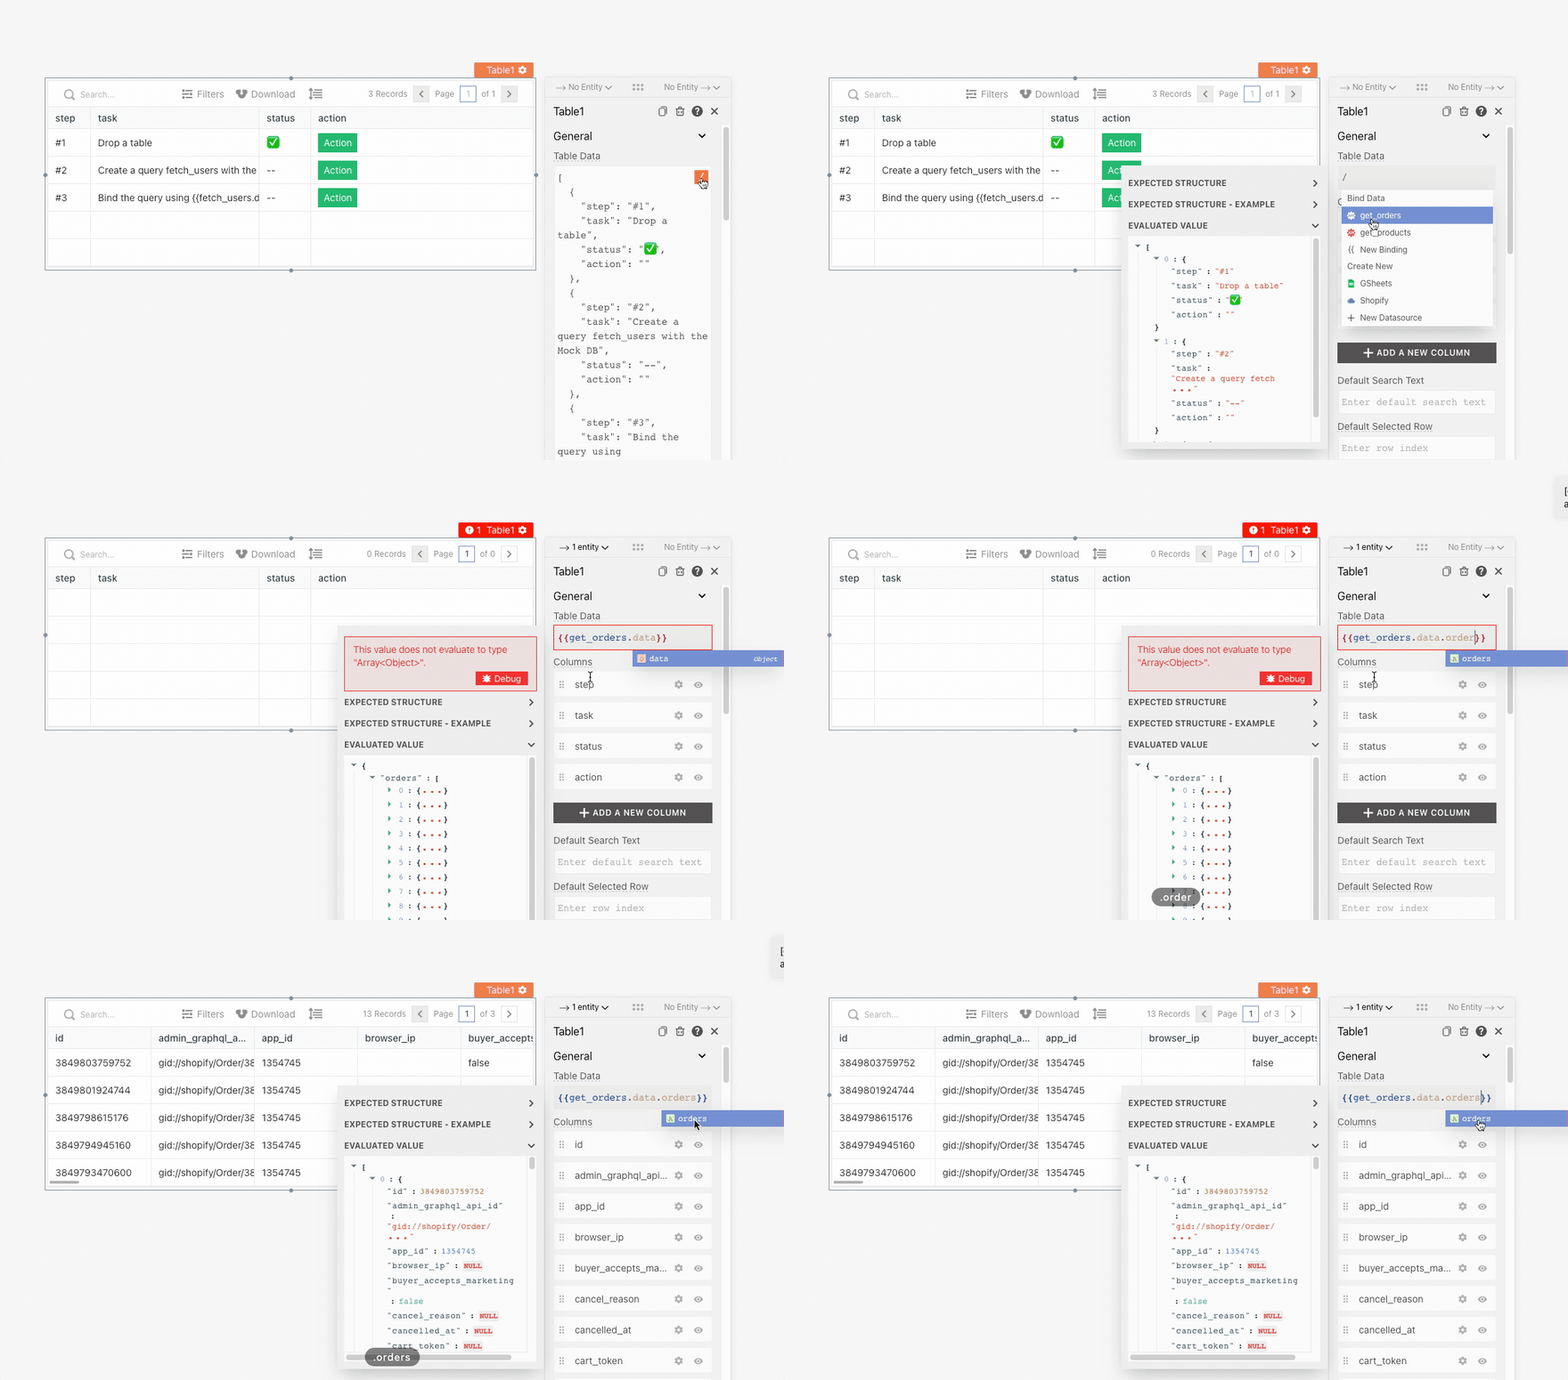
Add Table Widget
- Click the
Widgets +on the left sidebar, and drag in a new table widget - In the table's settings panel, click the
/(Slash) command - Select the
get_ordersAPI. - Add
.ordersto bind the Table Widget to the order array from response body.
Alright, now to connect the Google Sheet data.
Add Google Sheets APIs
If this is your first time connecting Google Sheets to Appsmith, start out by adding a new datasource:
Datasources + > Create New > Google SheetsThen follow the prompts and authorize Appsmith to connect to your Google account.
- Add new Query under Google Sheets datasource, named
get_workers - Enter URL for your spreadsheet
- Enter
workerfor the sheet name - Set Row offset to
0and Row Limit to50. - RUN.

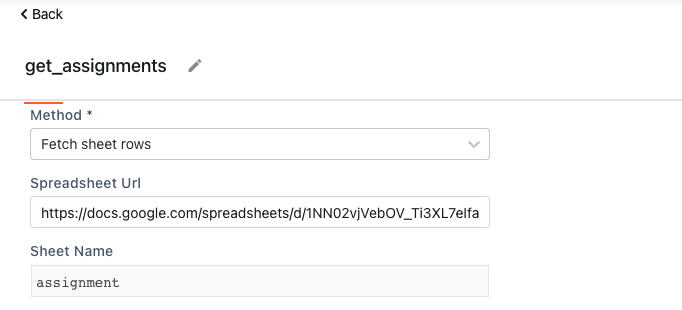
Next, copy the get_workers API, rename get_assignments and change the sheet name.
Ok, so far we have GET requests working to Shopify and Google Sheets.
Go ahead and add a few more Table Widgets for Workers and Assignments using the same method above.
Now we need a way to feed the get_orders request to the orders sheet.
Add a POST (Create) API for Google Sheets
Appsmith has a full list of methods available for performing CRUD operations with Google Sheets. We could use Insert sheet row to add orders one at a time, but the get_orders API returns an array of orders.
Now, the Bulk Insert Rows method expects an array of objects, with keys that match the the sheet's column names:
[
  {
    header1:value,
    header2:value,
    header3:value
  },
  ...{more objects},
]
And the map() method returns an array.
So we can map()! over the get_orders data and build our rows.
Detailed explanation here:
https://blog.greenflux.us/saving-api-response-data-to-google-sheets-with-appsmith
- Copy the
get_assignmentsAPI and renamecreate_assignments - Change the method to
Bulk insert rows - In the Row Object, enter:
{{
get_orders.data.orders.map(
o => {
 return {'id':o.id, 'email':o.email, 'products':o.line_items.map(l => l.name).join()};
}
)
}}
- RUN 🚀
SWEET!
All open orders are saved to Google Sheets with a single click!
*But what happens when we run it again? *
Uhhh... now I have two copies of every order.
Hmm... we need a way to tell Shopify what orders we already have, and only download new ones!
Passing values from an API response to a new request
Here's where things get interesting. First we have to get_assignments, then find the max order number that's already in our sheet, and finally, send a new request to Shopify to get new orders after that order number.
We can use the since_id parameter to filter the orders that are returned and then save only new orders back to the sheet.
First we need to know the last order number from our sheet. I like to store these values into a separate widget, so I can reference just the name, instead of trying to insert a whole function in place of the ID in the URL.
- Add a Text Widget named
maxId - Set the Text value to:
{{
get_assignments.data.map(
    o =>{ return o.id}
  )
  .sort().reverse()[0]
}}
- Update the
get_ordersAPI endpoint
This will produce an array of all order
ids, and then sort them in case any of the rows are stored out of order in the sheet. The default sort order is low to high, so reversing and taking the first (zero index [0]) item returns the max value.
Now we're getting somewhere. We can continuously download orders to the order sheet, but what about updating individual rows?
First let's add a few Widgets to view/edit the selected assignment. I've added a Container Widget to the right of the table_assignments, Text Widgets to display the Order# and Products, and Input Widgets for the Worker and Instructions.
Now we can reference the table_assignments.selectedRow properties to populate the default values for our Widgets. This will update the Widgets automatically when the selected row is changed.
Next, let's add a few Widgets to set values in the assignment sheet.
First we want to add a Select Widget (dropdown menu) with all the workers. The Options should contain an array of objects with label and value properties. (literal array, or expression that returns an array).
So you could hard-code the Select Widget's Options:
[
  {
    'label': 'Worker1',
    'value': W00001'
  },
  {...
  }
}
...but wouldn't it be cool if our dropdown could automatically show all the current workers from our workers sheet?!
{{
  get_workers.data.map(
    w =>  {return {label:w.name,value:w.id}
    }
  )
}}
EXCELLENT!
Time to test out these new input fields!
Update a row in Google Sheets
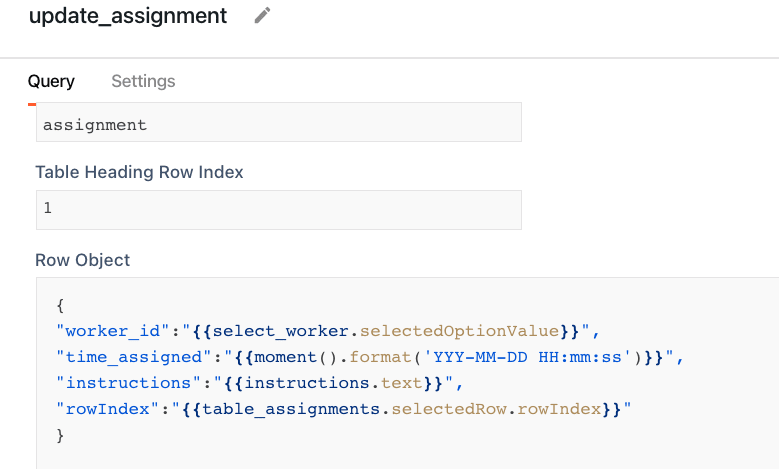
- Copy the
get_assignmentsAPI and renameupdate_assignment - Change the method to
Update a sheet row - Copy a single object from the
get_assignmentsresponse to theupdate_assignmentRow Object - Add commas between properties
- Add references to the new Widgets' text values
NOTE: I removed the
idandproductsbecause these should not be edited once downloaded. Our template is only for updating theworker_idand associated timestamps/ instructions.
Fulfill an Order in Shopify
Ok, we're almost there! The last piece we need is a way to fulfill an order in Shopify.
NOTE: Orders can have multiple fulfillments per line item and different status for each fulfillment.
To keep this example simple, our app is going to create a single fulfillment per order and ignore partial fulfillments.
This step will be using the /fulfillments.json endpoint, and we need the location id. You can get this through the API, but the easiest way is to view the location and get the id from the URL.
- In Shopify, click Settings on left sidebar
- Click Locations
- Click the location you want to use for fulfillments
- Copy the id from the URL
We want the employees to be able to select a row in the app and click 'Fulfill Order' without giving them full access to the Shopify admin account.
In other words, we want to use data from the selectedRow of the table_assignments to send a POST request to Shopify.
- Under the Shopify datasource, add a new Query named
create_fulfillment - Set the URL to
orders/{{Number(table_assignments.selectedRow.id)}}/fulfillments.json
- Set the body to:
{
  "fulfillment": {
    "location_id": YOUR_LOCATION_ID,
    "notify_customer": true
  }
}
- Add a button to run the
create_fulfillmentAPI - MAKE IT SO! 🛸
WHEW! What an adventure!
Thanks for taking this journey with me on my first official Appsmith post!
This is just a small sample of the awesome power of Appsmith. There's so much more we could do from here, like connecting another API and sending Slack messages or emails to each worker when an order is assigned, emailing customers pictures of the products during production, or calculating average processing times per worker or product.


Top comments (0)