Computer graphics teaches us how a pixel on a screen can be manipulated to draw beautiful shapes, artistic typography, eye-catching illustrations, ‘make-me-look-good’ photo-filters and a lot more. Hardware manufacturers, researchers, software developers work together to build great products: smartphones, smartwatches, smart TVs, cameras all with the study of computer graphics.
Despite the fact that computer graphics has evolved so fast and the development of software like Adobe Photoshop, Adobe Illustrator, Sketch has made our lives easier to a great extent, we still cannot generate images on-the-fly with them. In order to do that, we’ll need to reach a level where there is no drag and drop, no fancy select-all-make-bold keyboard shortcuts, no cropping and no copying-pasting.
And we cannot get there by time-travel, but surely with code!
Getting Started
Come along, open your favorite text editor, follow me and I’ll help you draw dynamic text data on images. I assume you have Python and pip installed on your computer, but if not, follow the steps in the links to set up the development environment. After you’ve done setting up, from the shell, execute the below command to install Pillow (more details here) and its dependencies.
pip install pillow
As you have installed all the dependencies, let's move forward and write some code. Pillow is an extensive library, but for our purpose, we’ll be using the following classes:
- Image: to create an image object for our greeting background
- ImageDraw: creates a drawing context
- ImageFont: font of the text we will be drawing on the greeting
Let’s take the following background image and initialize it with the following code:

# import required classes

from PIL import Image, ImageDraw, ImageFont

# create an Image object with the input image

image = Image.open('background.png')

# initialize the drawing context with
# the image object as background

draw = ImageDraw.Draw(image)
For creating ImageFont objects we also need font(ttf, otf) files, you can use any font of your choice, here I’ll be using the Roboto font which can be downloaded from the Google Fonts GitHub repo.
# create font object with the font file and specify
# desired size

font = ImageFont.truetype('Roboto-Bold.ttf', size=45)

# starting position of the message

(x, y) = (50, 50)
message = "Happy Birthday!"
color = 'rgb(0, 0, 0)' # black color

# draw the message on the background

draw.text((x, y), message, fill=color, font=font)
(x, y) = (150, 150)
name = 'Vinay'
color = 'rgb(255, 255, 255)' # white color
draw.text((x, y), name, fill=color, font=font)

# save the edited image

image.save('greeting_card.png')
Below is what you get after executing the above code:

With some fonts, you might have to pass an optional parameter encoding which tells the ImageFont module which encoding to use while opening the font file.
Computer graphics have an inverted coordinate system, the origin(0, 0) that lies at the top-left corner of the image. x here represents the distance of the text box from the left (x=0) and y represents the distance from the top (y=0).
While you save the image, you can pass optional parameters like optimize and quality to control the size of the output image.
image.save('optimized.png', optimize=True, quality=20)
This generates an output image optimized.png with reduced quality but smaller size.
Where Are We Using Pillow With Python?
While at work, I recently developed a feature which demanded the creation of a leaderboard image on-the-fly, with user-specific quiz score data. And just with a few lines of code, I was able to create an image like this:
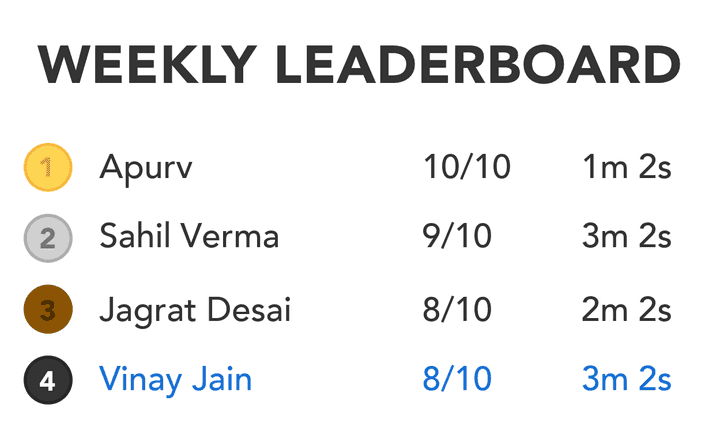
Voila! It looked great and we decided to use the idea of creating images on-the-go, for other use-cases as well. We currently use Pillow to generate images for Jokes, Motivational Quotes, Horoscopes, Word of the Day etc. in real time, and with data from different API responses.

The code we used in this post is not sufficient to draw text boxes as shown in the images above. I’ll be writing another post which will focus on text alignment, splitting long text into multiple lines, controlling space between two lines and more.
I recently read a post by @ben in which he wrote about how Dev.to generates social images dynamically. I realized I had done something similar at work so why not share with the community.
Please do give me your feedback if any in the comments section below.
This post was originally written for Haptik Tech Blog.


Top comments (6)
Hey, I'm getting an IndexError identical to Morris', but I do have the fonts installed, as well as pointing the script toward the .ttf files. I'm unsure what's causing this, and googling has got me nowhere.
Hey, great tutorial.
Although I keep running into an "IndexError: byteArray index out of range".
My code is just as yours is. I have even copy pasted the code directly.
Thanks Morris
Can you please tell me at which line you are getting this error?
Thanks
Traceback (most recent call last):
File "image.py", line 28, in
draw.text((x, y), message, fill=color, font=font)
File "/usr/local/lib/python2.7/dist-packages/PIL/ImageDraw.py", line 213, in text
ink, fill = self._getink(fill)
File "/usr/local/lib/python2.7/dist-packages/PIL/ImageDraw.py", line 111, in _getink
ink = self.palette.getcolor(ink)
File "/usr/local/lib/python2.7/dist-packages/PIL/ImagePalette.py", line 107, in getcolor
self.palette[index+256] = color[1]
IndexError: bytearray index out of range
Thanks Morris,
Looks like you don't have fonts installed on your system. I missed this step in the post. The way Pillow works is that it builds on top of the fonts installed in the system. To fix the errors you are getting please install the fonts by following:
Ubuntu: How to install fonts on Ubuntu
For macOS and Windows just open the fonts files which you have downloaded.
Thanks for the response Vinay Jain. I will try installing the Roboto font and see if it works. Again, thanks for the help.