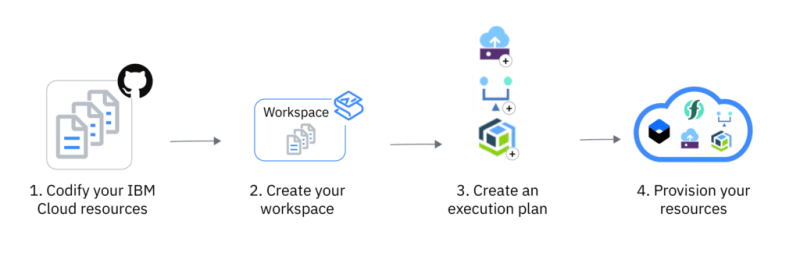
Learn how to provision multiple virtual server instances (VSIs) in a Virtual Private Cloud (VPC) using Terraform scripts with IBM Cloud Schematics.
Rather than directly diving into the Terraform scripts, let’s quickly learn about what is Terraform and how IBM Cloud Schematics simplifies the Terraform scripting experience on IBM Cloud.
What is Terraform?
Terraform is an open source software, developed by HashiCorp, that enables predictable and consistent provisioning of IBM Cloud platform, classic infrastructure, and VPC infrastructure resources by using a high-level scripting language. You can use Terraform to automate your IBM Cloud resource provisioning, rapidly build complex, multi-tier cloud environments, and enable Infrastructure as Code (IaC).
What is IBM Cloud Schematics?
With IBM Cloud Schematics, you can organize your IBM Cloud resources across environments by using workspaces. Every workspace points to a set of Terraform configuration files that build a Terraform template. You can choose to create your own Terraform template or use one of the pre-defined templates that are provided by IBM. Workspaces allow for the separation of concerns for cloud resources and can be individually managed with IBM Cloud Identity and Access Management. To use IBM Cloud Schematics, you don’t need to install the Terraform CLI or the IBM Cloud Provider plug-in for Terraform.
Let’s get started
Creating one VSI in a VPC is pretty easy using the Terraform IBM provider. If you check the documentation, the sample Terraform script goes like this:
resource "ibm_is_instance" "testacc_instance" {

name = "testinstance"

image = "7eb4e35b-4257-56f8-d7da-326d85452591"

profile = "bx2-2x8"

primary_network_interface {

subnet = ibm_is_subnet.testacc_subnet.id

}

network_interfaces {

name = "eth1"

subnet = ibm_is_subnet.testacc_subnet.id

}

vpc = ibm_is_vpc.testacc_vpc.id

zone = "us-south-1"

keys = [ibm_is_ssh_key.testacc_sshkey.id]

//User can configure timeouts_

timeouts {

create = "90m"

delete = "30m"

}

}
But what is the simplest way to provision multiple VSIs in a VPC?
This question came up while working on vpc-instance-extension code sample to auto-assign a floating IP as and when a new VSI is created.
One of our companion scripts for VPC solution tutorials had this answer, and all we need to do is extend the Terraform script to provision multiple VSIs. Code snippet from vpc-one-vsi script:
resource "ibm_is_instance" "instance" {

name = "${var.basename}-instance"

vpc = ibm_is_vpc.vpc.id

zone = var.subnet_zone

profile = module.map_gen1_to_gen2.profile

image = data.ibm_is_image.ds_image.id

keys = [data.ibm_is_ssh_key.ds_key.id]

resource_group = data.ibm_resource_group.group.id

primary_network_interface {

subnet = ibm_is_subnet.subnet.id

}

}
Create multiple instances using count
There is a parameter in Terraform called count that can be applied on resources to simplify configurations and let you scale resources by simply incrementing a number.
So, we can add a count to the above Terraform script:
resource "ibm_is_instance" "instance" {

count = var.instance_count

name = "${var.basename}-instance-${count.index}"

vpc = ibm_is_vpc.vpc.id

zone = var.subnet_zone

profile = module.map_gen1_to_gen2.profile

image = data.ibm_is_image.ds_image.id

keys = [data.ibm_is_ssh_key.ds_key.id]

resource_group = data.ibm_resource_group.group.id

primary_network_interface {

  subnet = ibm_is_subnet.subnet.id

}

}
var.instance_count is a Terraform variable, and you can find the complete script under the vsi branch of VPC-tutorials repository.
What’s the role of Schematics?
You can run this Terraform script just by simply pointing to the Git repository with the scripts.
_Note:_You will need an IBM Cloud account with permissions to provision VPC resources. Check the getting started with VPC documentation.
- Navigate to Schematics Workspaces on IBM Cloud and create a workspace-multiple-vsis-by choosing a resource group and location.
- Under Settings, scroll to the Import your Terraform template section and provide https://github.com/IBM-Cloud/vpc-tutorials/tree/vsi/vpc-vsi/tf under GitHub or GitLab repository URL.
- Select terraform_v0.12 as the Terraform version.
- Click Save template information :

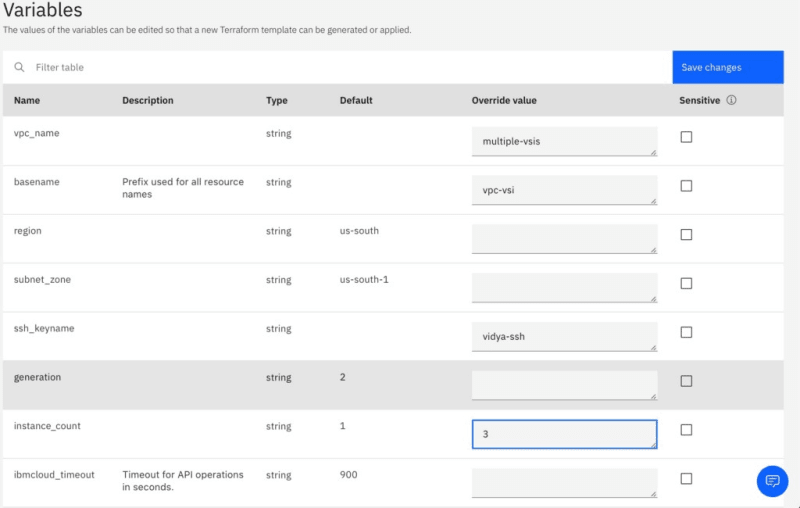
- You should see the Terraform variables section. Fill the variables as per your requirement and don’t forget to set the instance_count to 2 or more:
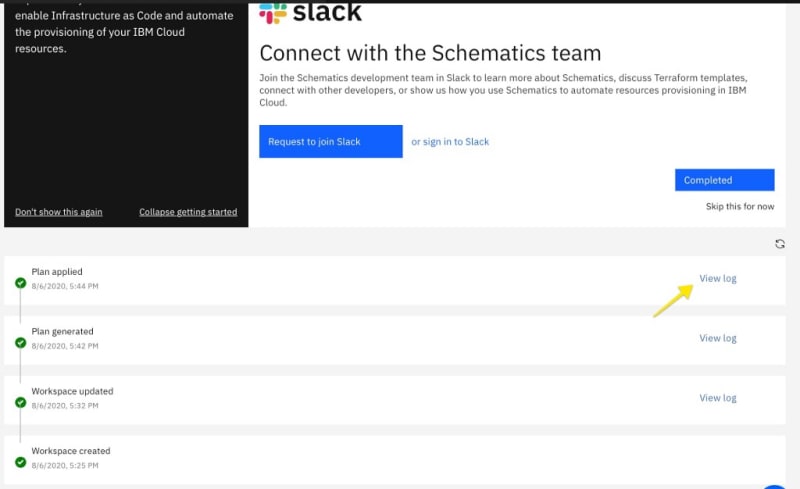
- Click Save changes and scroll to the top of the page to Generate (terraform plan) and Apply (terraform apply) the changes.
- Click Apply plan and click View log to check the progress. (Generate plan is optional.):
Using CLI
You can also provision VPC resources using the IBM Cloud CLI with Schematics plugin. All you need to do is to create a JSON config file and pass it to a command. Follow the instructions provided in the README.mdof vpc-instance-extension repository.
Remove resources
Cleaning up VPC resources is pretty easy. All you need to do is follow these three steps:
- Click on Actions on your Schematics workspace and click Delete.
- Check the all the Delete options, and enter the workspace name.
- Click Delete , and you are done.
Learn more
Check the IBM Cloud Solution tutorials for more VPC-related content and code samples.
Originally published at https://www.ibm.com on August 6, 2020.

Top comments (0)