
Generate NFT images using python and Jupyter Notebook
Let develop a nft image generator which generates a series of unique images using a collection of layers.
- Install Python
- Install PIP Download PIP get-pip.py
curl https://bootstrap.pypa.io/get-pip.py -o get-pip.py

python get-pip.py
- Install Python Pillow
pip install pillow
- Install Python display
pip install display
- Install Jupyter Notebook
pip install jupyter
- Set up developing folders similar to the following structure


Shift + right click => choose PowerShell
Run Jupyter in your generator folder
jupyter notebook
Choose New => Python 3 to create a new notebook
Import necessary packages.
from PIL import Image
from IPython.display import display
import random
import json
- Inject all the shapes and set their weights
# Each image is made up a series of traits
# The weightings for each trait drive the rarity and add up to 100%
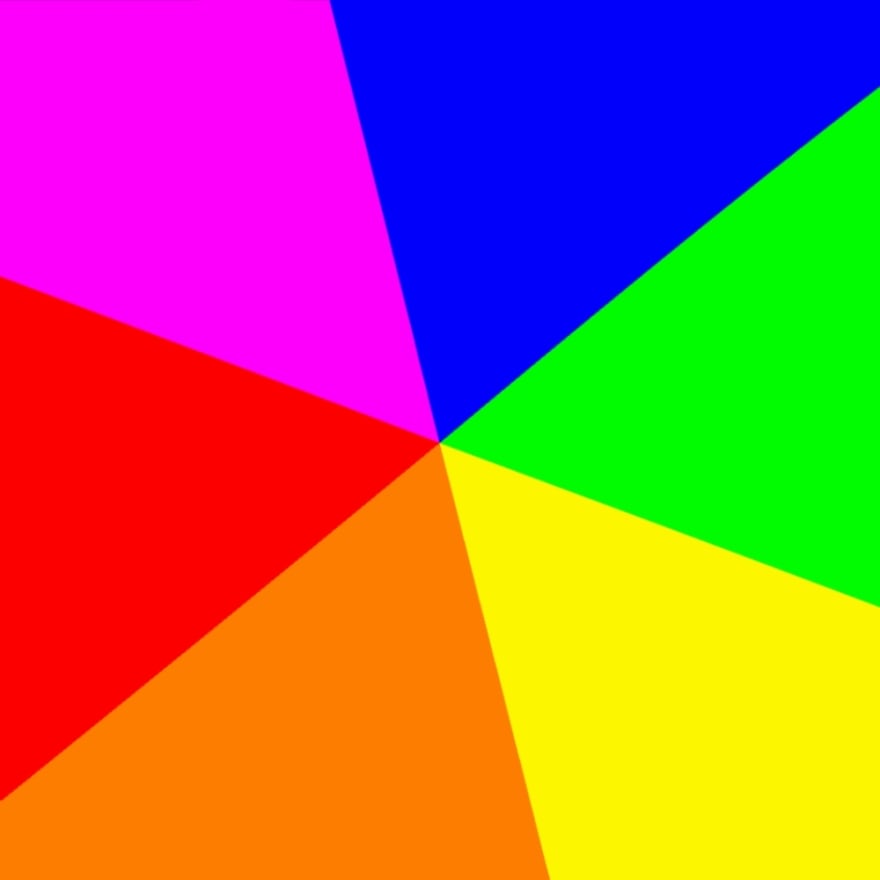
background = ["Blue", "Orange"]
background_weights = [30, 70]
circle = ["Blue", "Orange"]
circle_weights = [30, 70]
square = ["Blue","Orange"]
square_weights = [30, 70]
# Dictionary variable for each trait.
# Eech trait corresponds to its file name
# Add more shapes and colours as you wish
background_files = {
"Blue": "blue",
"Orange": "orange",
}
square_files = {
"Blue": "blue-square",
"Orange": "orange-square",
}
circle_files = {
"Blue": "blue-circle",
"Orange": "orange-circle",
}
- Create a function to generate unique image combinations
TOTAL_IMAGES = 8 # Number of random unique images we want to generate ( 2 x 2 x 2 = 8)

all_images = []

def create_new_image():

    new_image = {} #

    # For each trait category, select a random trait based on the weightings
    new_image ["Background"] = random.choices(background, background_weights)[0]
    new_image ["Circle"] = random.choices(circle, circle_weights)[0]
    new_image ["Square"] = random.choices(square, square_weights)[0]

    if new_image in all_images:
        return create_new_image()
    else:
        return new_image


# Generate the unique combinations based on trait weightings
for i in range(TOTAL_IMAGES):

    new_trait_image = create_new_image()

    all_images.append(new_trait_image)
- Return true if all images are unique
def all_images_unique(all_images):
    seen = list()
    return not any(i in seen or seen.append(i) for i in all_images)

print("Are all images unique?", all_images_unique(all_images))
- Add token Id to each image
i = 0
for item in all_images:
    item["tokenId"] = i
    i = i + 1
- Print all images
print(all_images)
- Get traits count
background_count = {}
for item in background:
    background_count[item] = 0

circle_count = {}
for item in circle:
    circle_count[item] = 0

square_count = {}
for item in square:
    square_count[item] = 0

for image in all_images:
    background_count[image["Background"]] += 1
    circle_count[image["Circle"]] += 1
    square_count[image["Square"]] += 1

print(background_count)
print(circle_count)
print(square_count)
- Generate Metadata for all Traits
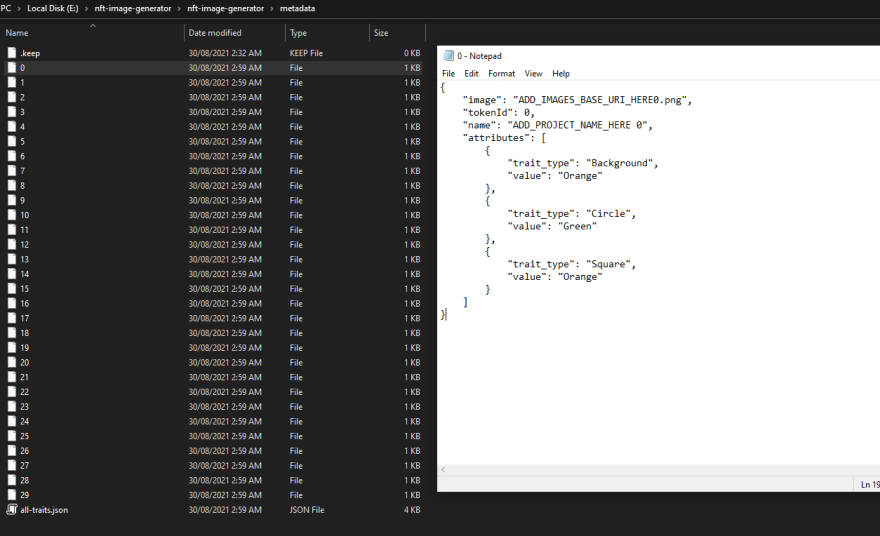
METADATA_FILE_NAME = './metadata/all-traits.json';
with open(METADATA_FILE_NAME, 'w') as outfile:
    json.dump(all_images, outfile, indent=4)
- Generate Images
for item in all_images:

    im1 = Image.open(f'./layers/backgrounds/{background_files[item["Background"]]}.jpg').convert('RGBA')
    im2 = Image.open(f'./layers/circles/{circle_files[item["Circle"]]}.png').convert('RGBA')
    im3 = Image.open(f'./layers/squares/{square_files[item["Square"]]}.png').convert('RGBA')

    #Create each composite
    com1 = Image.alpha_composite(im1, im2)
    com2 = Image.alpha_composite(com1, im3)

    #Convert to RGB
    rgb_im = com2.convert('RGB')
    file_name = str(item["tokenId"]) + ".png"
    rgb_im.save("./images/" + file_name)
- Generate Metadata for each Image
f = open('./metadata/all-traits.json',)
data = json.load(f)

IMAGES_BASE_URI = "ADD_IMAGES_BASE_URI_HERE"
PROJECT_NAME = "ADD_PROJECT_NAME_HERE"

def getAttribute(key, value):
    return {
        "trait_type": key,
        "value": value
    }
for i in data:
    token_id = i['tokenId']
    token = {
        "image": IMAGES_BASE_URI + str(token_id) + '.png',
        "tokenId": token_id,
        "name": PROJECT_NAME + ' ' + str(token_id),
        "attributes": []
    }
    token["attributes"].append(getAttribute("Background", i["Background"]))
    token["attributes"].append(getAttribute("Circle", i["Circle"]))
    token["attributes"].append(getAttribute("Square", i["Square"]))

    with open('./metadata/' + str(token_id), 'w') as outfile:
        json.dump(token, outfile, indent=4)
f.close()
- It will output all the generated images to the /images folder, and the metadata to the /metadata folder. The filenames will refer to tokenIds.
This blog will show you how to upload your first nft to Opensea.
My latest blog which shows you how to make an nft generator using JAVASCRIPT

Top comments (88)
Hey I have a question, I'm trying to run this portion of code
TOTAL_IMAGES = 30 # Number of random unique images we want to generate
all_images = []
def create_new_image():
Generate the unique combinations based on trait weightings
for i in range(TOTAL_IMAGES):
Except whenever this portion runs I get
an error saying RecursionError: maximum recursion depth exceeded in comparison. Any suggestions?
I hope you still check these forums.
May I know how many images you put into your background, circle and square folder? thanks
I just have two of each.
backgrounds (folder name)
-> blue.png
-> orange.png
circles
-> blue-circle.png
-> orange-circle.png
squares
-> blue-square.png
-> orange-square.png
Ok. Can you try to reduce the total images down to 8?
Reduce to 8? I only have 6 total images. blue.png, orange.png (background pics), two circles and two squares. Six total images.
Oh I see what you meant. I reduced it to 8 and It worked. What can I do to generate more images though? I mean the goal is generate a couple thousand images.
Could you explain the way the weights work?
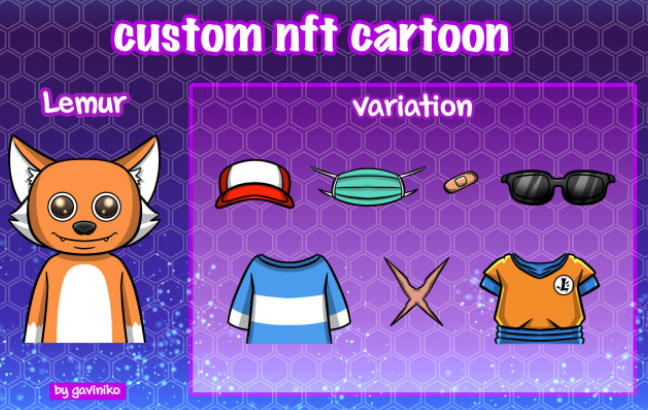
You can add different colours and shapes (rectangle, star) to generate more images to get familiar. A good practice would be having different characters with a set of variation. For instance:
Furthermore, you can add more colours to create more images according to the following example.
[shape]_weights should be added up to 100 (optional) and the less the shape weights the less likely it will be populated.
`
background = ["Blue", "Orange"]
background_weights = [30, 40]
circle = ["Blue", "Orange"]
circle_weights = [30, 15]
square = ["Blue","Orange"]
square_weights = [30, 15]
turtle = ["Blue","Orange"]
turtle_weights = [30,15]
For example I added a new attribute called turtle above ^. But when the composite is formed the result images are only of the turtle and it doesn't include any of the orange or blue backgrounds or squares and circles.
Can you try to add a new composite? It will let the processor know which combination of shapes you want to generate.
for item in all_images:
`
You can use for statement to handle this process better. something like this
`
`
Hello again!
Going off of your example above, if I just had the PNG of a blue circle in the center of my screen, is there any additional code I could write in order to position it in the top left section of the background automatically? If this isn't possible, what program could I use to make a new PNG in which the circle is in the right position?
Thanks so much! This is all very helpful for someone new to coding!
I recommend to keep everything simple by having all the png images in the same size.
You can center the object by right click => open with 3D paint => Choose select => move the object
this is the result

Oh thank you! Although I was looking to uncenter it. I have the letters "A", "B", "C" and "D" and I want it to be randomized between the four, but they're all centered and I want them to be randomized in the top left, top middle, top right, etc... (I drew a diagram to help) on a single background. Could this be done with coding or would it be easier to adjust each letter on it's own separate PDF file?
Oh in this case it's easier to set the image location then. You can use something like this to change the image location.
PUt these code into the generate images step
AH this is just what I was looking for! Thanks for all the help, like it seriously means a lot. Is there a way to stack this so it positions all 9 sets of images in a grid format?
I think you can make it work by manually set the position of these images like they are in a 2D array
2D will look something like
0------1----------2-------------3
|
1 image1 image2 image3
|
2 image 4 image5 image6
|
3 image7 image8 image9
PERFECT! Thanks so much!
One (maybe) last question: when uploading the generated NFTs to OpenSea via their “Create” button, will the 9 unique properties of each one show up on the Etherscan contract (i.e. if someone goes to the contract and reads it, will the property “Top Left = A”, “Top Middle = B”, etc… show up?)?
The metadata's attributes will be what they see
Cool! Is that embedded in the image or will I have to upload it to OpenSea manually somehow?
Well yes and no. You can create your own smart contract on Eth chain and host your NFTs on it. However, creating your own smart contract is quiet costly ( $700 or more on gas fee). This is a pro option.
Otherwise, you can use leapwork.com/ to set up automation flow to do this.
This is helpful!
I've actually been watching quite a few tutorials on making my own smart contract on Truffle Suite so I might give it a try for fun. I'm mainly going off of an article on Piñata's blog found here (medium.com/pinata/how-to-build-erc...), but I'm still not quite sure how to get the 8000+ images I generated using your code on-chain all at once, seeing as the article is describing how to do it one at a time. Plus, I'm still lost on how that could be directly listed on OpenSea. Any advice?
Edit: OpenSea itself has a tutorial on how to list your ERC-721 assets, so I think I'm covered there! I'm still confused on how to get all 8000+ images onto IPFS all at once, though.
hi im having a little issue.
im really new this and i need some help. i change the background to png instead of jpg, because my file was a png. But i'm getting this error.would really appreciate some troubleshooting help
im1 = Image.open(f'./layers/background/{background_files[item["background"]]}.png').convert('RGBA')
4 im2 = Image.open(f'./layers/mouth/{mouth_files[item["mouth"]]}.png').convert('RGBA')
5 im3 = Image.open(f'./layers/spoon/{spoon_files[item["spoon"]]}.png').convert('RGBA')
/Library/Frameworks/Python.framework/Versions/3.9/lib/python3.9/site-packages/PIL/Image.py in open(fp, mode, formats)
2966
2967 if filename:
-> 2968 fp = builtins.open(filename, "rb")
2969 exclusive_fp = True
2970
FileNotFoundError: [Errno 2] No such file or directory: './layers/background/purple.png'
There're 2 places you need to declare the colour
`
If you have done it but still getting error, could you please let me have a look at your folder/file structure?
background_files = {"blue": "blue", "green":"green", "LG": "LG", "pink": "pink", "purple": "purple", "orange": "orange"}
eyes_files = {
"I1": "I1", "I2": "I2", "I3": "I3", "I4": "I4", "I5": "I5", "I6": "I6","I7": "I7","I8": "I8","I9": "I9", "I10": "I10","I11": "I11", "I12": "I12", "I13": "I13", "I14": "I14", "I15": "I15", "I16": "I16"}
mouth_files = {"M1": "M1", "M2": "M2","M3": "M3", "M4": "M4", "M5": "M5", "M6":"M6", "M7": "M7", "M8": "M8", "M9": "M9", "M10": "M10", "M11": "M11"}
spoon_files = {"S1":"S1", "S2":"S2", "S3": "S3", "S4": "S4", "S5": "S5", "S6": "S6", "S7":"S7", "S8": "S8", "S9": "S9", "S10": "S10", "S11": "S11", "S12": "S12", "S13": "S13", "S14": "S14", "S15": "S15", "S16":"S16"}
so did this to my files and intead of of layers,i changes it to images
m1 = Image.open(f'./images/background/{background_files[item["background"]]}.png').convert('RGBA')
this fixed my intial problem.but i now have anew one :
10 com2 = Image.alpha_composite(com1, im3)
11 com3 = Image.alpha_composite(com2, im4)
12
/Library/Frameworks/Python.framework/Versions/3.9/lib/python3.9/site-packages/PIL/Image.py in alpha_composite(im1, im2)
3042 im1.load()
3043 im2.load()
-> 3044 return im1._new(core.alpha_composite(im1.im, im2.im))
3045
3046
ValueError: images do not match
Looks like it cannot find the images with the given names. Can you show me the declaration of im2 im3 and im4 as well? Thanks
here they are, thank you so much for all your help. i really appreciate it
im1 = Image.open(f'./images/background/{background_files[item["background"]]}.png').convert('RGBA')
im2 = Image.open(f'./images/mouth/{mouth_files[item["mouth"]]}.png').convert('RGBA')
im3 = Image.open(f'./images/spoon/{spoon_files[item["spoon"]]}.png').convert('RGBA')
im4 = Image.open(f'./images/eyes/{eyes_files[item["eyes"]]}.png').convert('RGBA')
hi victor, thanks for all your help. I realised that one of my images was not the same dimension as the other. i think that created the error. i've since resolved it and managed to generate the little images! thanks so much for the speedy replies and all your help!
Congrats! You got it. Thanks for reading my blogs. I'm about to upload another post soon. Please consider to check it out. Thanks again
Thanks for sharing! Just what I needed!
How would I upload these to Opensea?
What do I do with the Png and the Json metadata? Do I need to upload both files to somewhere?
Furthermore, if I am creating a collection of 5,000 NFTs is there an automated way to upload each file to Opensea?
Look forward to your reply, thanks! :)
Hi Chris! Great questions.
How would I upload these to Opensea?
This is another blog of mine which will show you how to upload images to Opensea.
dev.to/victorquanlam/step-by-step-...
What do I do with the Png and the Json metadata? Do I need to upload both files to somewhere?
Yes you need to create new shapes folder and upload your png images there and you don't have to upload the Json metadata. It already be generated by the script below:
`
Furthermore, if I am creating a collection of 5,000 NFTs is there an automated way to upload each file to Opensea?
Yes and no. As right now, the opensea api doesn't support upload images YET. We will need to wait for the next version. This is their comment to the situation: "there isn't currently an option for that in your OpenSea profile, but we're constantly working on ways to improve user experience".
The only way for now is to create your own smart contract most likely on ETH chain. Then upload your images to IPFS server and connect your contract to opeasea. (I know! Yikes)
Thanks for your quick reply! :)
In response to my 2nd question, the Metadata will already be already included within the PNG files from that line of code you show? So I could just upload the image created onto Opensea and the metadata will also be uploaded too?
Ah okay! Still trying to wrap my head around the smart contracts, a lot more complicated than uploading each file one by one on Opensea :S
As you can see the metadata files will be generated under the metadata folder.
You can run this little javascript to update the meta data
`
Check this article out for more details about metadata
docs.opensea.io/docs/2-adding-meta...
Hope it helps.
Great thanks!
Sorry to keep asking questions! There is a lot to learn.
What do I put in here:
IMAGES_BASE_URI = "ADD_IMAGES_BASE_URI_HERE"
I'm still a little confused as to what to do after creating the PNG and Metadata files. Do I need to upload these onto IPFS and then upload that to Opensea? Or if I upload the PNG files directly to Opensea it would automatically do it for me?
This is where you store your images for public views. It can be used when creating your smart contract.
Hope this gives you enough hint. I'm working on a web app to generate pixelated nft arts at the moment so I don't have much time to explain things in much details. I would create a new blog post for creating ERC721 Token and nft in the near future.
I am new to python and coding in general and this is a great post and very easy to follow. I am almost there on this but am having issues with generating the metadata. The error I am receiving is as below.
--> 141 for i in metadata:
142 token_id = i['tokenId']
143 token = {
NameError: name 'metadata' is not defined
Can you try to create a new folder called metadata? I reckon it's missing.
I have one called metadata...where should it reside in the folder structure? I have it in the project folder
oh I think it supposed to be for i in data instead of for i in metada
Similar error but now as below....do I need a folder also called data and if so where does that reside?
139         "value": value
140     }
--> 141 for i in data:
142 token_id = i['tokenId']
143 token = {
NameError: name 'data' is not defined
This seems to be the area where it is failing
for i in data:
token_id = i['tokenId']
token = {
"image": IMAGES_BASE_URI + str(token_id) + '.png',
"tokenId": token_id,
"name": PROJECT_NAME + ' ' + str(token_id),
"attributes": []
}
Oddly enough I ran this again today and now a new error:
C:\Users\CHRIS~1.STA\AppData\Local\Temp/ipykernel_27868/3811645234.py in
139 "value": value
140 }
--> 141 for i in data:
142 token_id = i['tokenId']
143 token = {
TypeError: 'function' object is not iterable
hmm strange. I haven't got any problem like this.
Check the source code out. Hope it helps
github.com/victorquanlam/nft-creator
Hi Victor! Thank you for sharing such a great step by step instruction and answering queries here. I finished everything and have generated some examples. I was just wondering does it matter if the metadata that was generated for each image contains "ADD_IMAGES_BASE_URI_HERE0.png" and "ADD_PROJECT_NAME_HERE 0"? I forgot to add some details here. What if I want to upload into the marketplace like OpenSea? I have attached a screenshot for your reference.
Great question! This image URI only matter if you have your own smart contract and connect your smart contract onto Opensea. Otherwise, you just have to change the titles of your images to what ever you like (by updating the [ADD_IMAGES_BASE_URI_HERE]). Please note that creating your own smart contract is a bit tricky and costly as well due to the gas fee( lowest would be $700 on a less traffic day)
Got it! Correct me if I am wrong, I already have some NFTs on Opensea and I have initially paid the fees. If I upload it manually I will not be paying gas fees again correct? If I create a smart contract to bulk upload my NFTs then I need to pay those gas fees again?
If you store your nft on IPFS storage, you can change your image data whenever you wish. Yes that's right. If you mint (create) a new token aka (new nft) on your smart contract you will have to to pay the gas fee. Otherwise, you can change the metadata of your nft on the opensea nft website without any fees.
Very informative. Really enjoyed your articles and nice talking to you makes my head clear. Keep up the good job! 👍
Thanks for all the support.
Hi Victor, is it possible to create over 50 images at once? I can successfully create 50, but when I try to do anything over 50, I get an (Error: Sesson cannot generate requests). Is this something hardcoded in one of the files being used in the jupyter notebook (extension.js) or could this possibly be due to me not having enough layers/traits? Thank you for any direction. Below is the error I'm getting.
Error happens on this code block:
Returns true if all images are unique
def all_images_unique(all_images):
seen = list()
return not any(i in seen or seen.append(i) for i in all_images)
print("Are all images unique?", all_images_unique(all_images))
Error is:
Error: Session cannot generate requests
Error: Session cannot generate requests
at w.executeCodeCell (c:\Users\theja.vscode\extensions\ms-toolsai.jupyter-2021.8.2041215044\out\client\extension.js:52:301310)
at w.execute (c:\Users\theja.vscode\extensions\ms-toolsai.jupyter-2021.8.2041215044\out\client\extension.js:52:300703)
at w.start (c:\Users\theja.vscode\extensions\ms-toolsai.jupyter-2021.8.2041215044\out\client\extension.js:52:296367)
at processTicksAndRejections (internal/process/task_queues.js:93:5)
at async t.CellExecutionQueue.executeQueuedCells (c:\Users\theja.vscode\extensions\ms-toolsai.jupyter-2021.8.2041215044\out\client\extension.js:52:311160)
at async t.CellExecutionQueue.start (c:\Users\theja.vscode\extensions\ms-toolsai.jupyter-2021.8.2041215044\out\client\extension.js:52:310700)
It is due to the lack of layers I reckon. You should try to add more layers and images.
Otherwise, you can try this nodejs app if you are familiar with Javascript. This code will generate more than 800,000 crypto punks without any problem. Check it out
dev.to/victorquanlam/generate-879-...
github.com/victorquanlam/cryptopun...
Thank you Victor. I ran the 800,000 crypto punk program and got it to work. Is there a way to lessen the number if wanted?
You are much welcome Jason. Normally people ask for more not less haha. I think you can delete a few inputs images/ layers to reduce the outputs.
However, I will add a new feature to manipulate the number of outputs for you shortly.
I have made changes to the code. You can now limit the outputs. Pull the latest code and run
node index.js 100Hi.
Thank you very much for the code
i was wondering if you could assist in the following error I'm getting .
Thanks
""
with open(METADATA_FILE_NAME, 'w') as outfile:
FileNotFoundError: [Errno 2] No such file or directory: './metadata/all-traits.json'
"
Could you double check if you have metadata folder created?
Hi,
Thank you for the quick reply,
i believe the folder was not in the right place =)
Thank you for the heads up.
hi victor, succed the code with my android phone, my questions is why the result image adding so much noise.? how to solve
Interesting! I didn't try it on my phone before tbh. Can you possibly send me your output files?
I don't think the problem is with the noise, but because the resulting image is half transparent and looks dark
com1 = Image.alpha_composite(im1, im2)
com2 = Image.alpha_composite(com1, im3)
and I need the image without making it half transparent just like pasting the image.
can you solve it.?
Original Background
Result Image

Thank you very much
Hmm interesting. Can you make sure that the second im2 or the im3 do not have any background noise?
solved, that because i have active filter in my photo editor. that make a result not completely transparent Lol...
thanks for your respons victor, this code is amazing 👍👍👍
You're welcome mate
ValueError Traceback (most recent call last)
in
8 #Create each composite
9 com1 = Image.alpha_composite(im1, im2)
---> 10 com2 = Image.alpha_composite(com1, im3)
11
12 #Convert to RGB
~\anaconda3\lib\site-packages\PIL\Image.py in alpha_composite(im1, im2)
2962 im1.load()
2963 im2.load()
-> 2964 return im1._new(core.alpha_composite(im1.im, im2.im))
2965
2966
ValueError: images do not match
Can someone help i only replace one element in square
May I see your changes?