Who's this for?
Visual Studio users who want to start using Source Control in their projects, new or existing, but have no experience with source control.
Pre-work.
OK, you will need a GitHub account. They're free and fast to setup! I doubt I can explain that any better then GitHub do.
Go get setup, I'll wait.
Open your Project (in Visual Studio)
Oh, your back!
Let's continue. To get your project into GitHub, you want to open it first.
Alternatively you can start a brand new project to experiment with.
Either way, get a project open in Visual Studio.
Get version control for your project
With your project open, right click on the solution. In the (rather long) list is a magic option Add Solution to Source Control.
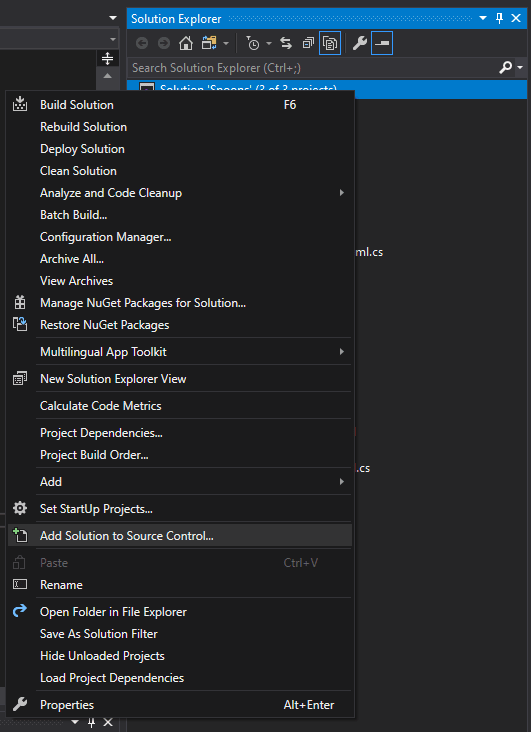
Click it and a new repository will be added to your solution. Yay! You now have source control.
But...
It's only local to your PC. Not on GitHub or anywhere else.

Get your project into GitHub!
Don't be disheartened though, you're actually almost there.
Next, get the Team Explorer tab open. If it is not currently visible, you can get it from the View menu.

With the Team Explorer open, click the Sync button (You can always find these buttons again by pressing the Home button)
You'll be prompted to chose between Azure DevOps, GitHub or other remote repository. Choose GitHub and then sign in with your shiny new GitHub account.
You'll notice that in the example, I tick the Private check box. As that particular project of mine is not open source I have ticked it so only I, and others I select, can view it.
Press Publish, and up it goes to GitHub.

Now what?
Now you start making changes to your project like normal.
As you do, you'll see the icon next to each file change. If it's red then that file has changed compared to the repository.
If you're working alone on your project (the easiest way to start and the way I'm limiting this article) then you need only push your changes up to the server.
Note: do this only when you're happy with the changes you've made.
To sync up your changes, go back to the Team Explorer and select Changes.
This will list for you all the changed or added files.
Add a note to explain what you've modified and then press Commit All. I tend to always use the Commit All and Sync option to make sure everything matches.

Well done!
Welcome to the world of professional source control.
There is much more to learn, but this is just to get you started.
Enjoy!
Rob,
Valley Software.


Top comments (0)