
Introduction
Frontend testing is not often considered during the development process. It can be challenging to test front-end interfaces and style-sheets but regardless this process will ensure you create quality interfaces.
There are four types of testing techniques commonly used, namely:
- Syntax testing.
- Regression testing/ Reference Testing.
This article covers the different types of testing techniques and how to use different tools.
Prerequisites
- Familiarity with HTML, CSS and JavaScript.
- Have npm (node package manager) installed locally on your editor.
Regression Testing / Reference Testing
This type of testing is generally used in software development and is applied to modified code to check if bugs and errors are introduced in the codebase. CSS regression testing tests for breaking changes on your interface when CSS style is modified.
Regression Testing Tools
There are a number of available tools that are used to automate CSS regression tests.
BackstopJS
BackstopJS is an automated visual regression testing tool for web user interfaces. It compares DOM elements screenshots over time. Backstop can be integrated with the playwrite engine and pupetteer.
How To Use BackstopJs
- Install the globally available backstopjs package.
$ npm install -g backstopjs
- Create a default configuration file in your current working directory.
$ backstop init
The above command creates a backstop.json file in your root folder. When BackstopJS is invoked, it looks for this file. a folder named backstop_data is also created. It contains playwrite and puppeteer scripts in subfolders.
Configuration file (backstop.json) content properties.
{
  "id": "backstop_default",
  "viewports": [
    {
      "label": "phone",
      "width": 320,
      "height": 480
    },
    {
      "label": "tablet",
      "width": 1024,
      "height": 768
    }
  ],
  "onBeforeScript": "puppet/onBefore.js",
  "onReadyScript": "puppet/onReady.js",
  "scenarios": [
    {
      "label": "BackstopJS Homepage",
      "cookiePath": "backstop_data/engine_scripts/cookies.json",
      "url": "https://garris.github.io/BackstopJS/",
      "referenceUrl": "",
      "readyEvent": "",
      "readySelector": "",
      "delay": 0,
      "hideSelectors": [],
      "removeSelectors": [],
      "hoverSelector": "",
      "clickSelector": "",
      "postInteractionWait": 0,
      "selectors": [],
      "selectorExpansion": true,
      "expect": 0,
      "misMatchThreshold" : 0.1,
      "requireSameDimensions": true
    }
  ],
  "paths": {
    "bitmaps_reference": "backstop_data/bitmaps_reference",
    "bitmaps_test": "backstop_data/bitmaps_test",
    "engine_scripts": "backstop_data/engine_scripts",
    "html_report": "backstop_data/html_report",
    "ci_report": "backstop_data/ci_report"
  },
  "report": ["browser"],
  "engine": "puppeteer",
  "engineOptions": {
    "args": ["--no-sandbox"]
  },
  "asyncCaptureLimit": 5,
  "asyncCompareLimit": 50,
  "debug": false,
  "debugWindow": false
}
- id: Used for naming screenshots that you want to share reference files with teammates.
- viewports: This property is an array of screen sies that your DOM objects will be tested against.
- scenarios: This is the setup for your actual tests. It should contain a label and URL. Other sub-properties are optional. The URL is an absolute path to your webpage or local path. The label is a screenshot name identifier.
Define a scenario
The scenario property is an array where you modify your tests. CSS selectors are mostly used where you can specify click and hover events. Consider the following scenario:
"scenarios": [
    {
      "label": "Login Page",
      "url": "http://localhost:3000/login",
      "referenceUrl": "https://anypay-28455.web.app/login",
      "delay": 30,
      "clickSelector": ".btn",
      "selectors": [
        ".formStyle"
      ],
      "selectorExpansion": true,
      "misMatchThreshold" : 0.45,
      "requireSameDimensions": true
    }

  ]
Specifying a referenceUrl helps to create a reference file over which your test file is tested against. The refence URL can be a production environment URL. Otherwise leave the value as empty to set the url value as reference value by default.
Run the following command to create a reference file.
$ backstop reference
A bitmaps_reference file is created.
After the reference file is created, run the test.
$ backstop test
When the test is done, results for number of passed and failed tests are return. Results can also be viewed on the browser.
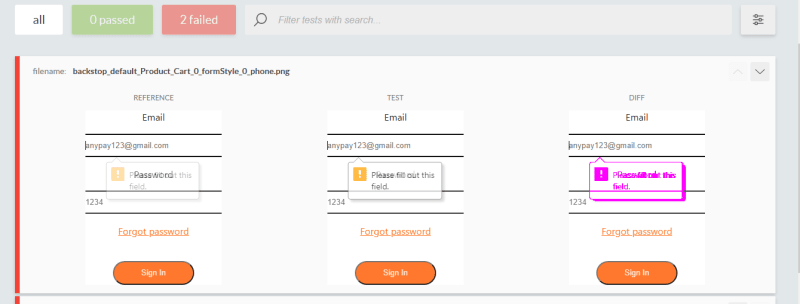

Use the scrubber tool to view the difference when the red vertical line is moved.
If satisfied with the results, approve the test scenario reports. Your test batch images will now be used as the reference points.
$ backstop approve
Learn more about Backstop from their GitHub page.
Other regression testing tools include CSSCritic, Spectre, Wraith, Gemini and Reg-cli.
Syntax Testing
Syntax testing analyzes your CSS code to flag errors that break any syntax rules, which may in turn break the styling for your web page. Linting tools are used for this purpose.
Advantages of Using CSS Linting Tools
- Error detection: CSS linters helps to identify such as incorrect selector syntax, misspelled property names and invalid selector values.
- Enforcing coding standards: CSS linters can be configured to follow specific standards according to your preferred guidelines.
Simple Command Line CSS Linting Tool
- Install csslint from your command line.
$ npm install -g csslint
- Change directory to the folder where your css file is.
$ cd your_folder_name
- Run "csslint" command on your CSS file.
$ csslint css_file_name.css
A list of potential issues are returned in the command line.
Example


Potential Issues Identified
- Too many font-size declarations.
- Don't use IDs in selectors.
- Heading (h3) should not be qualified.
- Rule doesn't have all its properties in alphabetical order.
- Fallback background-color (hex or RGB) should precede RGBA background-color.
When CSS lint identifies these issues, it's easier to fix and adhere to the correct syntax.
Stylelint
This is a powerful linting tool as it can:
- automatically fix issues
- support shareable configurations
- be customized to your fit your preferences. Stylelint can be installed using npm with the following command:
$ npm init stylelint
A new config file is created named ".stylelintrc.json".
Run stylelint with:
$ npx stylelint "**/*.css"
A list of errors that violate the syntax rules are displayed on the command line such as:

After running Stylelint, proceed to customize its configuration to best suit your needs.
Conclusion
Testing CSS code can be valuable to your web development workflow as it improves CSS code quality and consistency. To achieve comprehensive test coverage, combine regression testing tools with the syntax testing tools and also perform manual tests. Consider integrating tests into your Continuous Integration pipeline to run them automatically when changes are made.

Top comments (0)