Originally published by UUKI Blogs
Hey there, if you are reading this then there is a high chance that you are on a look out for a little assistance regarding how to add Polygon (Matic Network) to Metamask. Well, we got you covered as you are at the right place. This article is a complete guide to do so.
Let’s take a look at it in more detail.
What is MetaMask?
Many DEXs are available in the market, such as Aave, OpenSea, and Kava. In pursuit of accessing those DEXs, you will need a way to communicate with their protocols. Enter MetaMask, which is a cryptocurrency wallet that enables users to access the Web 3 ecosystem of decentralized applications (dapps).
It is a non-custodial wallet that can be accessed from your browser (Extension) or mobile (App) and it offers complete control over one’s assets. This can be installed like any regular extension. Post installation, it allows users to store Ether and other ERC-20 tokens, allowing them to make transactions to any Ethereum address.
What is Polygon (MATIC)?
Polygon, formerly known as the Matic Network, is one of the most widely talked about layer-2 scaling solutions that aims at providing multiple tools to elevate the speed and reduce the fees of transactions on blockchain networks.
Most of the times people get baffled between Polygon and Matic. After the rebranding, Matic is the native token of Polygon. It is an ERC-20 token operating on the Ethereum blockchain which is used as the unit of payment and settlement between participants who interact within the network.
Interacting with the Polygon blockchain needs a compatible crypto wallet such as MetaMask. However, MetaMask doesn’t have Polygon added as a network by default. Setting up your browser wallet to connect to Polygon is simple.
We have created this step-by-step guide to make it a cakewalk for you. So, let’s get started.
Install MetaMask Wallet
- To create a new wallet, you must first install the plugin. Download it from here https://metamask.io/download/
They offer support for the browsers Chrome, Firefox, Brave and Edge, as well as both iOS and
Android.
Now, follow a series of easy steps required to complete the setup. Once you get to the backup seed phrase, Keep it secured (preferably offline) and do not share this ever.
Congratulations! You’ve just created a MetaMask account. It should look something like this:

Add Polygon Network to Your MetaMask
- Adding Polygon support to your wallet involves adding some network details to the extension. Refer to the image below, the default network on MetaMask is set to the Ethereum Mainnet (top right). Just click the network selection dropdown menu.
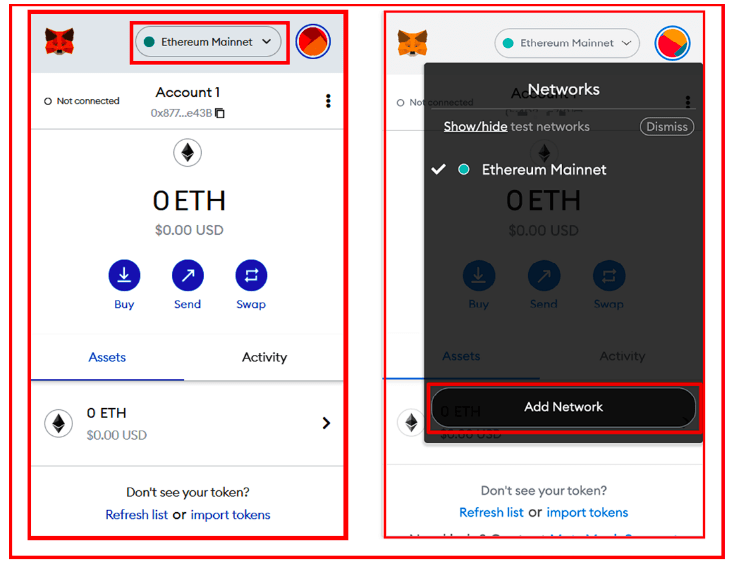
Then, click the “Add Network” button.
After clicking the Add Network, a window will open up to add the network details.
Now, Input the following info in the fields and click the “Save” button.
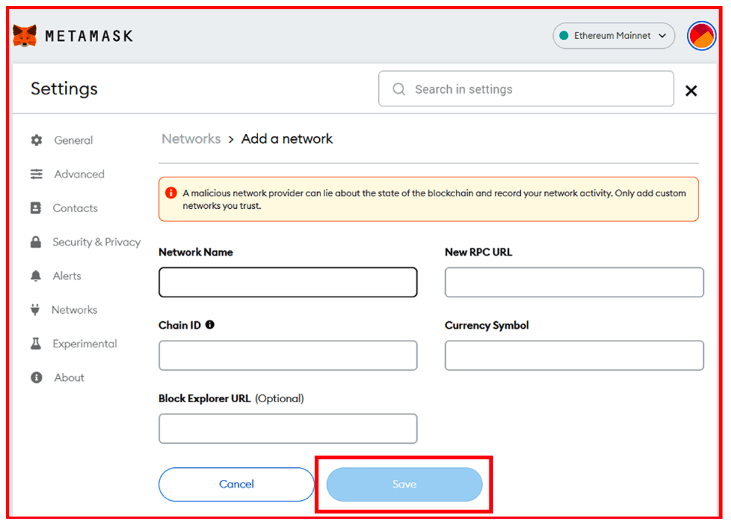
a. Network Name: Polygon Mainnet
b. New RPC URL: https://polygon-rpc.com/
c. ChainID: 137
d. Currency symbol: MATIC
e. Block Explorer URL: https://explorer.matic.network
- You’ll now victoriously be connected to the Polygon network with your Metamask Wallet!
Well Done!
Conclusion-
While Metamask is a way to interact with the Ethereum blockchain, polygon (formerly MATIC) is a widely used network due to its features like high speed and less charges. One can interact using polygon if Metamask is connected (which off course isn’t a default setting). Thus, the aforementioned are simple steps to add polygon with Metamask and derive all the benefits that it offers.


Top comments (0)